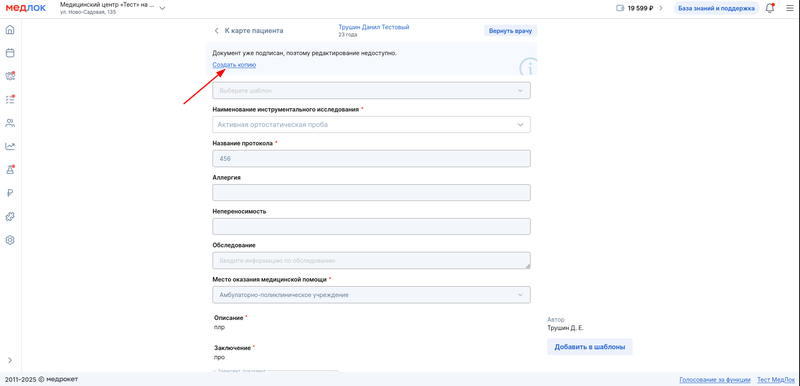
Required data required for the protocol 
All fields of required data in the patient profile and protocols are highlighted when the EGISZ module is enabled.:
- Mandatory patient data (to be filled in the patient's card in the medical unit):
- Last name, first name, patronymic (if any);
- Date of birth;
- Paul;
- SNILS;
- The residential address is a subject of the Russian Federation.
- Required fields in the examination report/dental report (to be filled in in the report in the medical unit):
- Anamnesis of the disease;
- Anamnesis of life;
- Objective status;
- Diagnosis — ICD;
- Clinical diagnosis / treatment at the appointment / examination plan / treatment plan (at least one of the fields must be filled in);
- The date of the repeat session.
- Examination report (to be filled in in the protocol in the medical unit):
- Location of the event;
- Type of instrumental research;
- Description;
- Conclusion.
In all documents, a Certifier must be selected from the list set up by the supervisor.

Creation and signing of the protocol by a doctor 
- When creating an appointment protocol, be sure to specify the date of the repeat visit or select an option«Не требуется».
- Be sure to fill in the other required fields in the protocol.
- After filling out the protocol, the button «Подписать»at the bottom of the page should be active.
- Click «Подписать»and select the signature of an individual belonging to you from the list of available signatures.


Note: if any data necessary for forming the protocol is left blank (in the protocol itself, the patient's or doctor's profile, etc.), the signing process is interrupted and a list of data that needs to be filled in is displayed.
Important! After you sign the protocol, it cannot be edited (you can create a copy of the document to make changes).

You can also view the list of documents that need to be signed. For this:
- Go to the section «ЕГИСЗ».


- To view the document before signing it, click on the document name.

- You can sign each document separately by checking the box next to the specific document.

Or select all the documents at once to sign them all at once.

- Then tap «Подписать»at the bottom of the screen. After you sign the document, it cannot be edited.

- After you sign the document, it will be sent to the supervisor for signature. The supervisor can review the document and send it for correction before signing it. In this case, you will see an exclamation mark in front of the document and will be able to correct it.

Re-sign the document after making corrections.
In order for the document to be registered with the RAMD, a record of work experience in the organization must be added to the doctor in the FRMR.
Archive 
The section «Архив»is common to the entire clinic. They get into it:
- protocols that were not signed by the doctor's first signature 7 days after the document was created;
- signed with two signatures and sent to RAMD protocols.
Frequently Asked Questions 
- Why can't I sign the document using an EDS? What could be the causes of errors?
When signing protocols, the Slowlocker highlights the reasons why it cannot be signed.:
1. Not all protocol fields are filled in.

2. Error in CryptoPro - it is necessary to check the operation of the plug-in, reinstall if necessary.

3. The doctor's EDS is outdated, contact the certification center that issued the EDS.
4. Check whether all patient data is filled in (SNILS, address, subject of the Russian Federation).

5. Check if the RAMD certifier is specified.

- Previously, the doctor could set the date of the repeat visit in the protocol himself, but now he can only choose from the ready-made one: after 7 days, 1 month, after 3 months, after 6 months. How can I change it?
The repeat visit is indicated only in the examination report and the dentist's report (SAMD 119). You can choose a repeat visit date from the ready-made options or specify your deadline.

If you select your deadline, a field will appear below«Дата визита». Click on this field and select the desired date of the visit in the calendar.

You cannot set the date of the repeat session when creating the protocol template.
- How do I add a certifier and grant access rights?
To add a certifier, it is necessary to give the employee the right to sign protocols on behalf of the supervisor. Go to the Medlock under system administrator access (sys_...), select the desired employee and click on the button«Настроить права доступа». In the list that opens, check the box next to the item «Подписание протоколов от лица руководителя»and click «Сохранить». Next, you need to log in again under the certifier's account, go to the section «ЕГИСЗ»and click on the button«Настройки». Specify the certifier and save the settings.
Read more about this in the article Signing the protocol by the head.
