
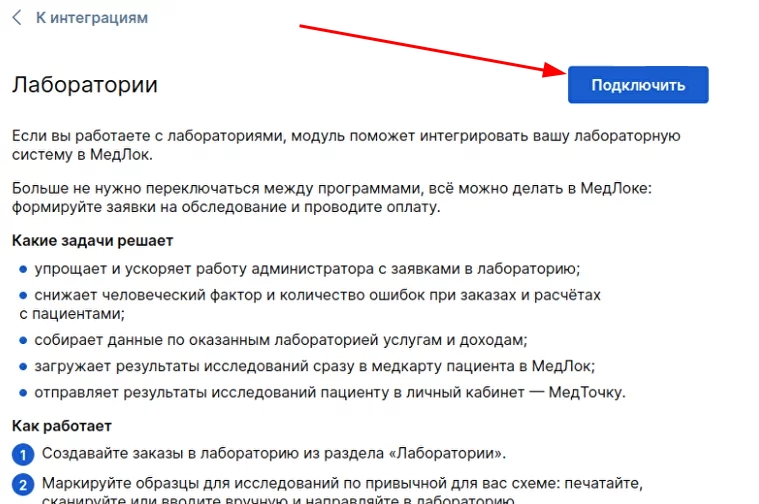
The module «Лаборатории»allows the integration of the laboratory system
to Medlock: add laboratory tests to an appointment, form applications and pay for them.
The results of laboratory tests are automatically uploaded to the patient's electronic medical record in Medlock and transferred to the patient's personal account in Medlock.
Important! The results are not sent to the patient's email address, as this is an unsafe channel for sending and storing medical data. You can read more about this in our article Why doesn't Medlock send test results by email
Table of contents 
- Connecting the module
- Filling out prices for laboratory tests
- Automatic price list loading
- Uploading an Excel file
- Setting prices manually
- Filling in prices for biomaterial collection
- Creating an order to the laboratory
- Payment for research
- Labeling of biomaterial
- Manual barcode entry
- Printing labels directly to the order (KDL laboratories, DiaLab, CitiLab, Invitro)
- Sending research to LIS
- Cancellation of the study after payment
- Obtaining research results
Connecting the module
For the module to work correctly«Лаборатории», the following modules must be enabled: «Касса», «Электронная медицинская карта»or «Стоматология».
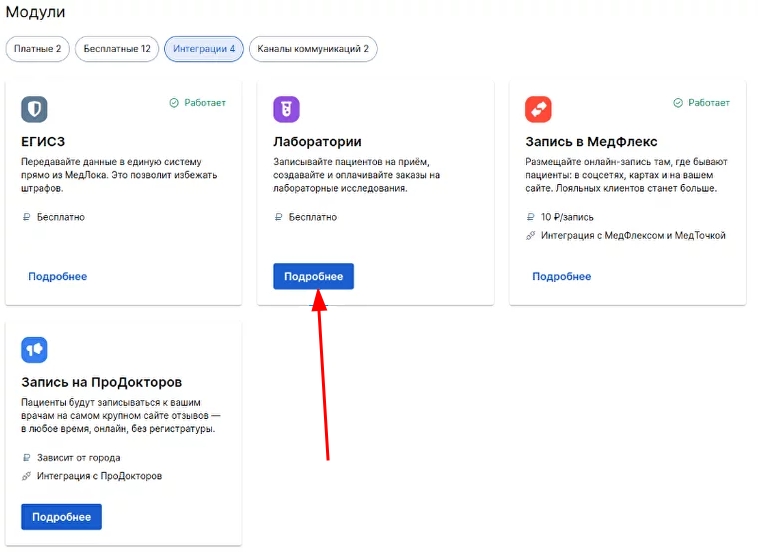
1. To connect the module«Лаборатории», go to the section «Модули»and click «Подключить».
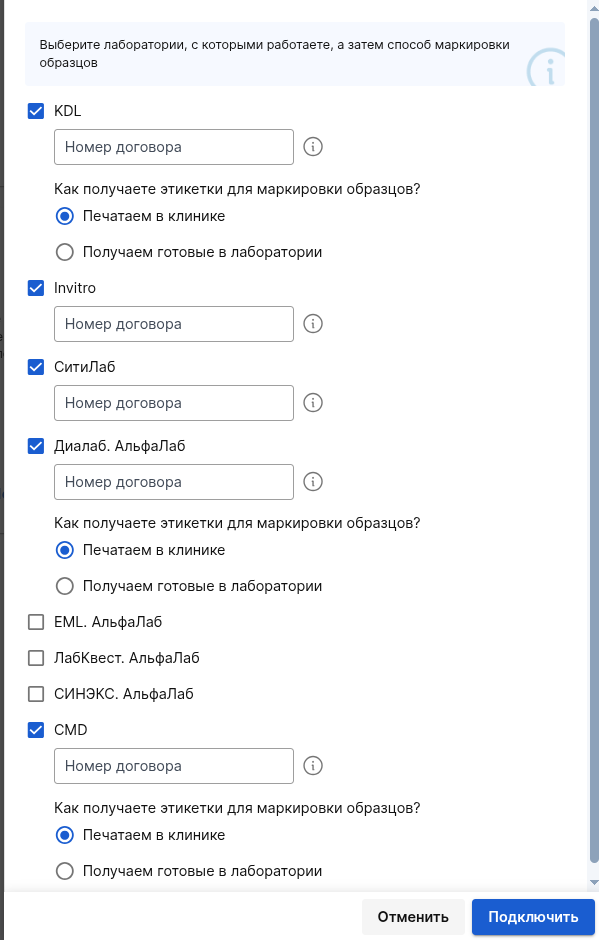
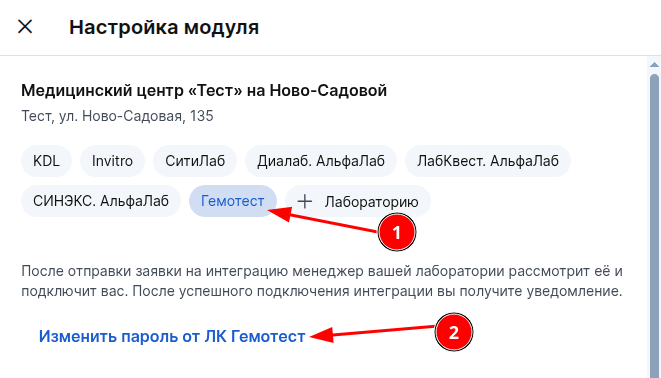
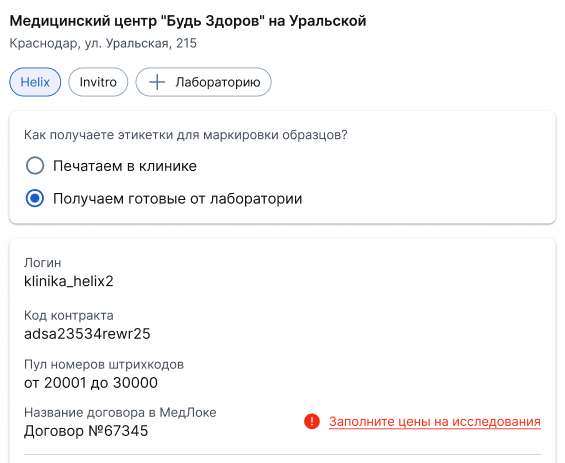
2. Select the branch to which you want to connect the laboratory and click «+ Лабораторию».
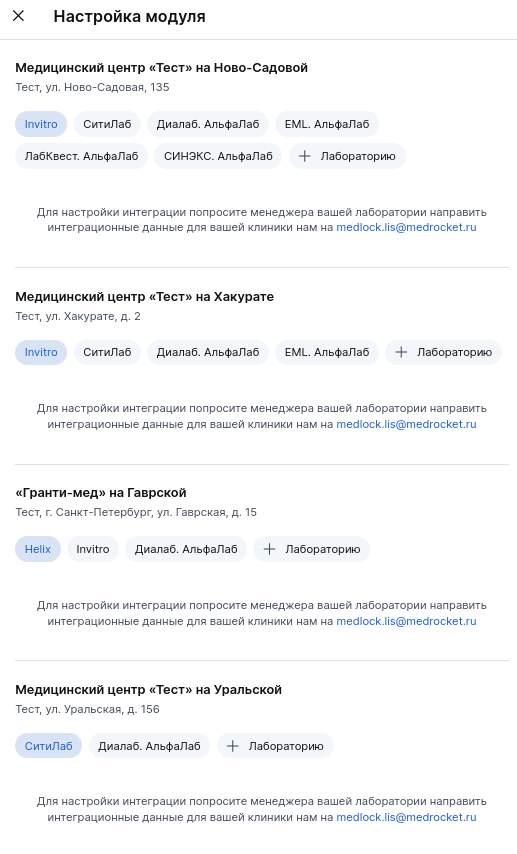
3. Select a laboratory from the list, as well as a labeling method«Печатаем в клинике»«Получаем готовые от лаборатории», and click «Подключить».
If the lab is already connected, it will not be displayed in the list. The format of obtaining labels for each of the Laboratories may differ, for example, for Invitro, CityLab, Dialab, Alfalab, and Hemotest, the option "Print in the clinic" is available only.
For the Hemotest: you will need to specify the password for your Personal Account in the Hemotest in the application.
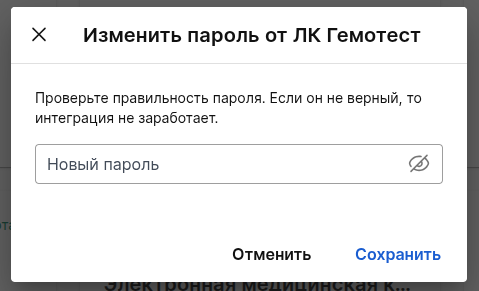
For the Hemotest: if the password you entered is incorrect, the Laboratory will not be able to connect you. To do this, you need to change your password in the submitted application, having checked it beforehand.
To check the password for relevance, try logging into your Personal Account Gemotest: if the authorization was successful and you logged in, then the password is correct. This password must be entered in the corresponding field of the submitted application.
Go to Modules -> Labs -> select the desired branch and click on the tab«Гемотест», then click «Изменить пароль от ЛК Гемотест».
Enter the correct password in the field and click«Сохранить», your connection request will be updated by the Laboratory integrator.
The connection request will be automatically sent to the Laboratory integrator, who will check the application and connect you.
MedLock employees do not connect Laboratories. More information about this can be found in the article at the link.
Now you need to fill out the price list for laboratory tests.
Filling out prices for laboratory tests
Important! When integration is enabled in Medlock, all prices listed in the Laboratory Information System (LIS) are automatically adjusted.
Check the relevance of the price list. If your retail prices differ from the prices in LIS, you need to upload an Excel file with the current prices.
When uploading a price list from a file, the studies themselves are not deleted or added, only their prices are updated.
The laboratory transmits the list of studies to MEDLOCK (the list contains all the studies that the laboratory performs under the contract). When uploading an Excel file, the list of studies cannot change, only their price changes.
There are three ways to fill in the prices:
- Automatically according to the contract / agreement with the laboratory information system (LIS). It is possible only if there are prices in LIS.
- An Excel file.
- Manually, by setting the prices of each study.
Automatic price list loading
When the price list is loaded automatically, the list of studies with prices will load within a few minutes.
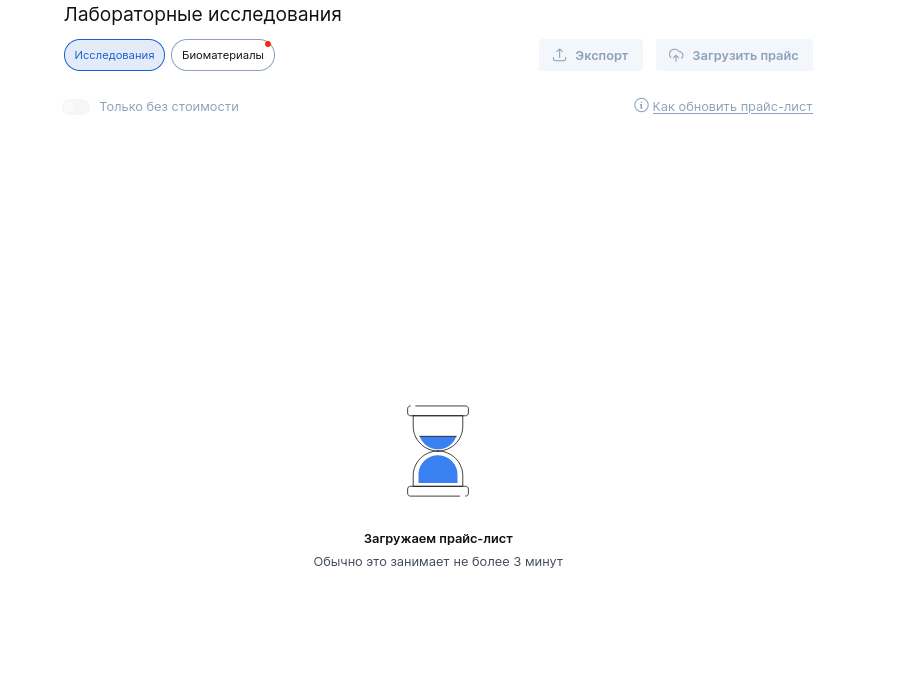
Prices from LIS are updated once a day. If the prices are specified manually using one of the methods below, then the price update from LIS will not affect your price list.
Price update time from LIS (Moscow time)
CitiLab - 05:00
Invitro - 07:00 and 23:00
KDL - 13:00
AlfaLab (DiaLab, LabQuest, SYNEX) - 17:00
Hemotest - 3:30
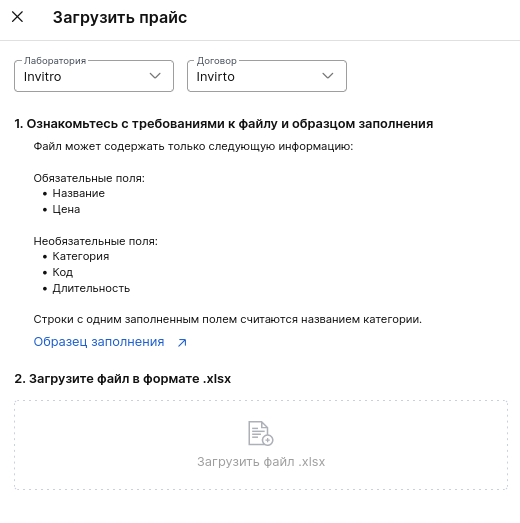
Uploading an Excel file
To download the price list from your computer in Excel format, click «Загрузить прайс».
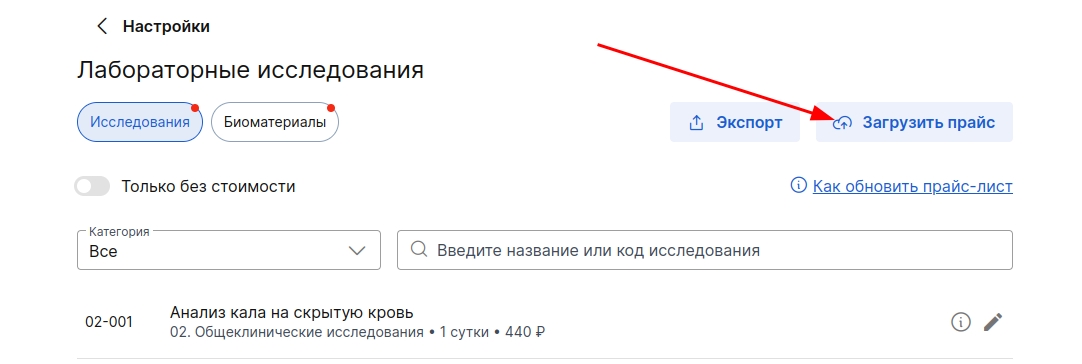
Make sure that the file meets the requirements and upload it.
Setting prices manually
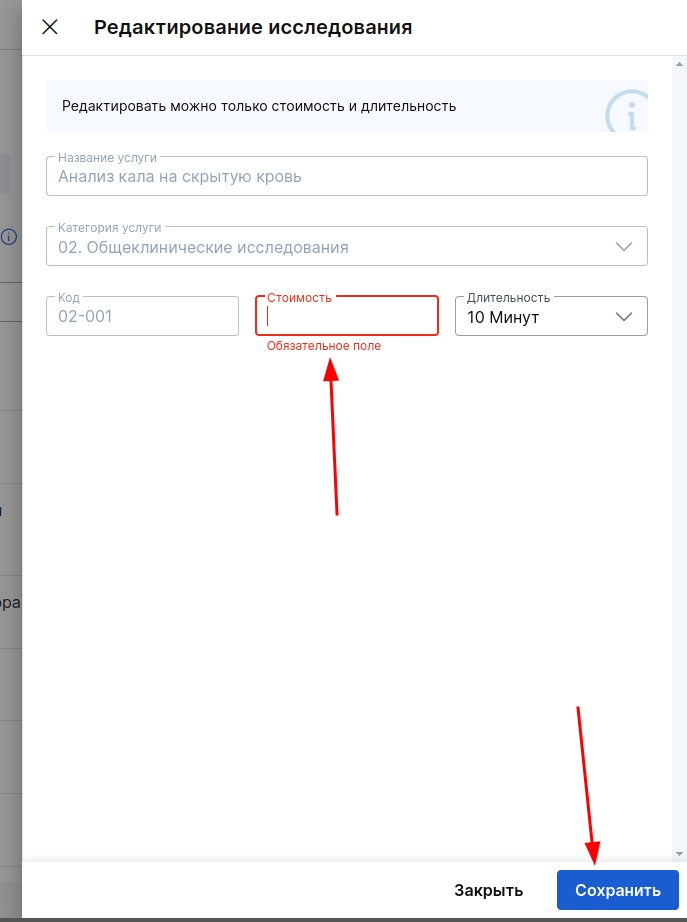
To specify the price for the study manually, click on the pencil icon next to the desired position.
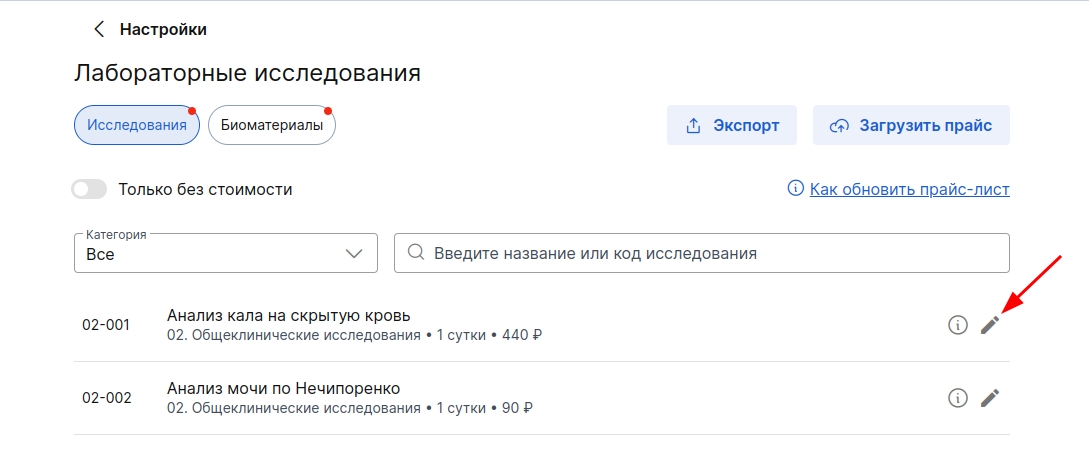
In the window that opens, specify the cost. Click«Сохранить».
If the cost of collecting biomaterial is not included in the final cost of the study, fill in the prices for taking biomaterial.
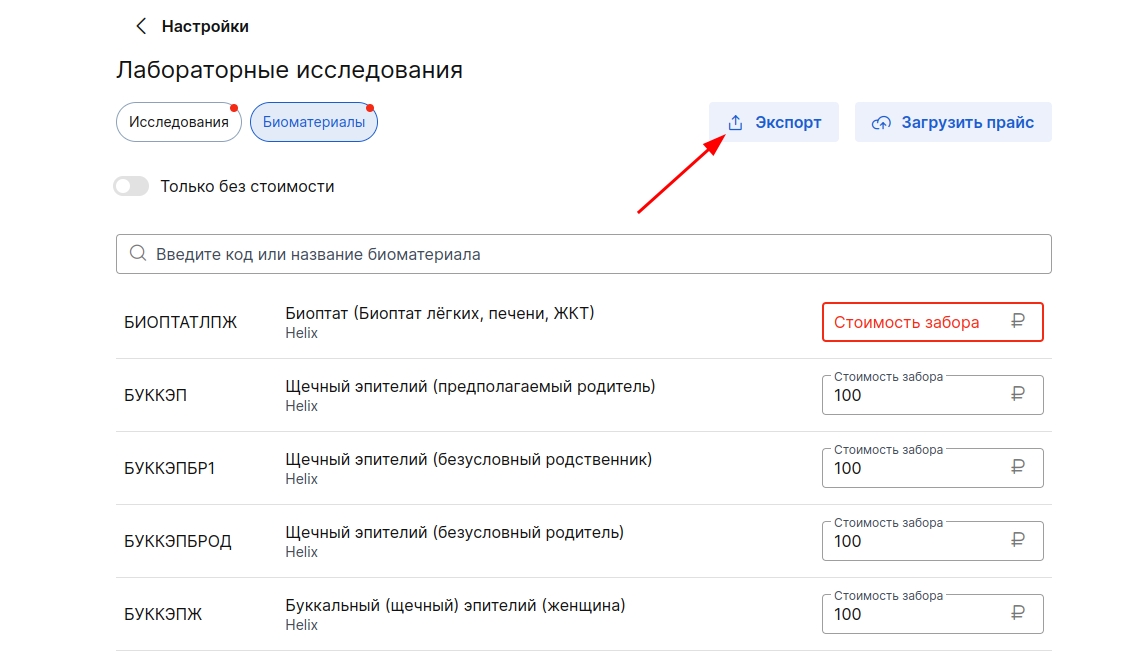
Filling in prices for biomaterial collection
The list of biomaterials for research will be uploaded to the Medlock automatically.
You can specify prices for taking biomaterials if they are not included in the cost of research.
If the prices for biomaterials are filled in, the cost of sampling the biomaterial will also be substituted in the order after selecting the study (for example, «Анализ крови»venous blood sampling will be substituted). If the FOX does not fill in the prices for biomaterials, then the services of its fence will not be included in the order.
You can download the prices using an Excel file.

Or specify them manually.
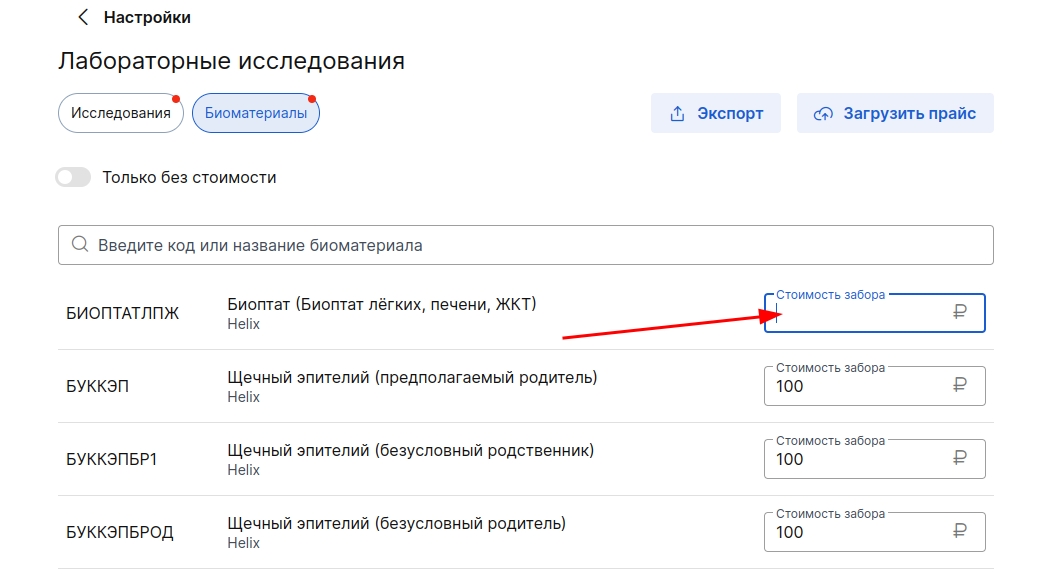
To download the list of biomaterials, you can use the button «Экспорт».
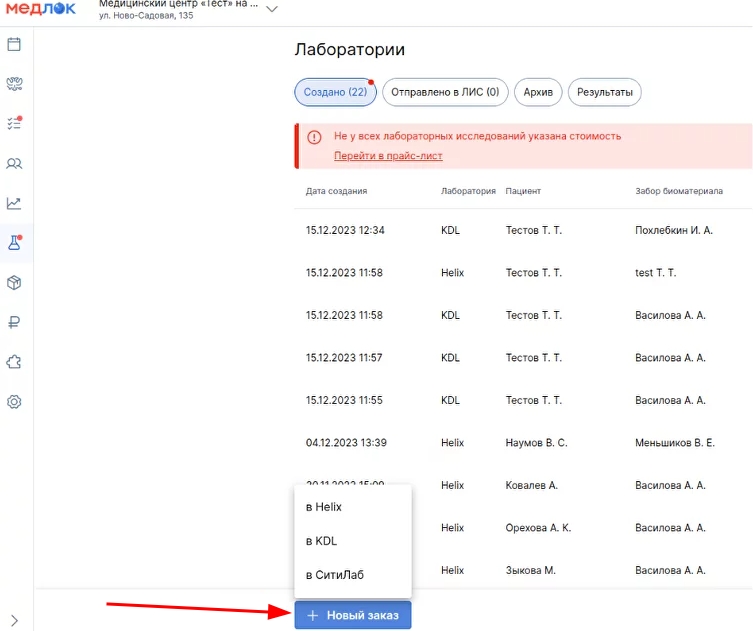
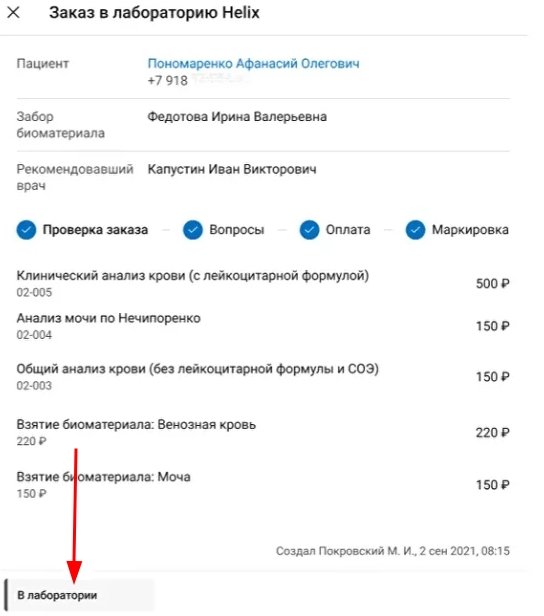
Creating an order to the laboratory
- Go to «Лаборатории»→ tab «Заказы на исследование». Click «Новый заказ»and select a laboratory.
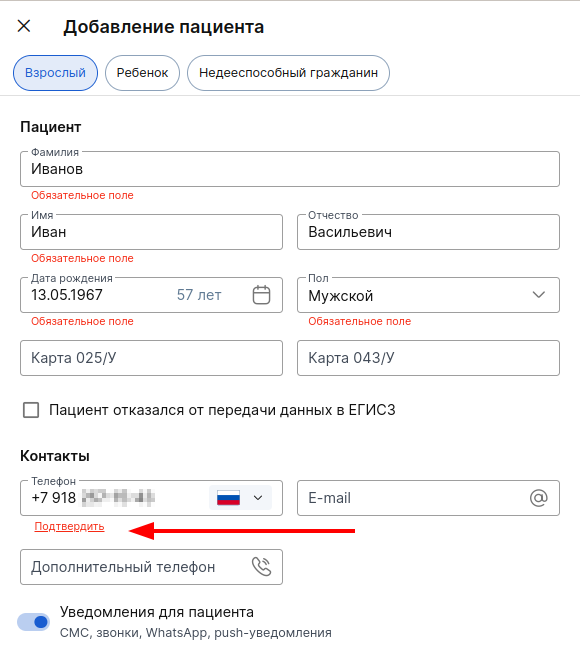
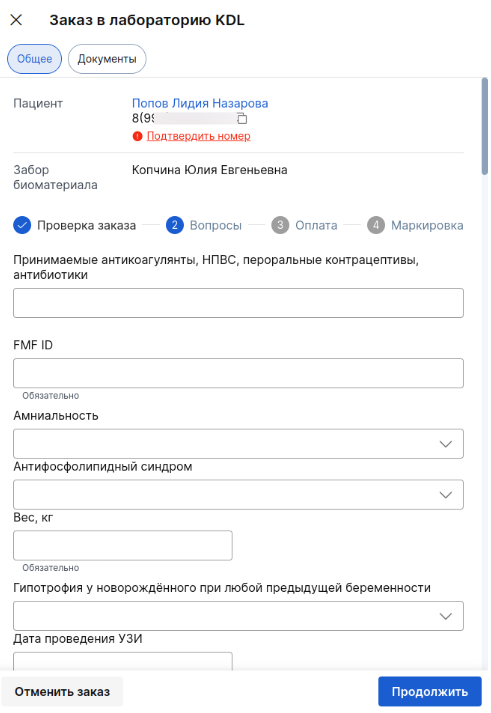
2. Fill in the patient's details.
If the patient did not apply incognito, specify and confirm his phone number. Confirmation of the phone number is important for sending the analysis results. If the phone number is incorrect, the patient will not receive the test results and they will have to be sent manually.
If the patient has applied incognito, it is mandatory to indicate only the phone number (without confirmation), gender and age. These data are necessary for the analysis of laboratory research.
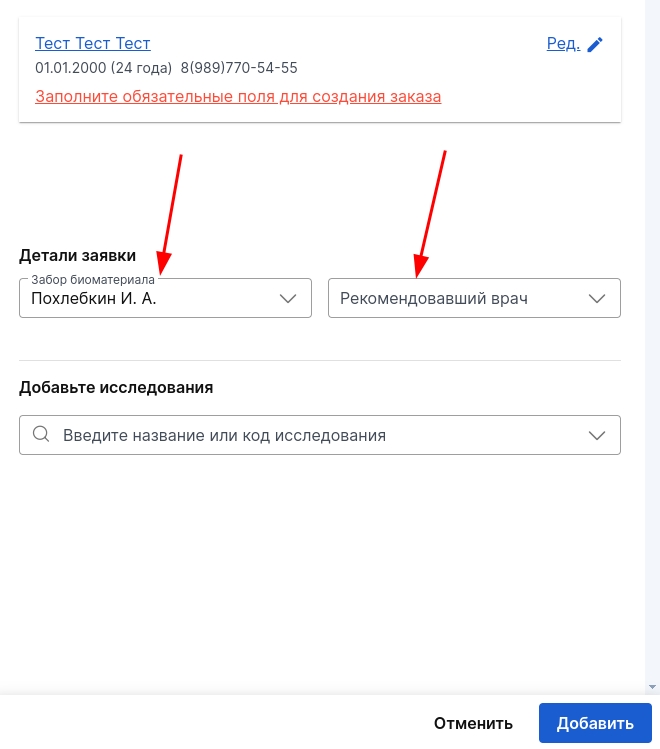
- Select the doctor or nurse who performed the biomaterial removal.,
as well as the doctor who recommended the study. Click«Добавить».
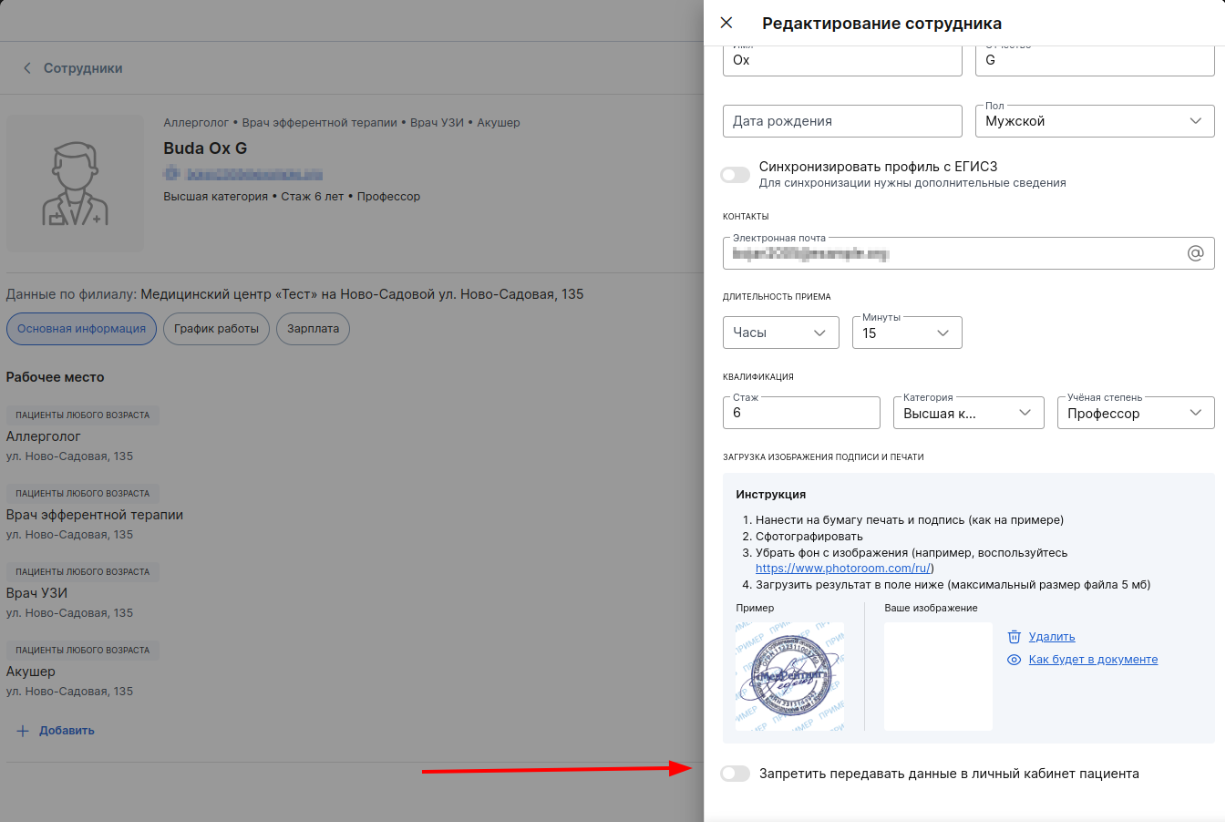
Make sure that the doctor has permission to send data to the patient's personal account in his profile. To do this, go to settings - employees - select doctor - pencil icon - move the slider to the left. If the ban is enabled, the analysis results created by this doctor will not be sent to the patient, they will need to be sent manually.
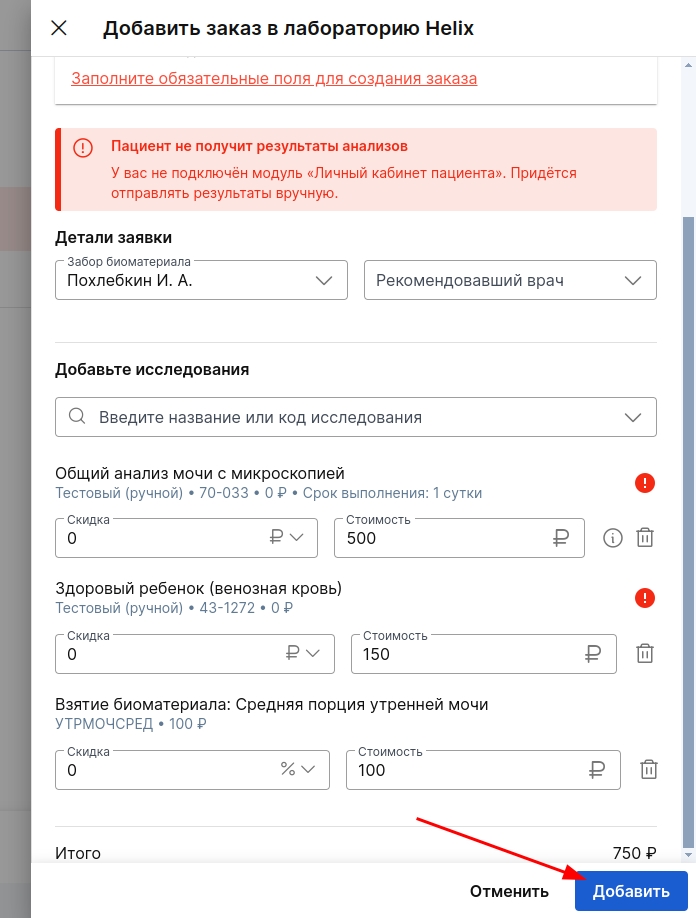
- Choose a study and a biomaterial.
If the cost of taking the biomaterial is not included in the cost of the study, the study itself and the separately related cost of taking the biomaterial will be added to the order.
Click«Добавить».
Important! If the same biomaterial is used for several studies as part of the order, the cost of the sample is added 1 time.
If prices for biomaterials are not filled in, biomaterial collection services will not be included in the order.
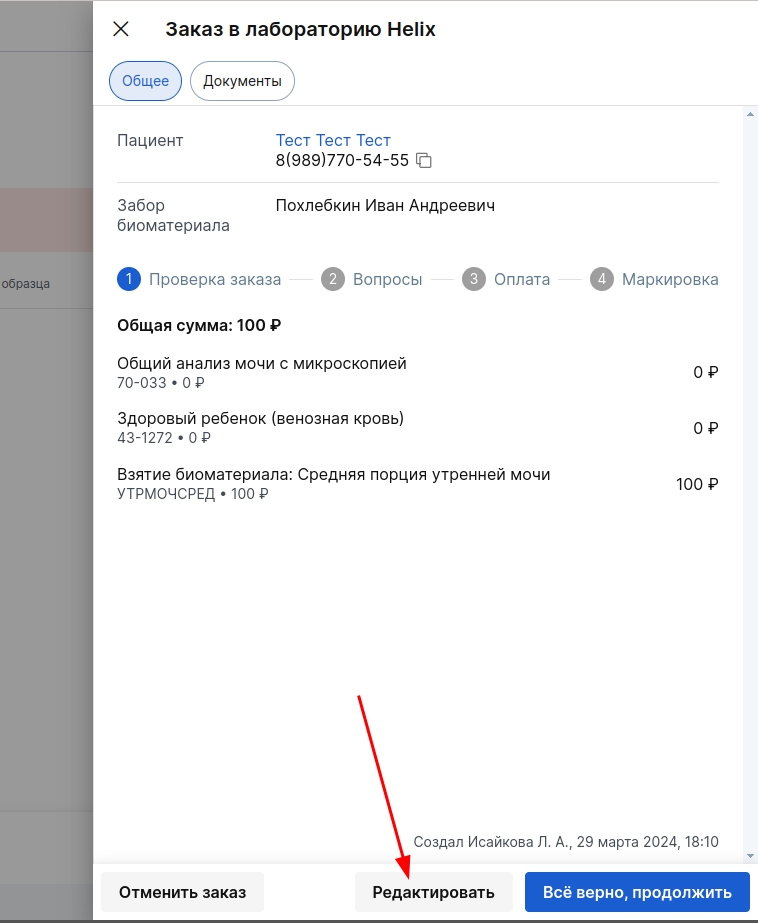
5. Check the order carefully: patient details, order contents.
If you find an error, click «Редактировать»and make changes.
If everything is in order, click «Всё верно, продолжить».
Important! After clicking on «Всё верно, продолжить»the order, it will be recorded. The studies in it cannot be edited.
Receipts will be created for the examination and collection of biomaterial.
Also, when an order is recorded, a request is sent to create an order in the LIS service and the necessary patient data for this.
- After the order is registered, a questionnaire will open (if it is necessary to take into account the information for some studies).
Fill in the answers to the required questions.
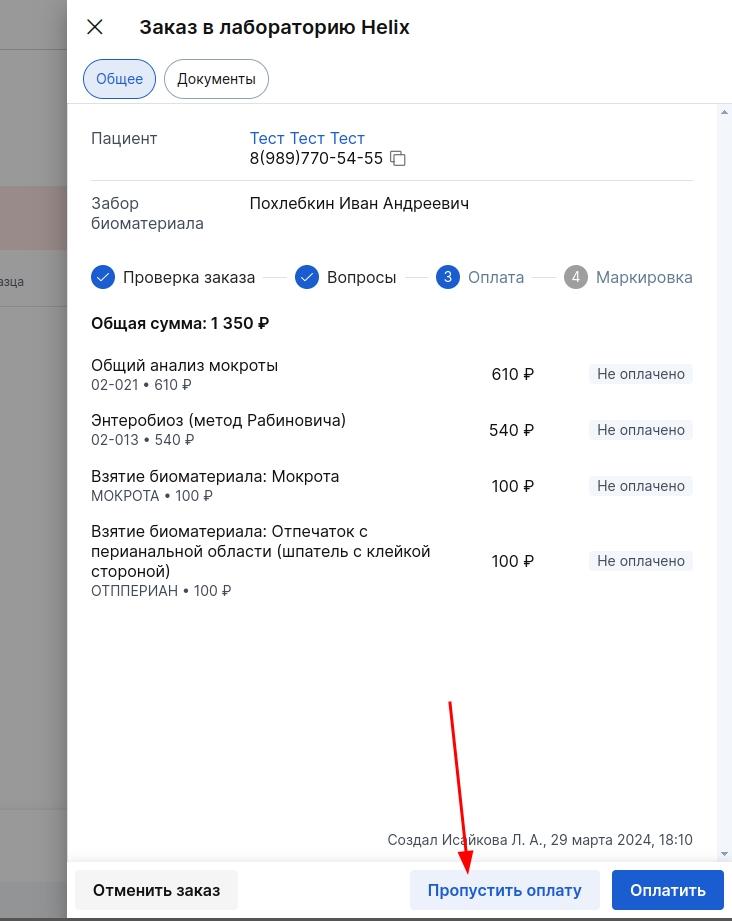
Payment for research
Payment can be made both before and after the collection of biomaterial, depending on the procedure established in your clinic.
If you need to make a payment before taking the biomaterial, proceed to the payment. Click «Оплатить»at the bottom of the form and make the payment using the usual method.

If the payment is made after the biomaterial is collected, skip the payment step. Click «Пропустить оплату»at the bottom of the form and go to labeling.
Labeling of biomaterial
You must specify the barcode of the test tube in the order. There are two ways to do this.:
- Scan or manually enter (the barcode field will be empty and you can enter the number by scanning or manually using the keyboard).
- Printing (the barcode field will already be filled in, and you can only print the corresponding barcodes on the printer).
Depending on the settings that were specified during the connection of the module, one of the types of marking will be available to you. If you have changed the labeling method, you can change it in the module settings.
For Invitro Laboratories and Hemotest, in order to receive barcodes, an order must first be submitted. The barcodes that can be printed are sent to the laboratory after the order has been sent.
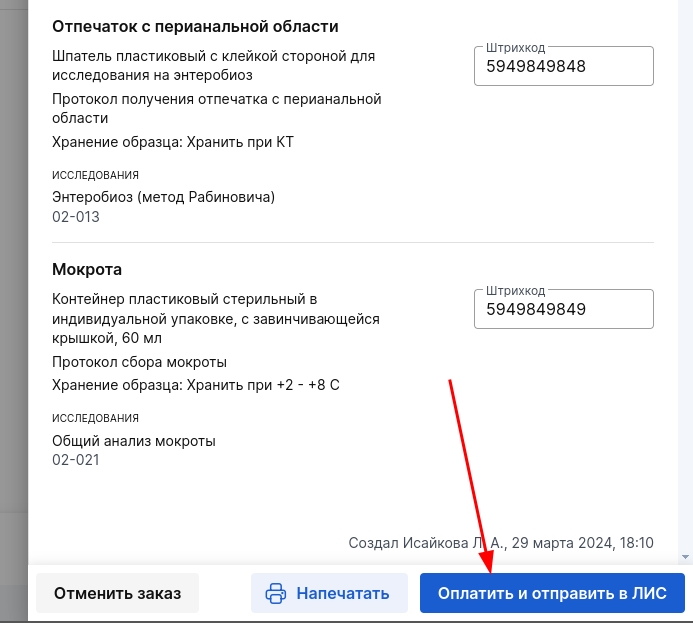
Manual barcode entry
This is a labeling method in which you receive ready-made barcodes from the laboratory. It is used by KDL laboratories, DiaLab (the clinic determines the quality of LIS independently — manual labeling or printed).
1. For auto-completion, the first Barcode number is entered (or scanned), and all fields below are filled in automatically.
Moreover, Dialabs and KDL will have the same numbers.
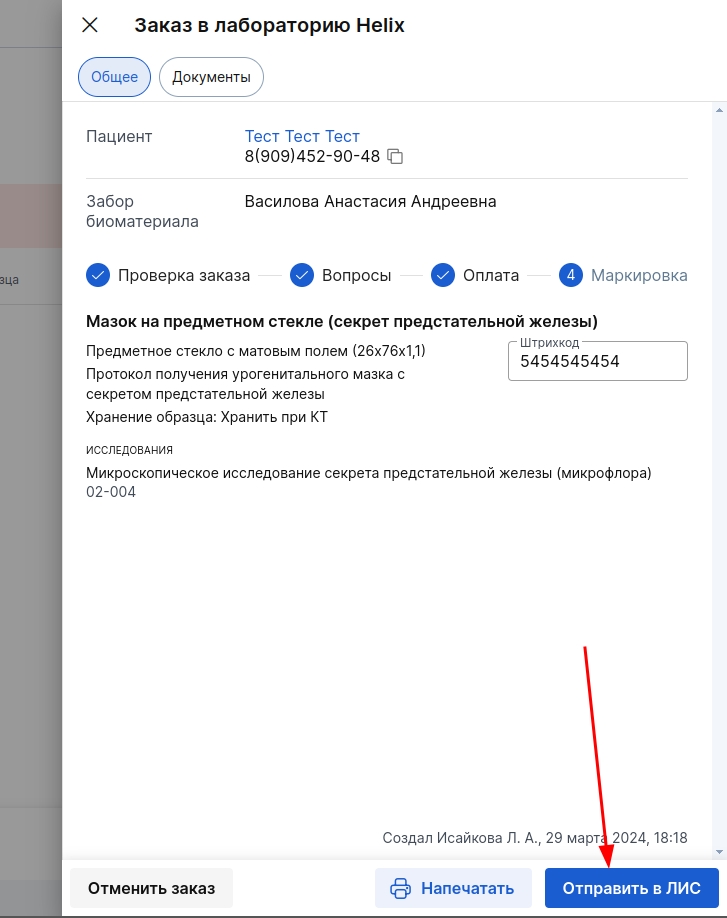
2. Click «Оплатить и отправить в ЛИС».
Label printing directly to the order (KDL laboratories, DiaLab, CitiLab, Invitro, Hemotest)
For the Invitro laboratory, the hemotest labels for labeling are sent by the FOX.
Click «Напечатать»and select in the window that opens«Печать этикеток».
Sending research to LIS
After sending the order, you will have access to the order sheet in Excel or PDF format (only PDF format is relevant for the Invitro laboratory).
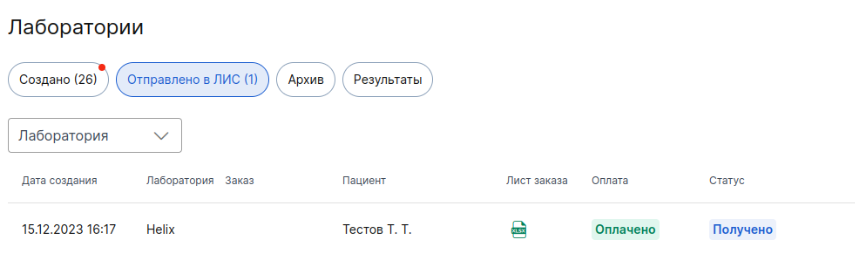
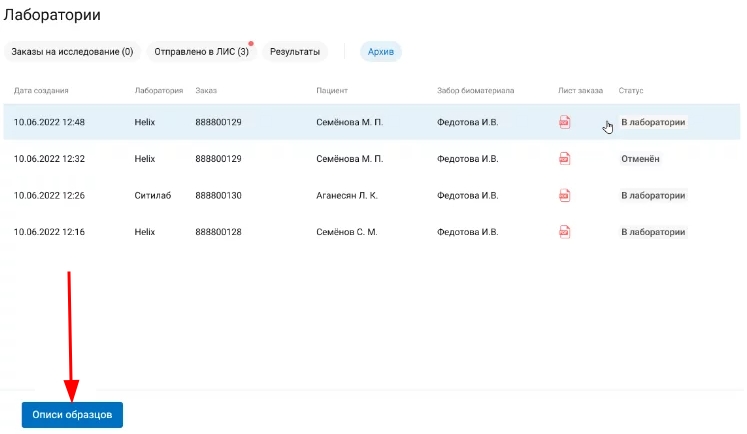
Information about the orders sent is displayed in the tab«Отправлено в ЛИС».
Upon arrival of the courier, it is necessary to print the inventory and hand it over along with the samples.
- Select a lab and click «Сформировать опись образцов».

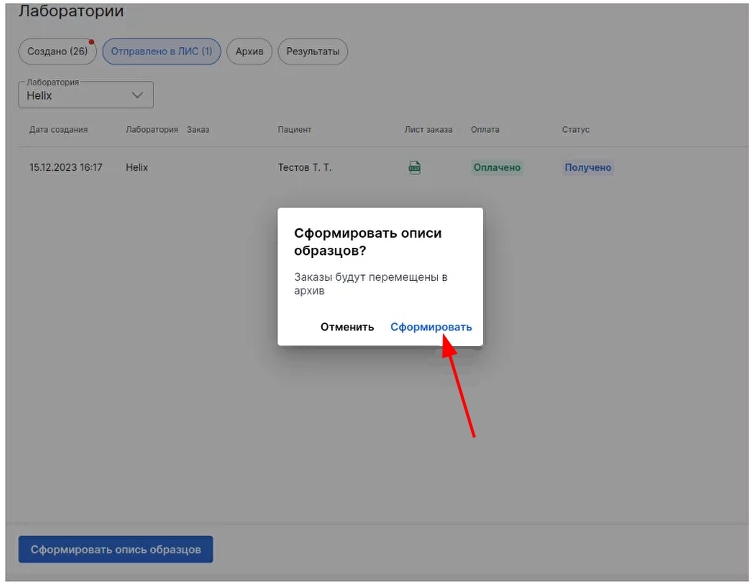
2. Confirm the action by pressing «Передать».
Orders will be moved to the tab«Архив».
Cancelled orders are also displayed here. To see the details, click on the order line.
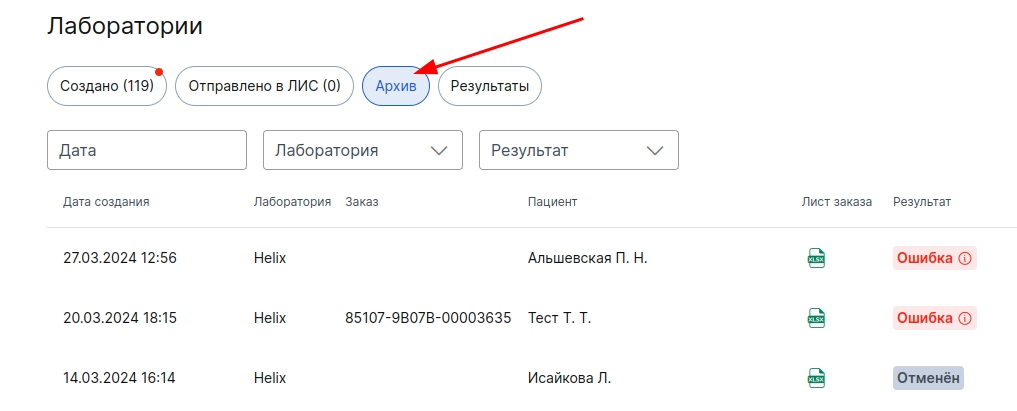
The order details contain information about the patient, the composition of the order, its current status, the date of creation, as well as the last name of the employee who created the order.
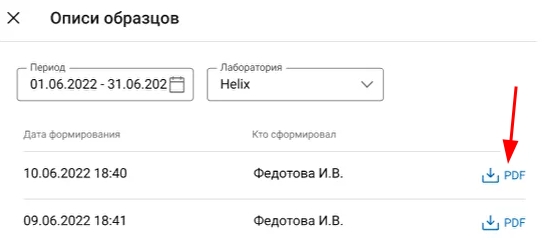
In the tab«Архив», you can also open and print out the sample inventories created earlier.
Select the inventory you are interested in from the list that opens.
Cancellation of the study after payment
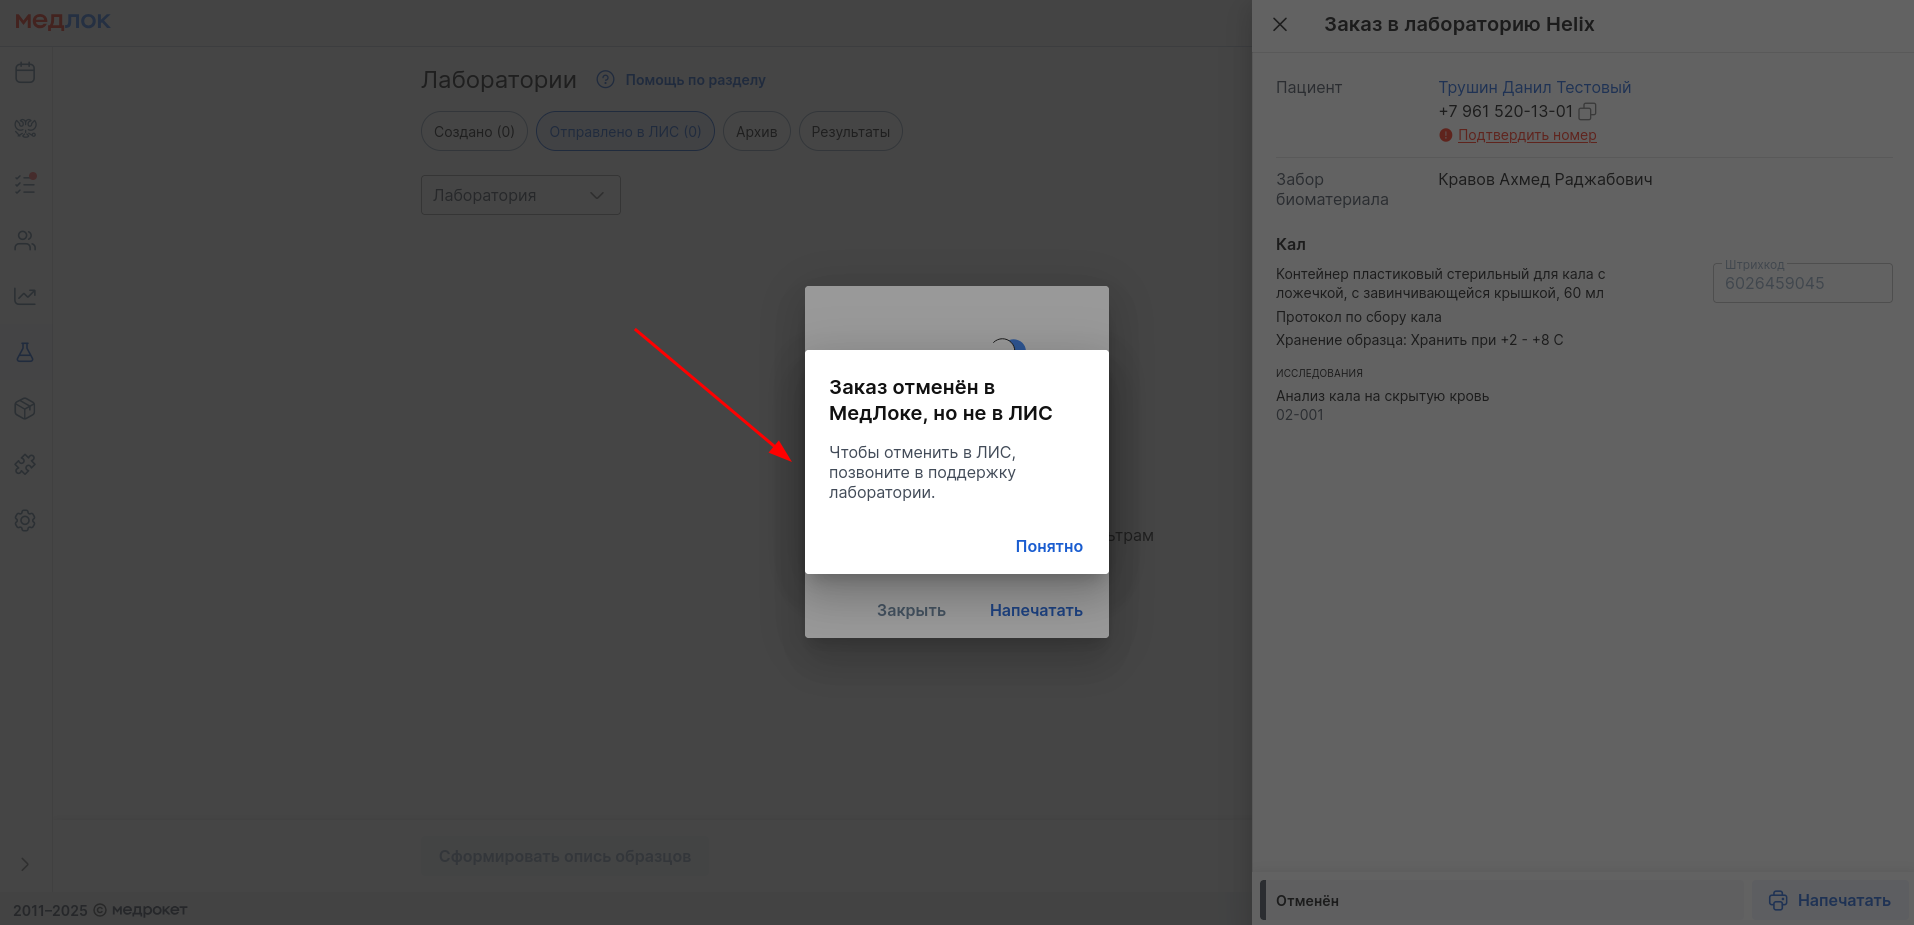
If you have already made a payment to Medlock, but have not yet sent the order to LIS and need to cancel it.:
- Click«Отменить заказ».
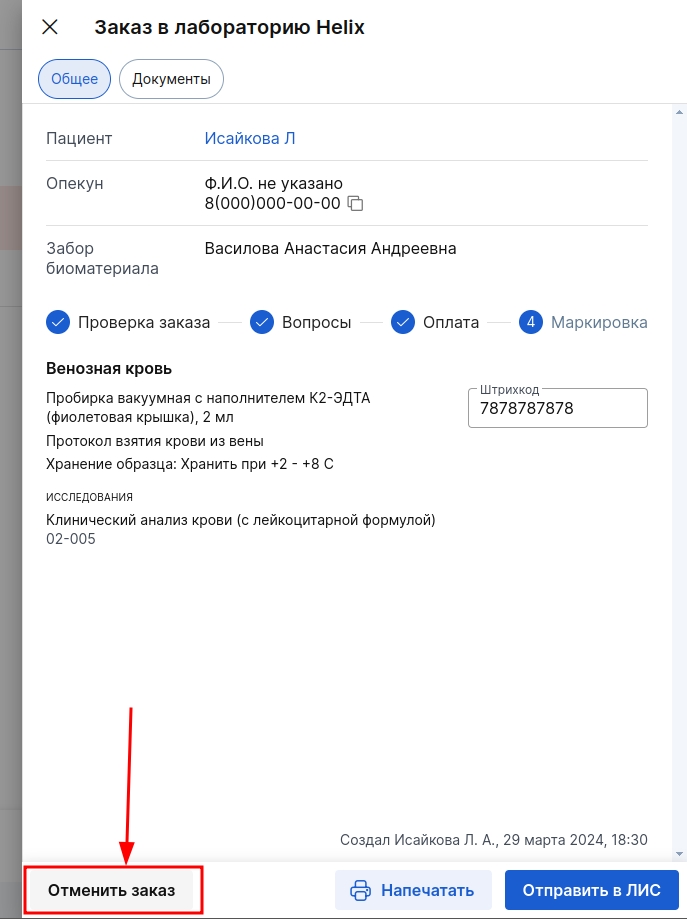
2. Click «Оформить возврат»and refund the payment to the patient in the usual way.

3. It is important that canceling an order in MedLock does not cancel it in LIS. You need to contact LIS support and ask them to cancel the order.
Obtaining research results
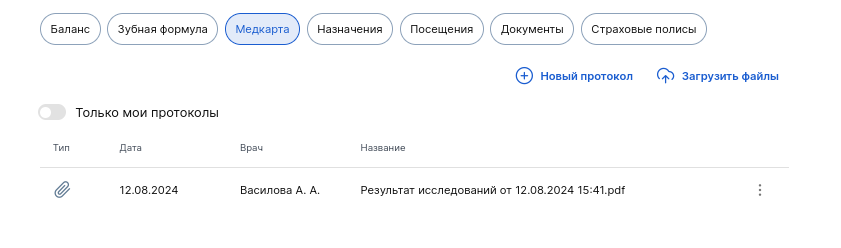
When the study is completed, a PDF file with the result will appear in the patient's medical record. As the studies that were sent in one order are ready, this file will be updated.
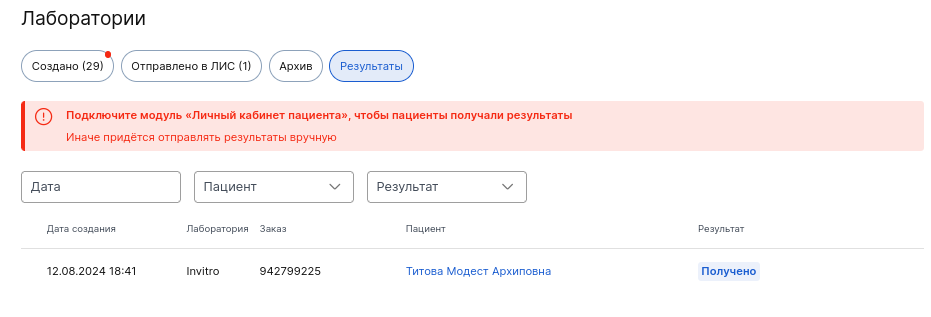
You can track the order statuses in the tab«Результаты».
Filters are available by date, patient's last name, and order status.
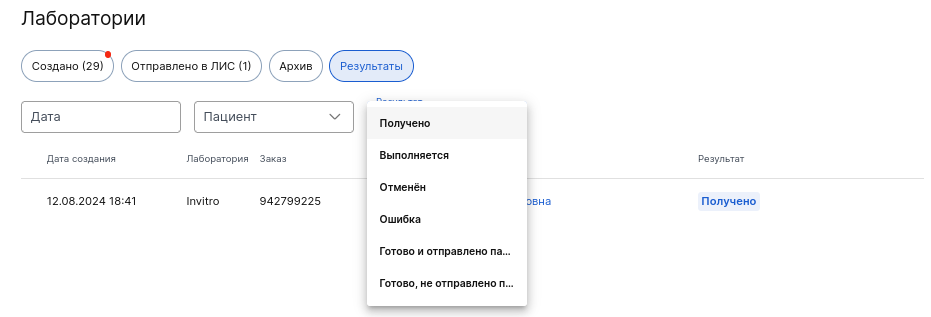
Statuses are displayed:
- Received — the order has been successfully sent to the LIS, but the laboratory has not yet received the biomaterials.
- In progress — an order is in the process of being completed by the laboratory. At the same time, a partial result can be prepared for it (PDF).
- Cancelled — the order is cancelled in the MedLock at any step. However, the order is not automatically canceled in the LIS if it has already been sent.
- Error — the laboratory sent an error regarding the order and its cancellation. This is possible in case of problems with biomaterial transportation.
- Ready and sent to the patient — the order is fully completed and the results are sent to the patient at the medical center. The results are sent automatically if the clinic uses the module «Личный кабинет»in the Medlock.
- Ready, but not sent to the patient — the order is fully completed, but the results are not sent to the patient in the medical room.
Orders in the status «Готово [...]»may not be fully completed if the laboratory has stopped fulfilling them. Then the order is considered partially completed.
If the results are ready but not sent to the patient«Результаты», a red badge will light up on the tab. He draws the attention of the administrator so that he manually sends the test result to the patient.
As soon as the administrator views the orders with unsent results, the red badge disappears.
The result will not be sent to the patient, and it will have to be sent manually if:
- your clinic does not use the module«Личный кабинет пациента»;
- The slider is active for the patient«Инкогнито»;
- the doctor 's slider is active«Не передавать данные в личный кабинет пациента».
Click on the patient's full name to open their contact details page for transmitting the results.
In order to securely transfer personal data, Medlock does not transmit the test results by e-mail. Automatic transmission is available via a secure channel in the patient's personal account.