
How to create a protocol template
How can a doctor create a protocol during an appointment?
How to create a treatment plan in the protocol
How to indicate the treatment performed at the reception in the protocol
Dental formula in the patient's profile: how to work with it
How to create a dental treatment plan in the patient's profile
How to specify the treatment performed at the reception
Features of dental treatment plans for minors and incapacitated patients
The module «Стоматология»allows doctors to:
- create dental protocols;
- print out the created protocols for patients;
- keep the patient's dental formula in his profile;
- view the patient's medical history;
- make a dental treatment plan.
How to connect Dentistry 
Create a profile in Medlock for each specialist who will use the module. Read more about this in the article, section«Как подключить ЭМК?»
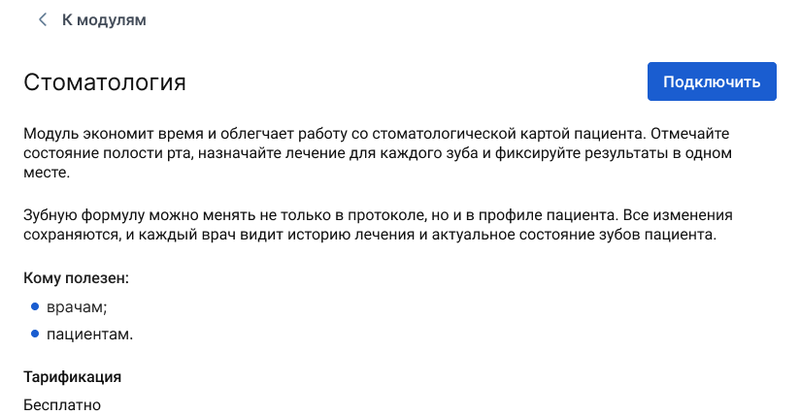
Then go to the section«Модули», «Стандартные»and click on the button «Подробнее»in the module card «Стоматология», then «Подключить».
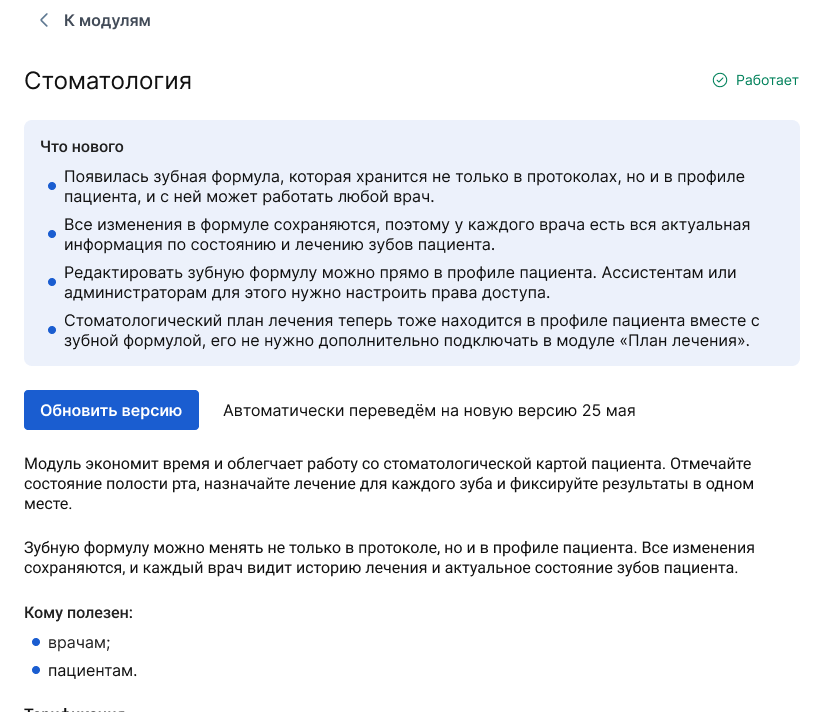
If you have previously used the module, then to update it, go to the section «Модули»«Стандартные»and click on the button «Подробнее», then «Обновить версию».
How to create a protocol template
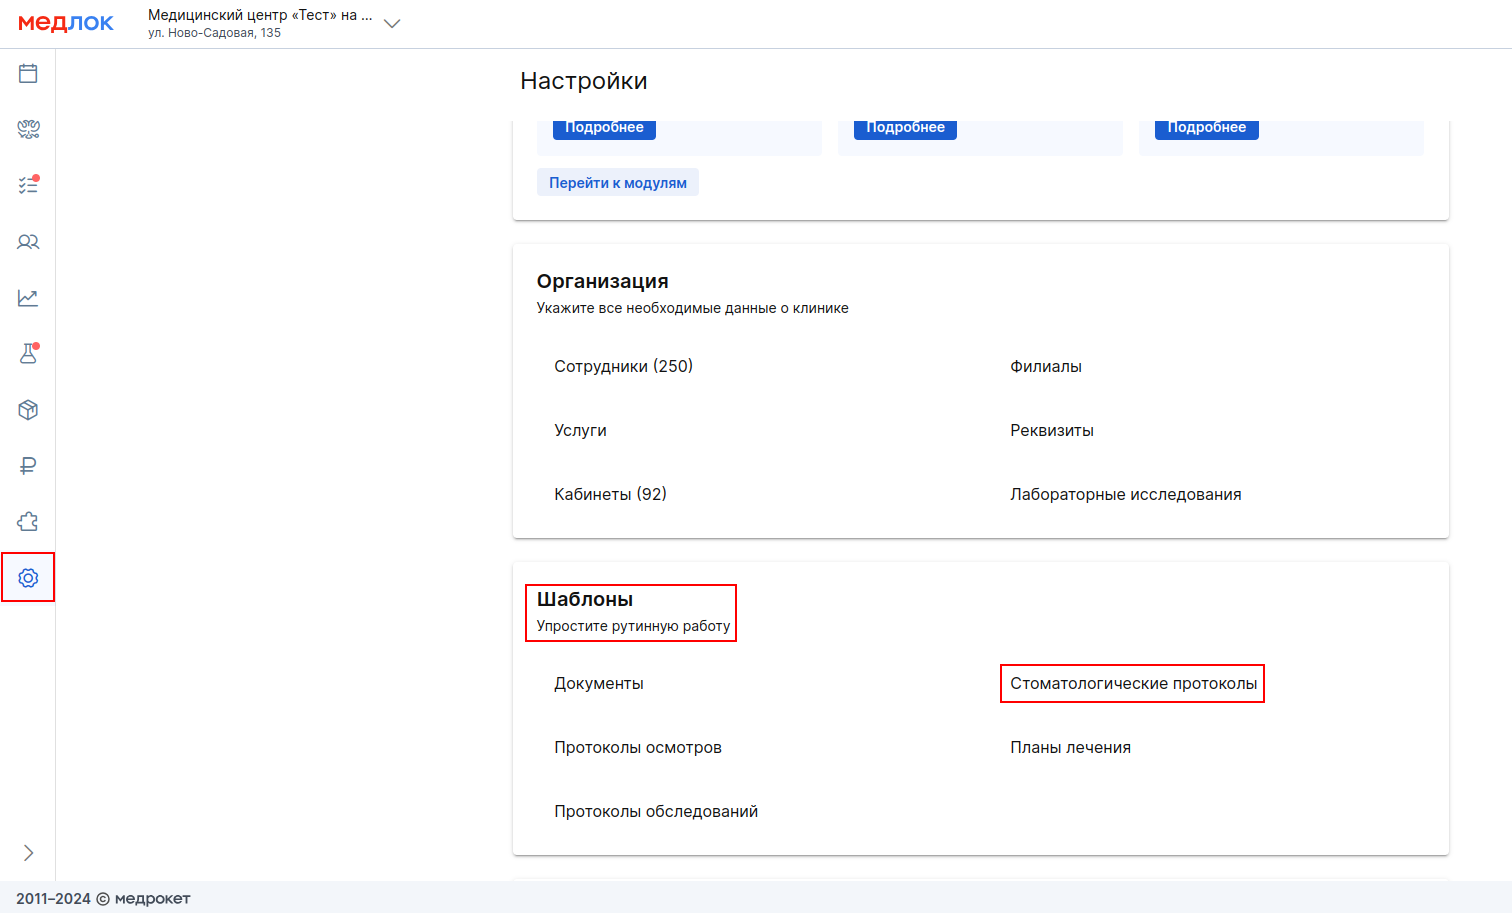
- In «Настройки»the → section«Шаблоны», select «Стоматологические протоколы».
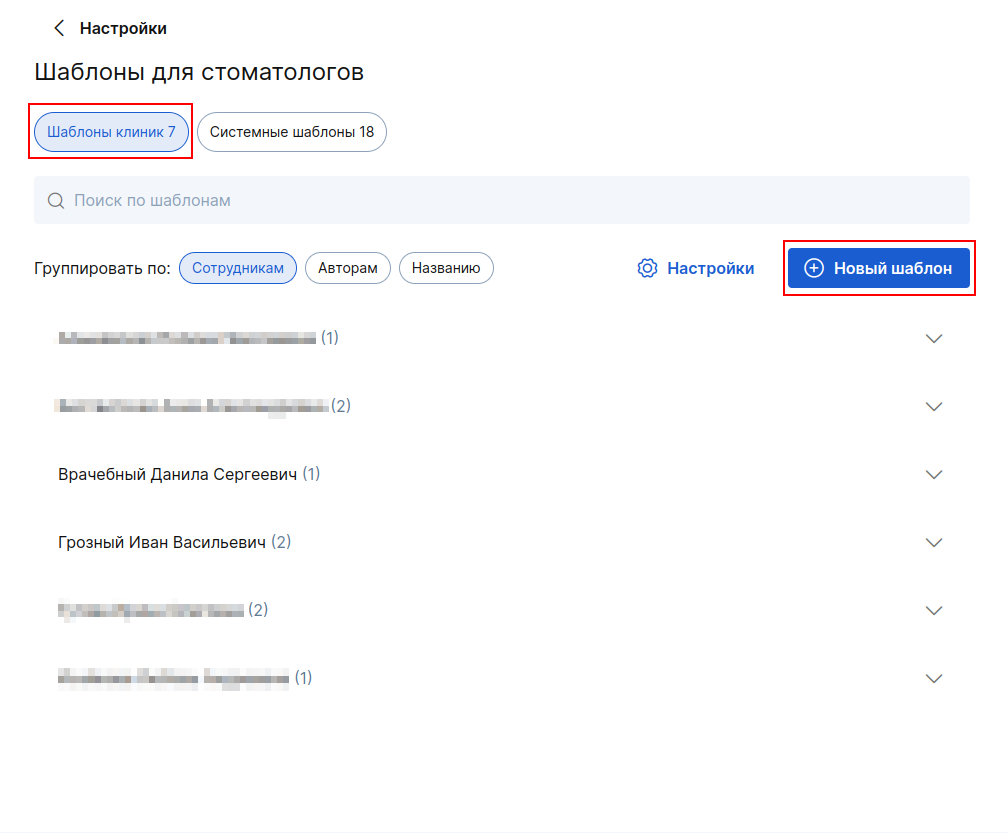
2. Click «+ Новый шаблон»in the upper-right corner.
3. Enter the name of the template and specify the doctors who will be able to use it. Don't forget to add yourself if you need it too.
In the column«Название протокола», specify the name that the patient will see on the printout.
For example, the template is called «Кариес», but you want it to be in the printout«Осмотр врача-стоматолога», then «Название протокола»write in the field«Осмотр врача-стоматолога».
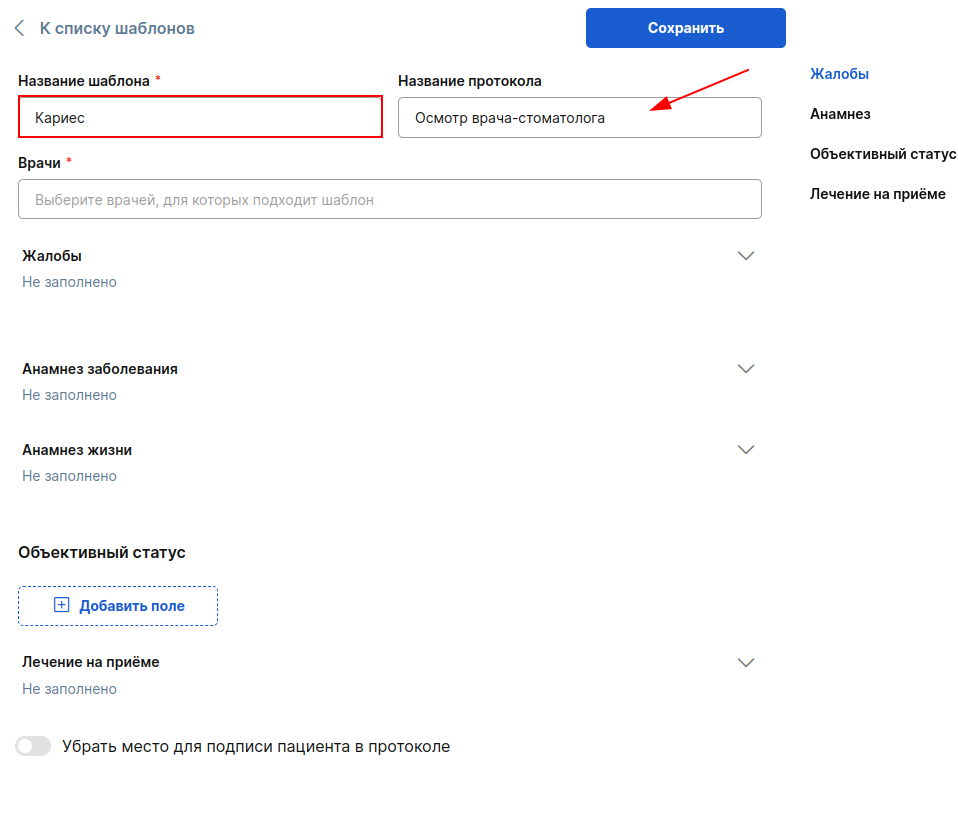
If necessary, fill in the remaining fields. You can copy them from templates that you already have.
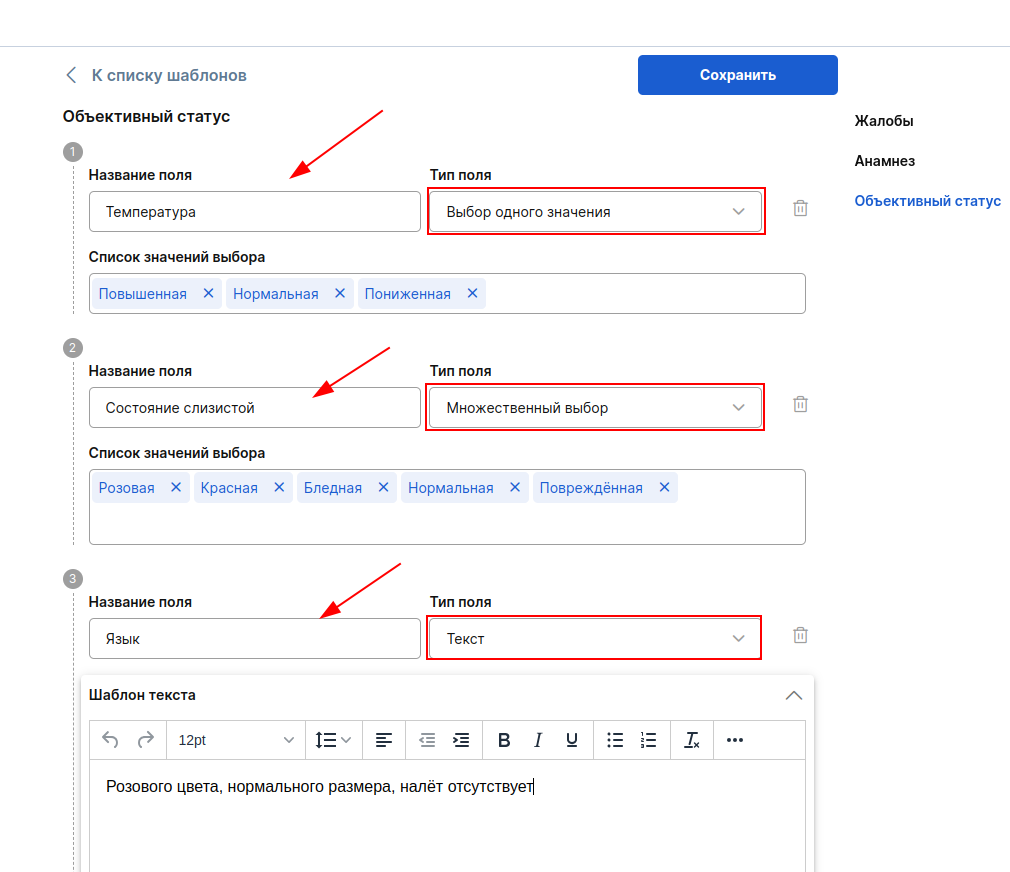
4. The section «Объективный статус»is designed in the constructor format.
4.1 Specify the name of the field
4.2 «Список значений выбора»Enter a value in the column, for example, «повышенная»(temperature). Press Enter.
4.3 Select the field type:
Selecting one value — when filling out the protocol, you can select only one of the listed values.;
Multiple choice — when filling out the protocol, you can select several items at the same time;
Text — when filling out the protocol, you will be able to edit the text that you entered in the template. The default text must be specified in the column«Шаблон текста».
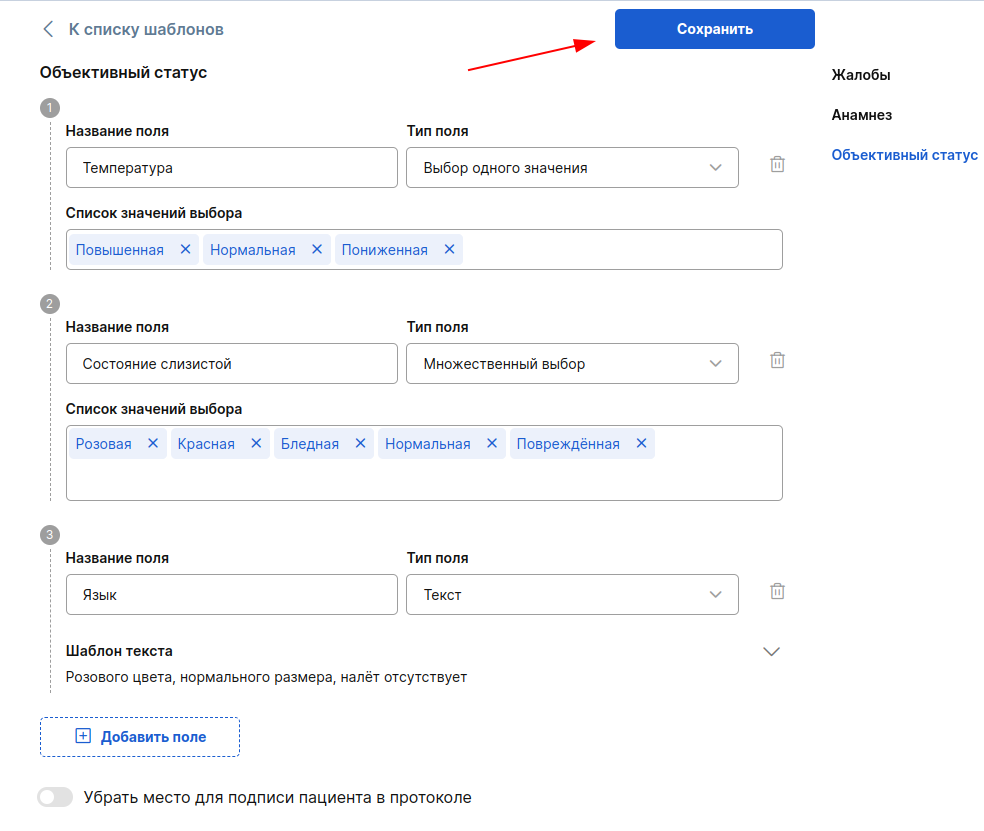
5. To add information about the patient's treatment process, fill in the text field«Лечение на приёме».

6. When all the necessary fields are filled in, click «Сохранить»in the upper-right corner.
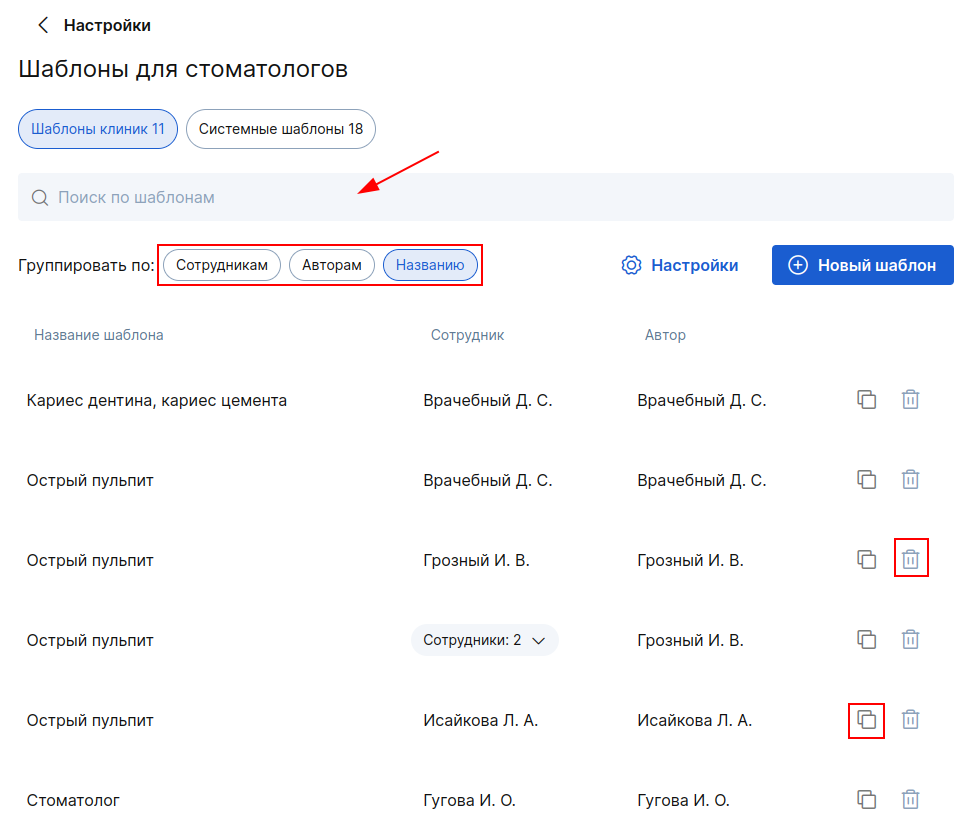
The general list of templates includes a search bar and the ability to group templates by employee, author, or title.
Any template can be copied by clicking on the copy icon.
Only the author can edit or delete the template. To edit it, click on the template name, and to delete it, click on the trash icon to the right of the employee's initials.
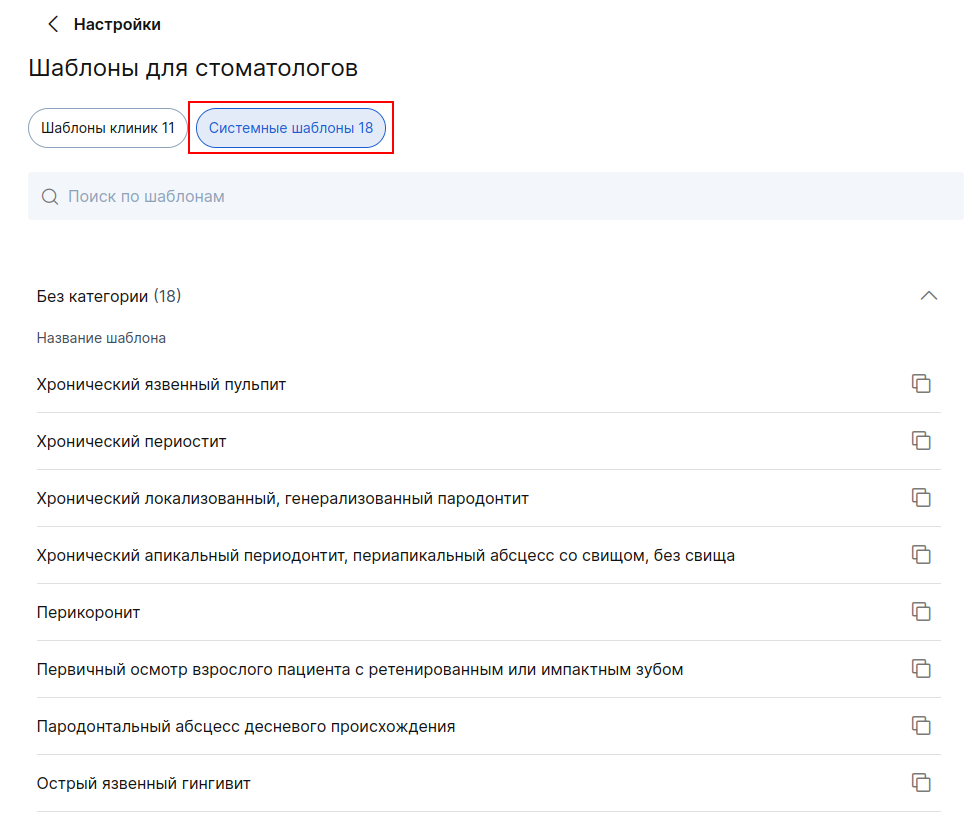
To speed up protocol setup for your specialists, use ready-made system templates for basic nosologies.
1. Go to «Настройки»→ «Шаблоны для стоматологов»→ «Системные шаблоны».
2. Select the system template based on the doctor's specialization and copy it.
3. Specify the doctors for whom this template will be relevant.
4. If necessary, edit it and save the result.
5. You will find the received template in the tab«Шаблоны клиники».
In the sections«Шаблоны для стоматологов», you can select the protocol printing settings (caps).
To do this, click«Настройки» in the upper right corner, you have 4 printing options available.:
- logo and banking details
- banking details only
- only the logo
- do not print
In the setting, you can also choose which QR code to output in the patient report.

How can a doctor create a protocol during an appointment?
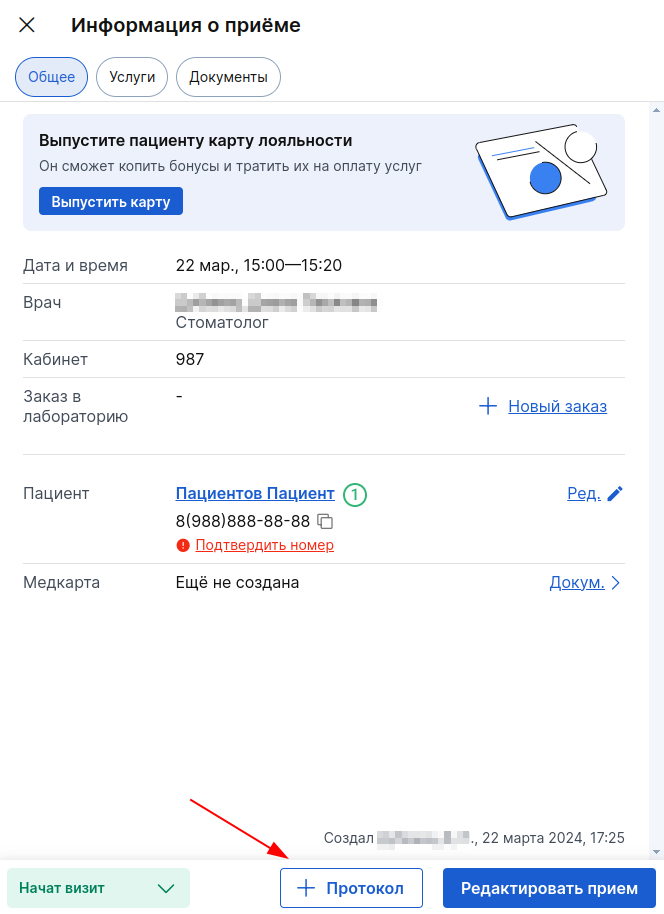
- To create a protocol, the patient's application must specify the status«Начат визит». After that, a button will become available«+Протокол», click on it.
*The doctor can create a protocol only for those patients who are registered with him.
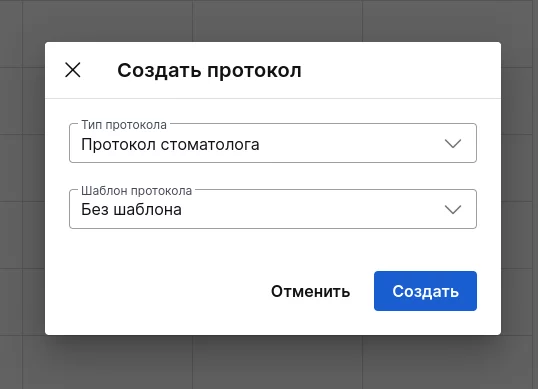
2. In the protocol creation window, select a template or item«Без шаблона», and click «Продолжить».
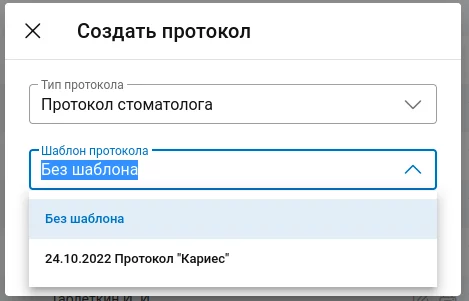
If the patient has already been to your appointment, you can use the previous protocol as a basis. This way you won't have to fill out your medical history again.
Click on the field «Шаблон протокола»and select the appropriate protocol from the drop-down list.
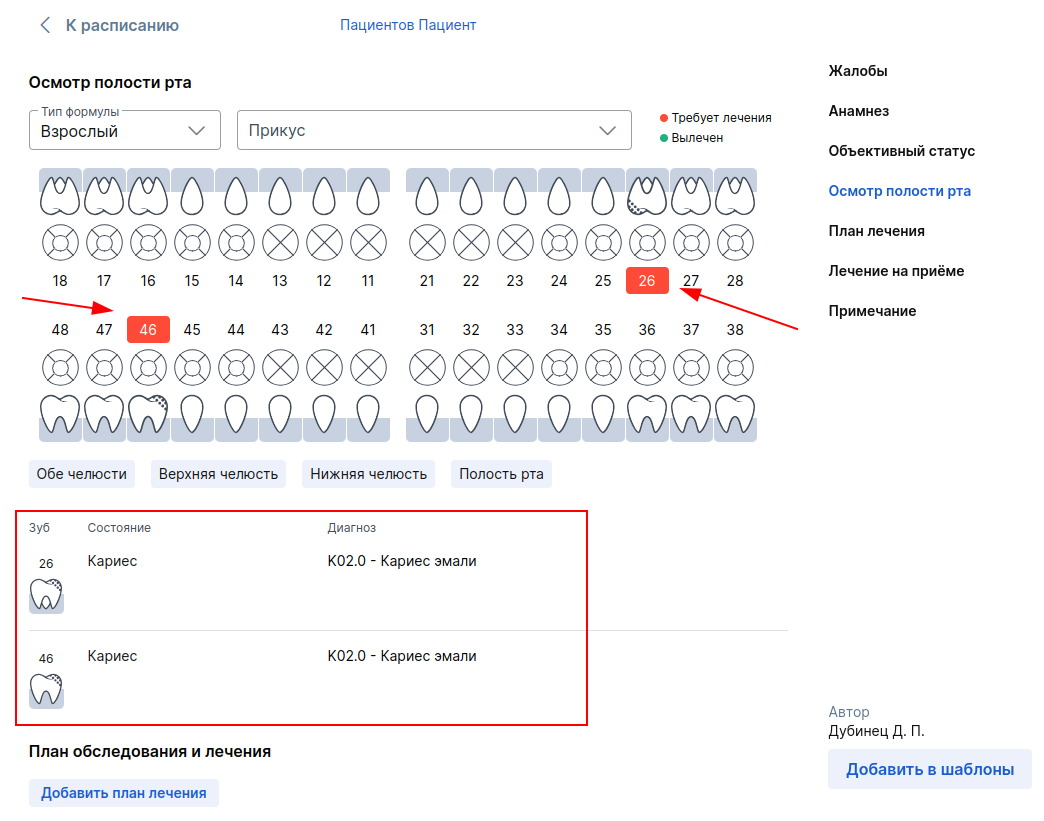
3. If you have selected a template, the protocol will display the information that you entered into this template.
The dental formula* will also appear in the protocol window, indicating the type of bite* of the patient.
*These parameters appear only in the protocol (they are not in the template), as the information is individual for each person.
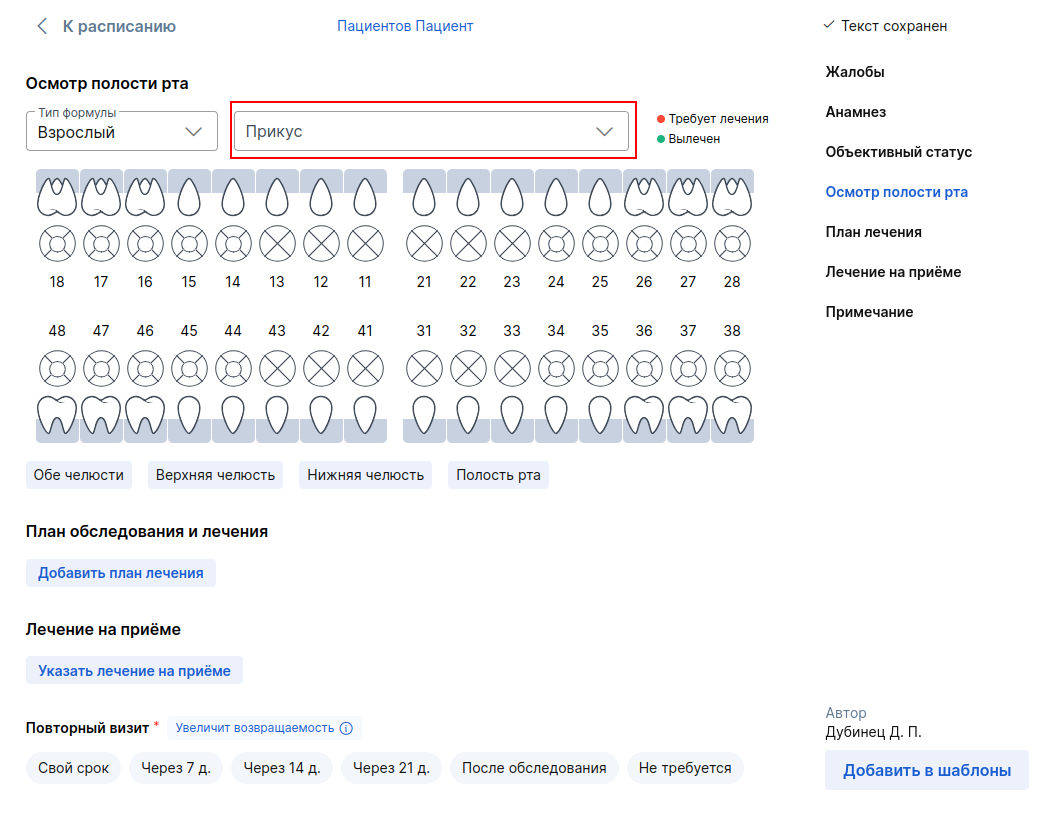
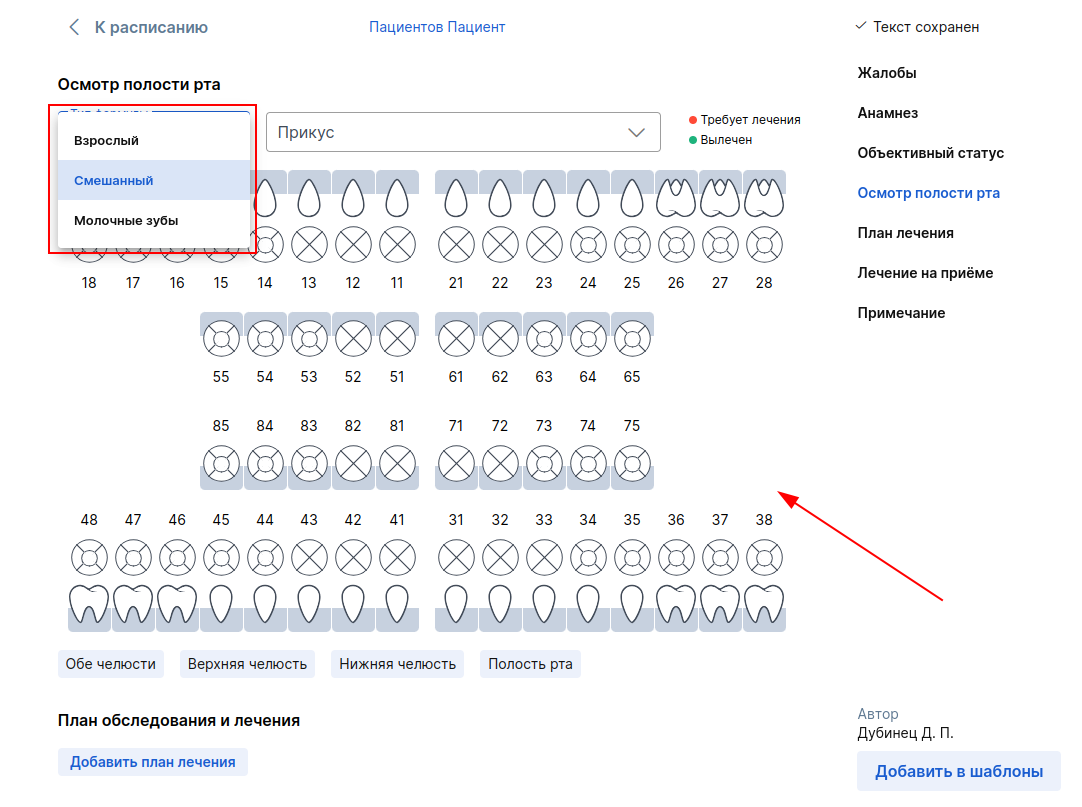
4. To display the correct formula, select the type of formula according to the patient's condition.
5. To add the current condition of the patient's teeth, click on the desired tooth, and then a window will open on the right to enter information on the selected tooth. Specify his condition and diagnosis, then click «Добавить».
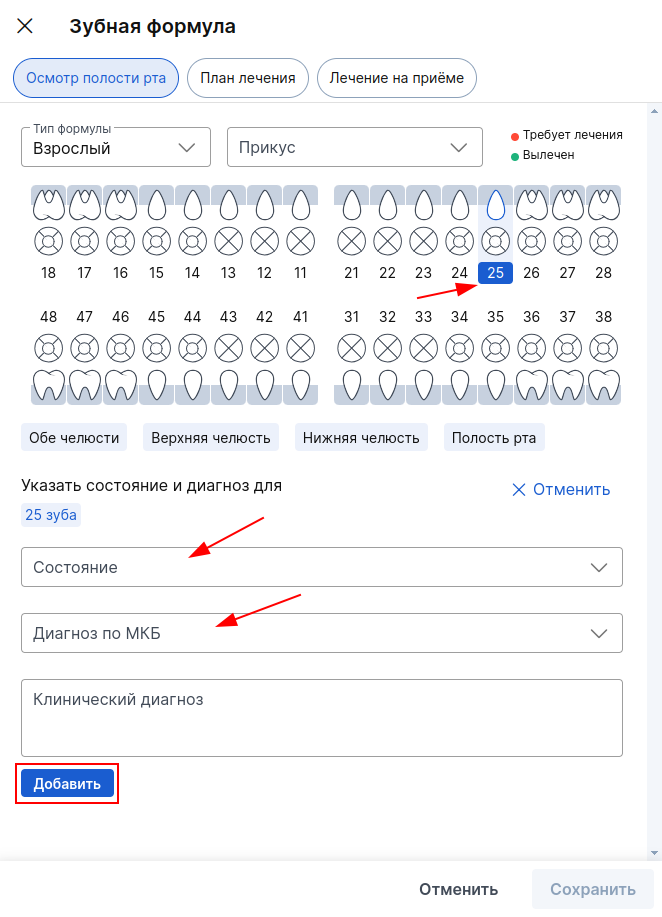
If several different teeth have the same diagnosis, you can select them at once and specify the diagnosis, it will be applied to each tooth.
6. When you have entered all the necessary data, click «Сохранить».
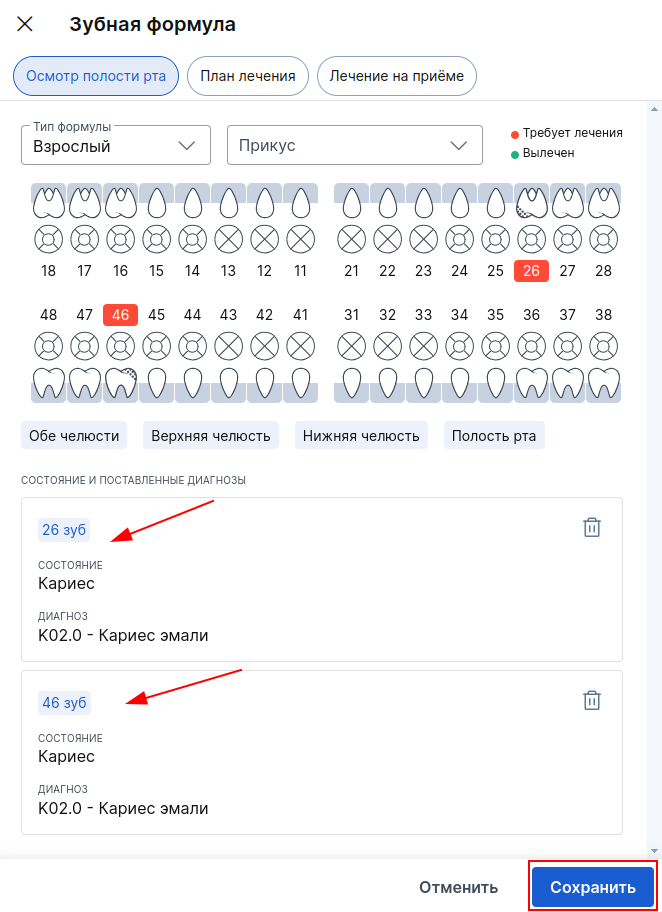
The added information will be displayed in the protocol, and the teeth that were diagnosed will be marked in red.
How to create a treatment plan in the protocol
- To add a treatment plan, click on the po button«Добавить план лечения».
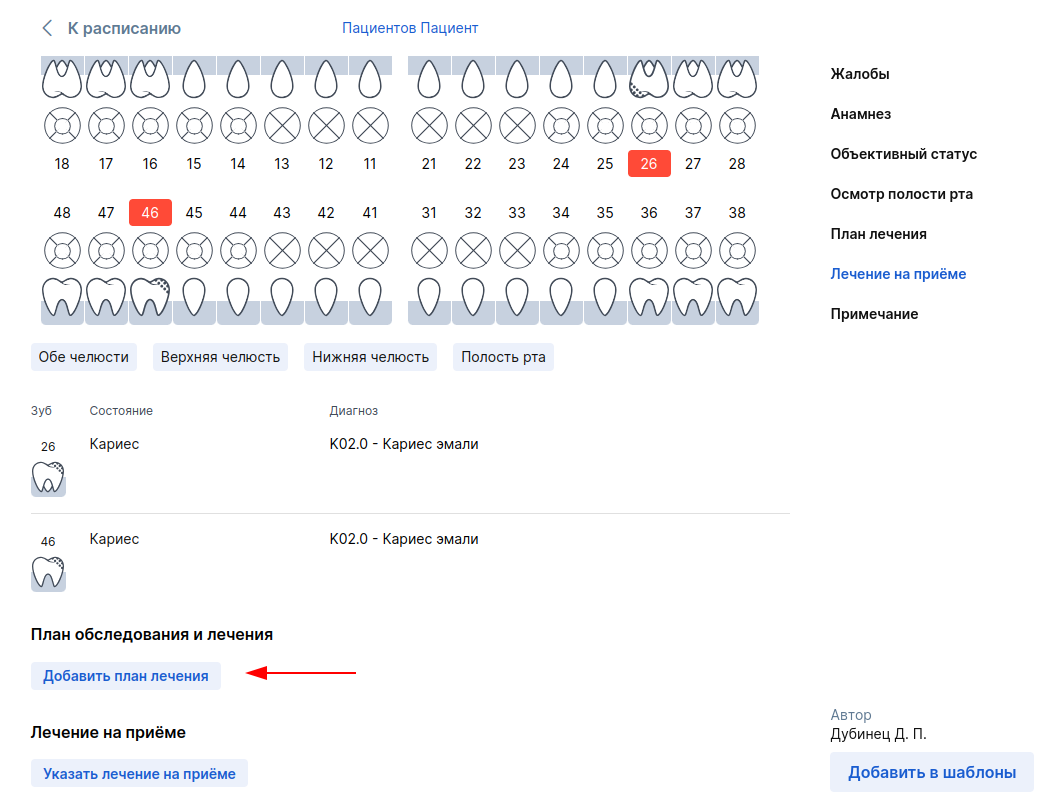
You can also switch to the tab in the window for adding dental information«План лечения».
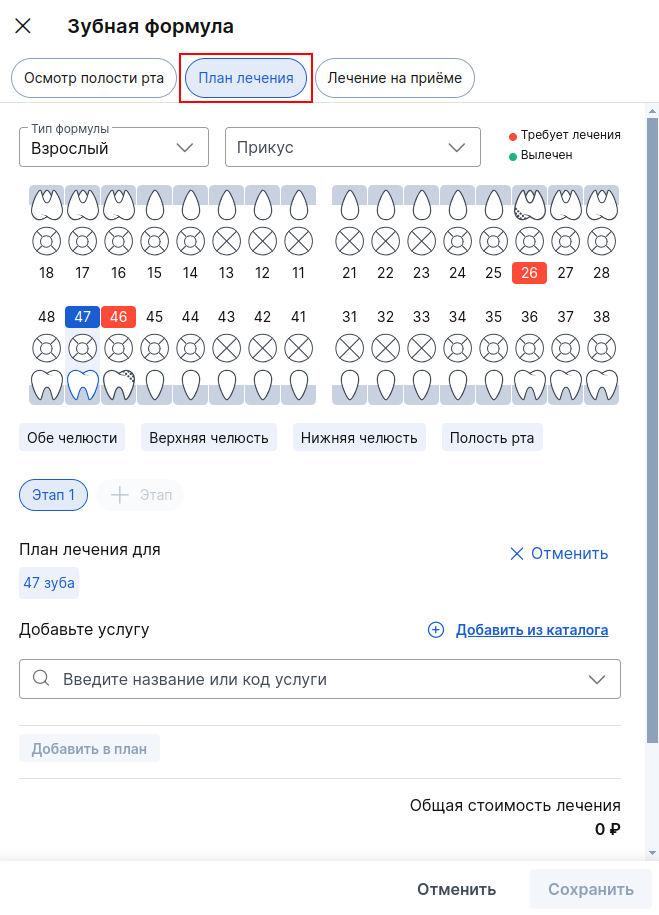
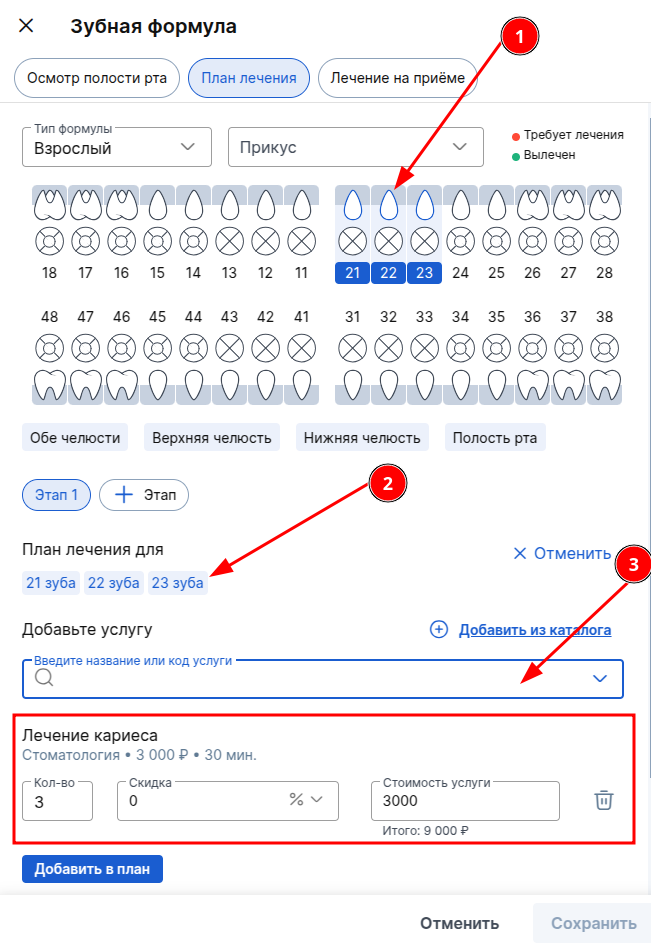
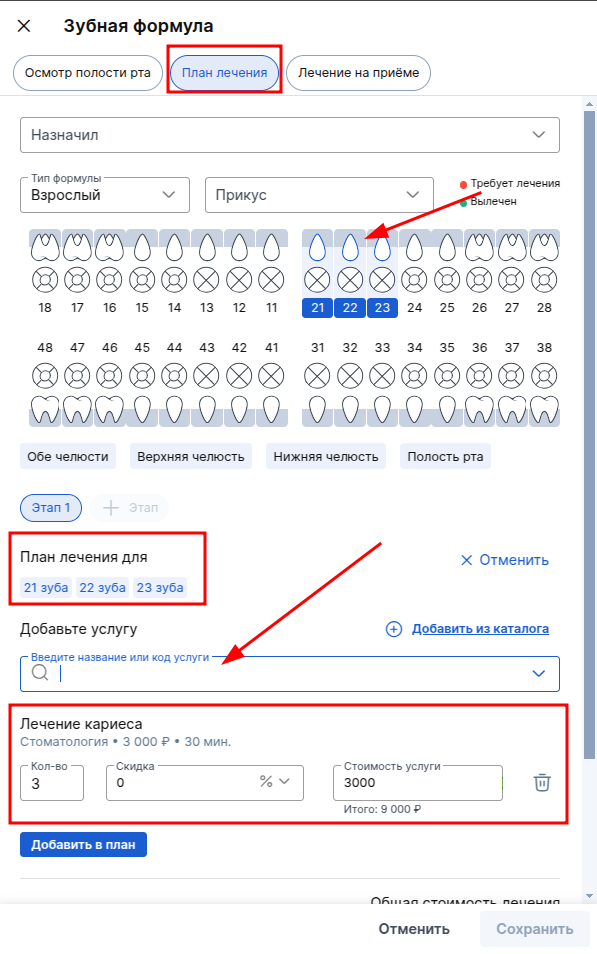
2. Select the desired tooth, part of it, or several teeth. The treatment can be divided into several stages, and it will be possible to complete stage 2 only after saving the data in the first one.
Specify the necessary services for a tooth (or several teeth), then click «Добавить в план».
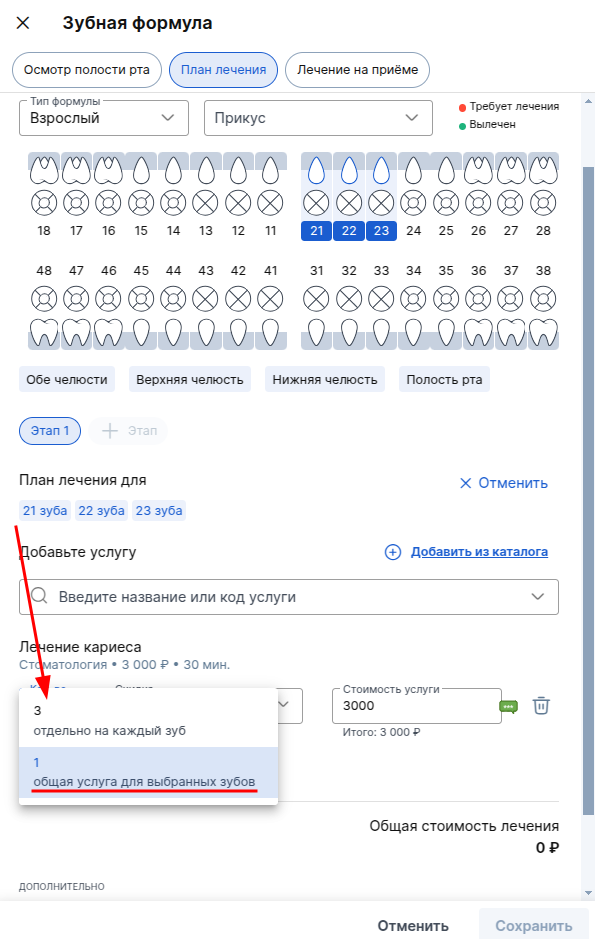
If you need to select one service for several teeth at once, click on the value of the number and select the desired option (for example, if you need 1 service for 3 teeth - "Caries", you need to select the item "General service for selected teeth"
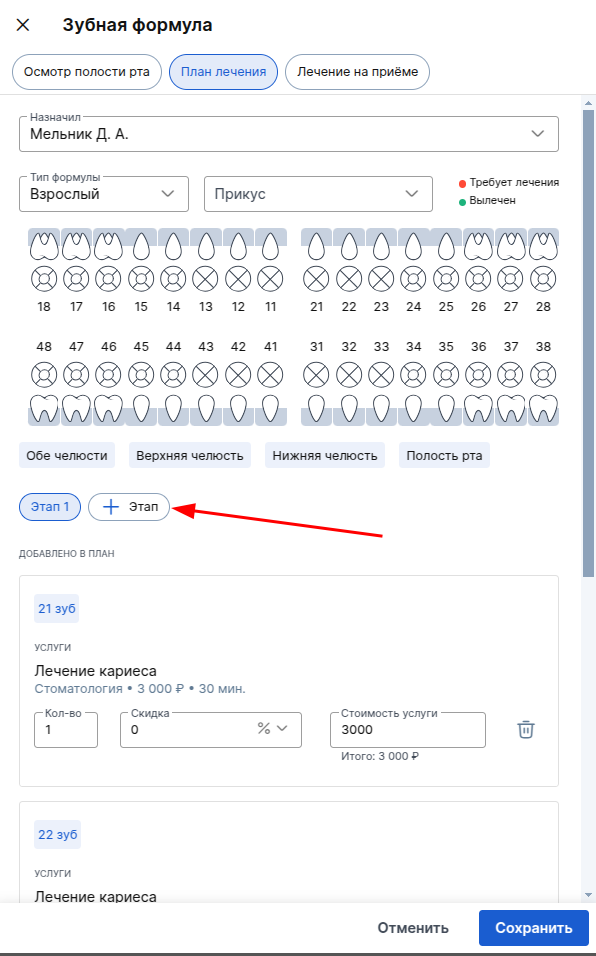
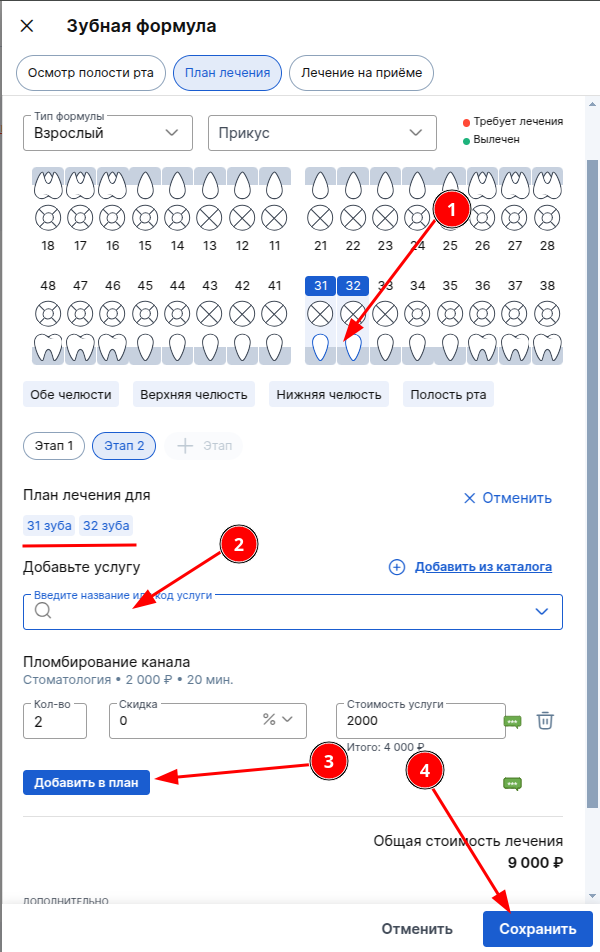
3. To specify the services in step 2, click on «+Этап», and then on the desired tooth.
4. After entering all the necessary data, click «Сохранить».
5. The completed treatment plan will be displayed in the protocol. If you need to edit it, click on «Редактировать».
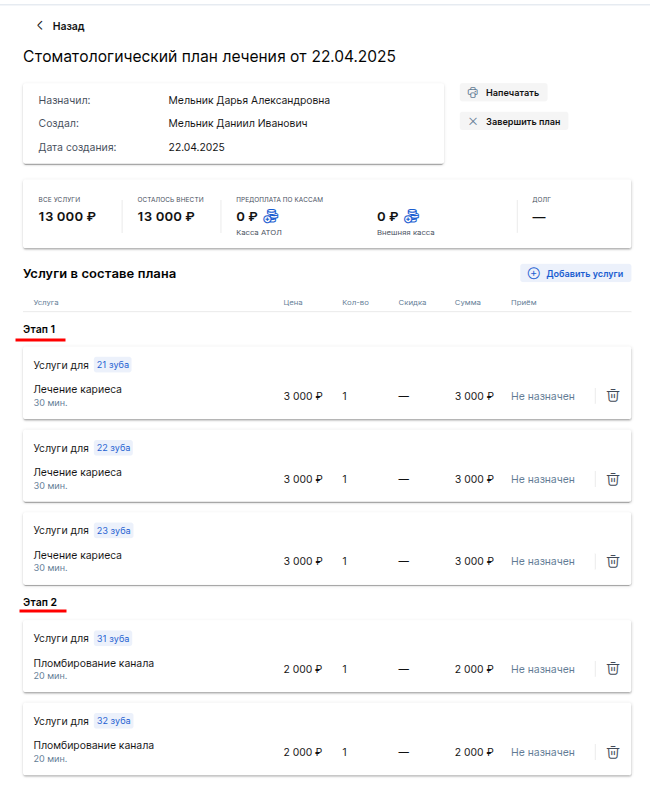
If you also use the module«Личный кабинет пациента», be sure to confirm the patient's phone number. Then the created treatment plan will be sent to the patient's personal account«МедТочка». It will allow you to view the condition of your teeth, scheduled services, and quickly make an appointment for a follow-up appointment.
How to indicate the treatment performed at the reception in the protocol
- To add information about the treatment performed at the appointment, fill in the text field if necessary.
And to specify the specific services provided to the patient, click on the button«Добавить услуги».
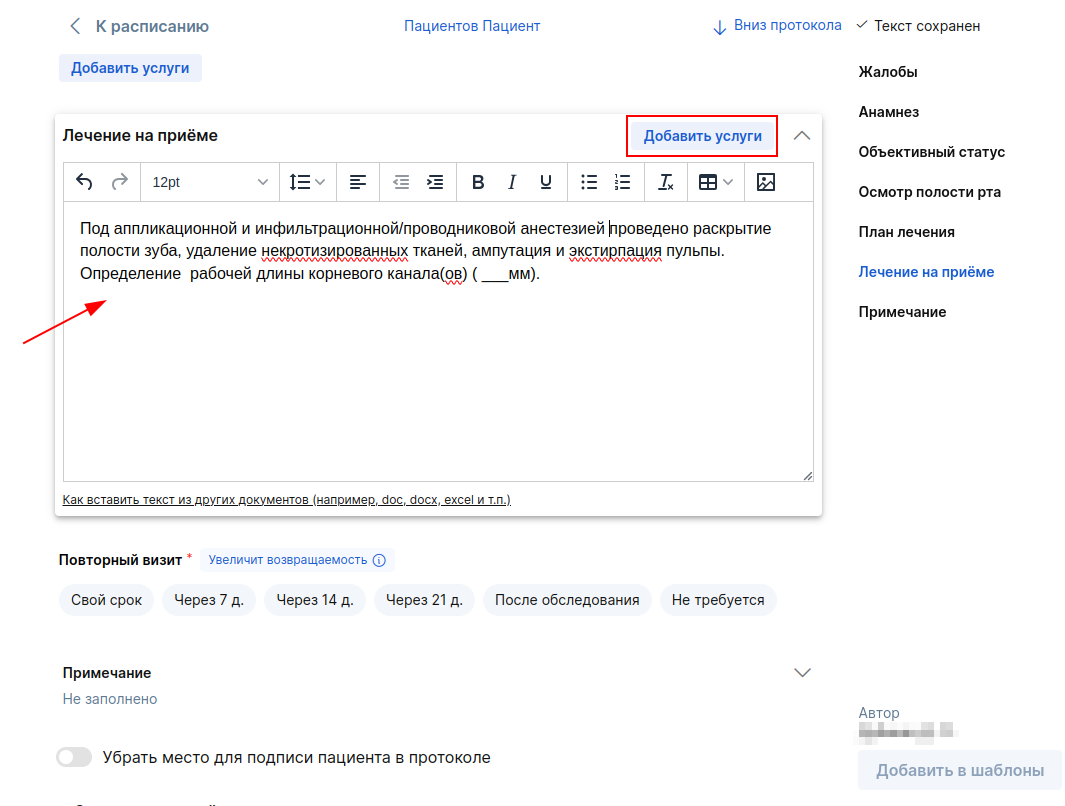
You can also switch to the tab in the window for adding dental information«Лечение на приёме».
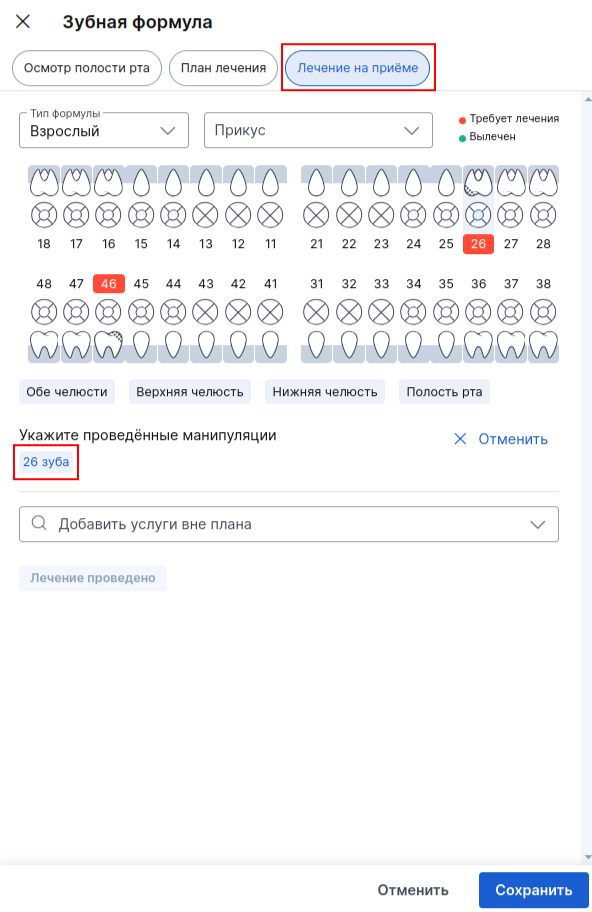
If a treatment plan has been drawn up for the tooth, it will immediately pull up through the window.
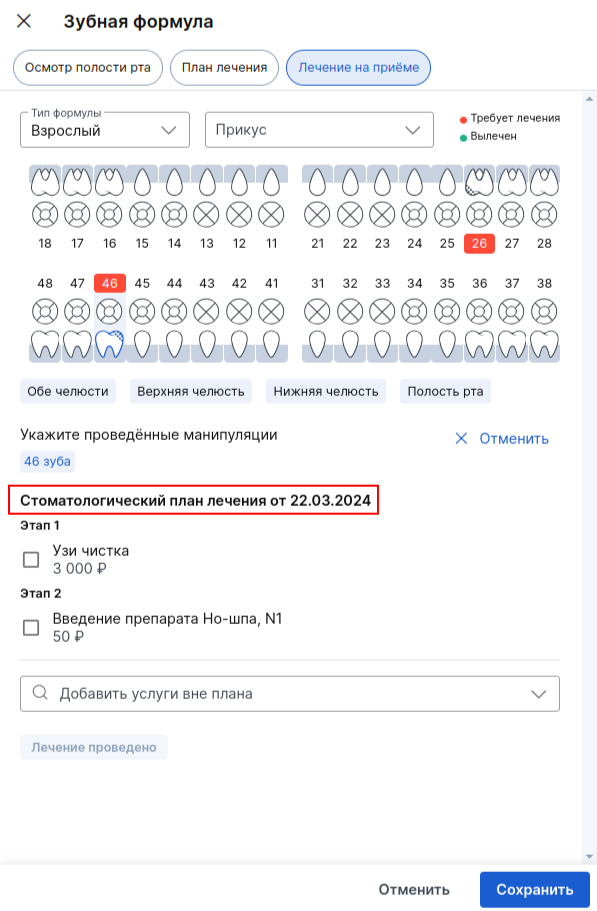
2. To select the services that were provided at the reception, click on the checkboxes. If other services have been provided outside of the treatment plan, then indicate them in the appropriate line.
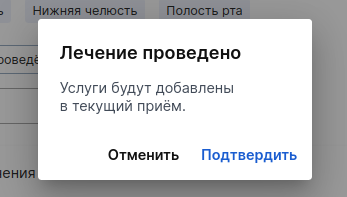
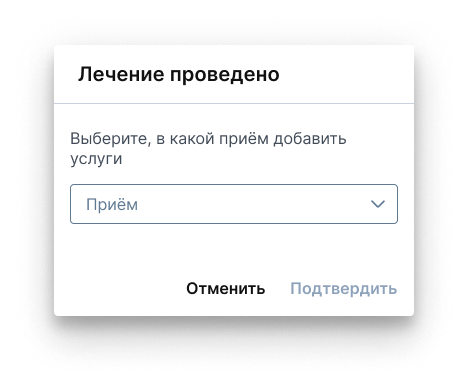
3. After adding all the services, click on «Лечение проведено», and then «Сохранить»the listed services will be added to the reception.
4. The saved services will also be displayed in the protocol.
After completing the protocol, you can immediately print the document to the patient.
When printing the inspection report, two files are generated:
1. An abbreviated version is prepared for the patient - a Conclusion.
2. A more extended document will be created for the doctor - the Examination Protocol.
3. If a treatment plan has been created, it is also available for printing.
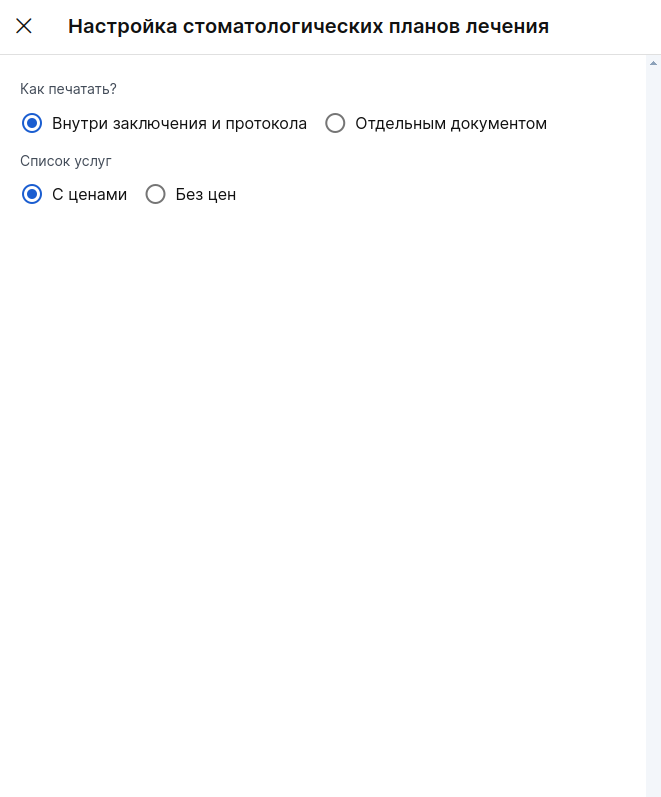
The treatment plan can be printed separately from the protocol. To do this, go to the module «Стоматология»and click «Настроить»: in the window that opens, select how to print the dental treatment plan.
Dental formula in the patient's profile: how to work with it
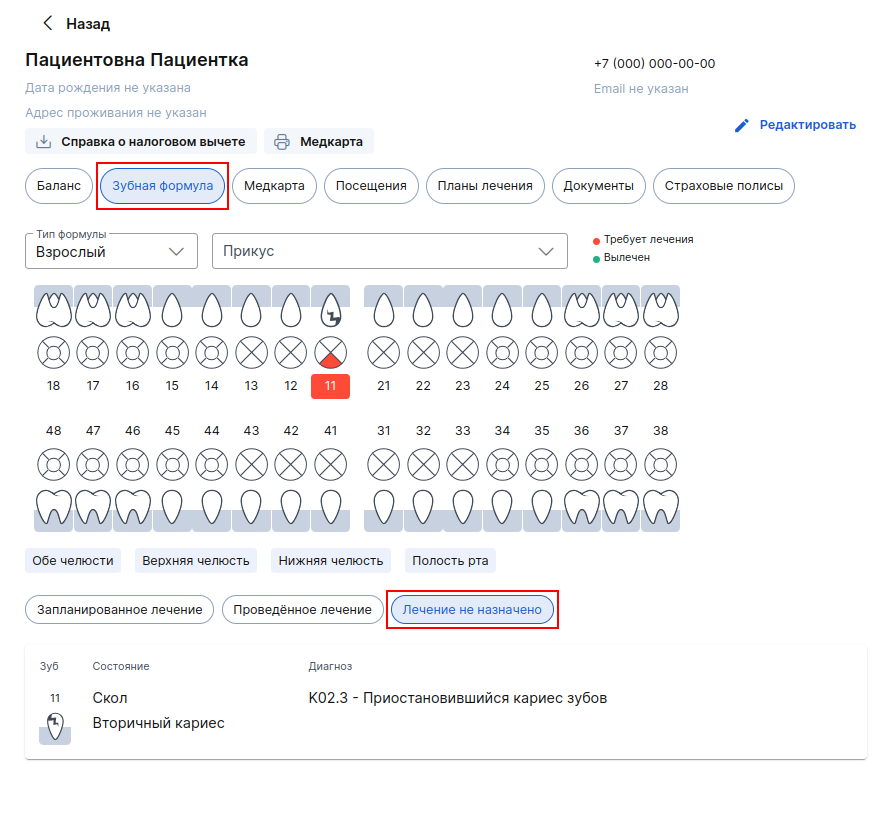
You can enter data into the patient's dental formula without creating a protocol. To do this, go to the patient's profile and open the section«Зубная формула».
Without an appointment with the status«Начат визит», it will be possible to add data on the current condition of the teeth and make a treatment plan. You will not be able to specify the treatment performed at the reception.
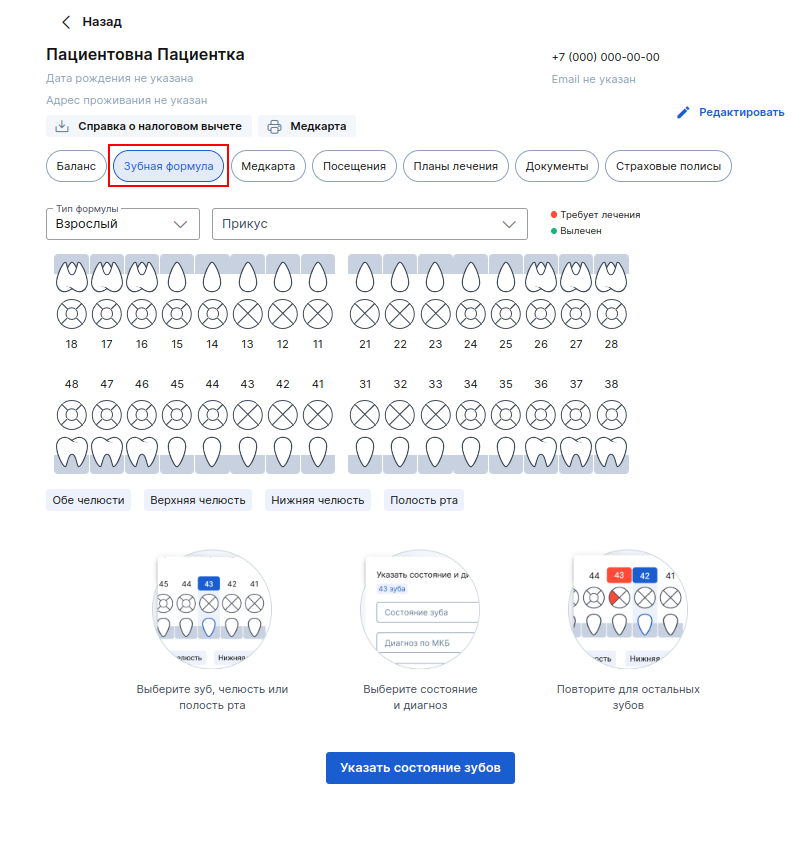
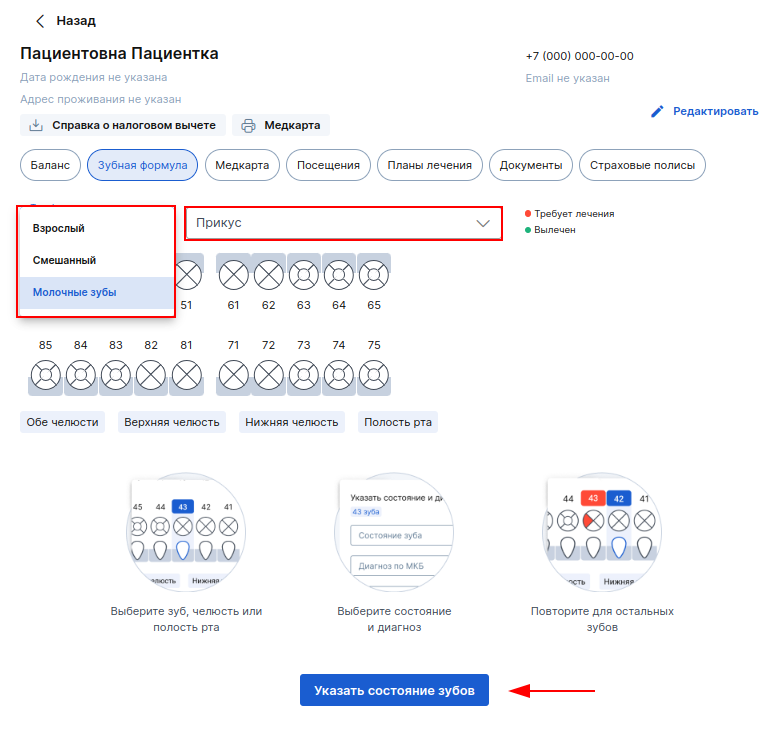
1. To correctly display the formula, select the type of formula according to the patient's condition, and specify the bite if necessary.
To enter the current dental condition, click on the desired tooth (part of it) or click on the button«Указать состояние зубов».
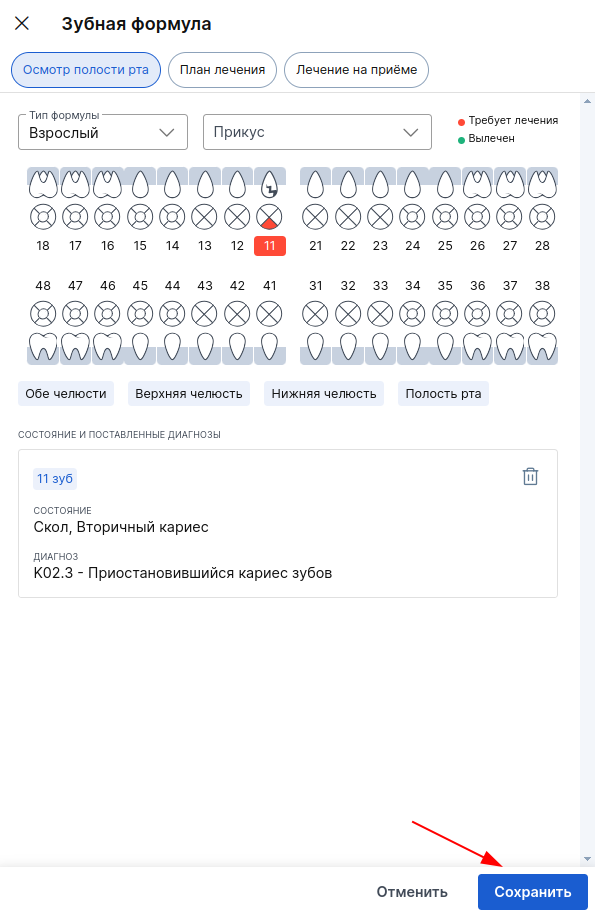
2. A window with the selected tooth will open on the right, in which you need to indicate its condition and diagnosis. After entering the data, click «Добавить».

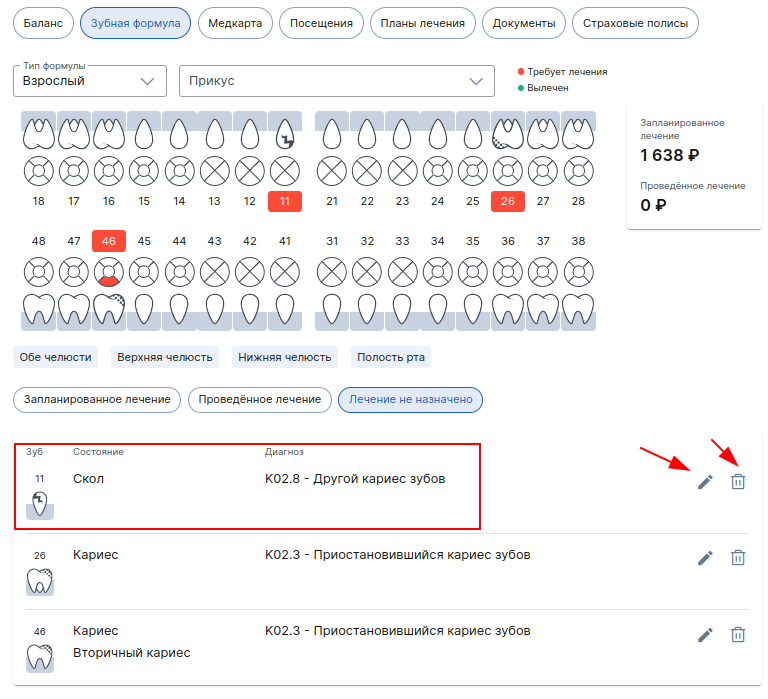
3. Save the entered data: after that, the information will be displayed in the dental formula in the patient's profile in the section«Лечение не назначено».
If you need to edit the already specified tooth condition, then click on the pencil. If you need to delete a condition, click on the trash to do this.
How to create a dental treatment plan in the patient's profile
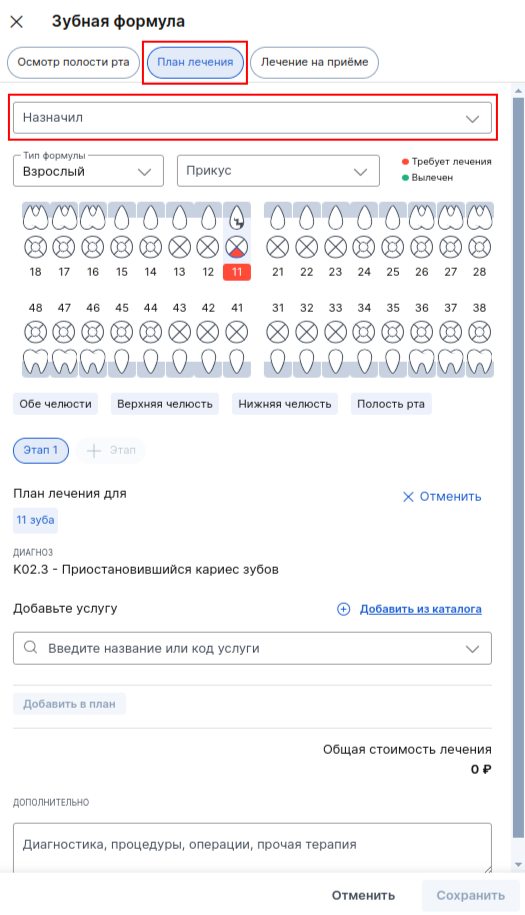
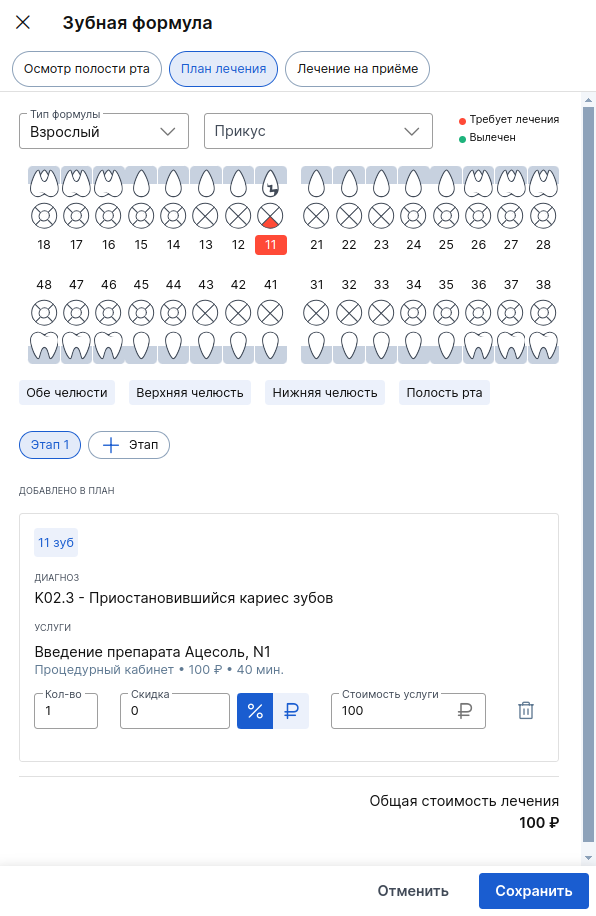
- To create a treatment plan, go to the section «Запланированное лечение»and click on the button «+ План лечения»or switch to the tab «План лечения»in the data addition window.
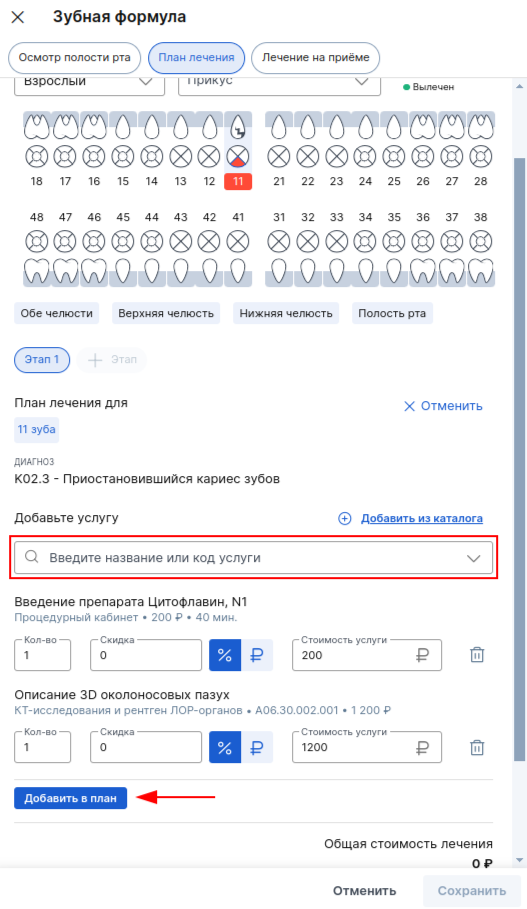
2. Specify who prescribed the treatment plan, select dental services, add them to the plan by clicking «Добавить в план»and save.
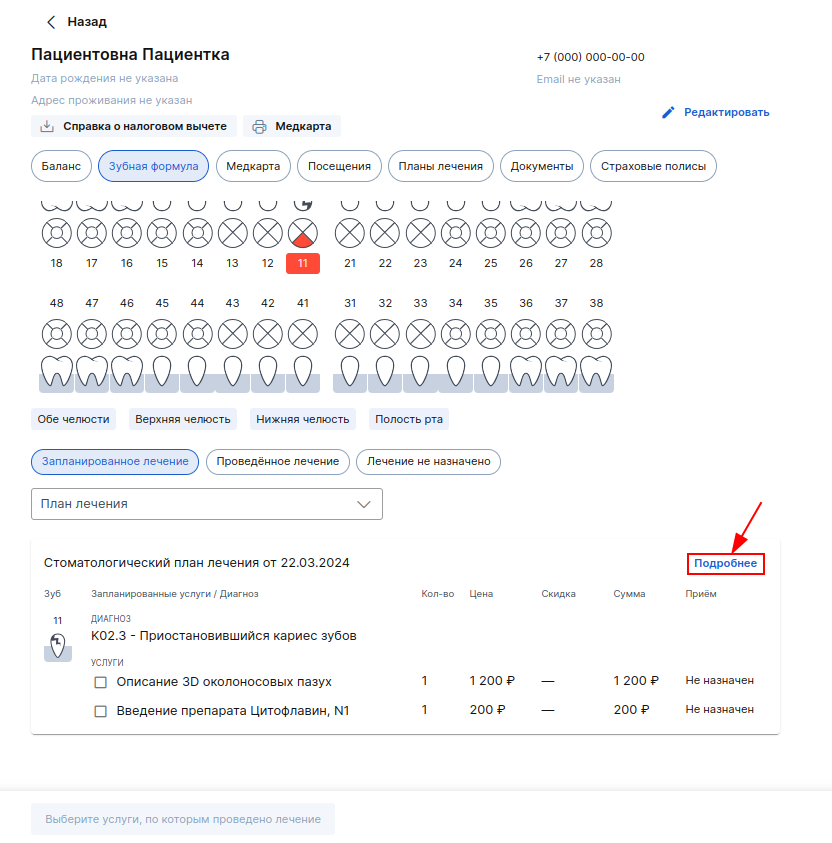
3. The created treatment plan will appear in the section«Запланированное лечение». When a patient has several treatment plans, use a filter to view a specific one.
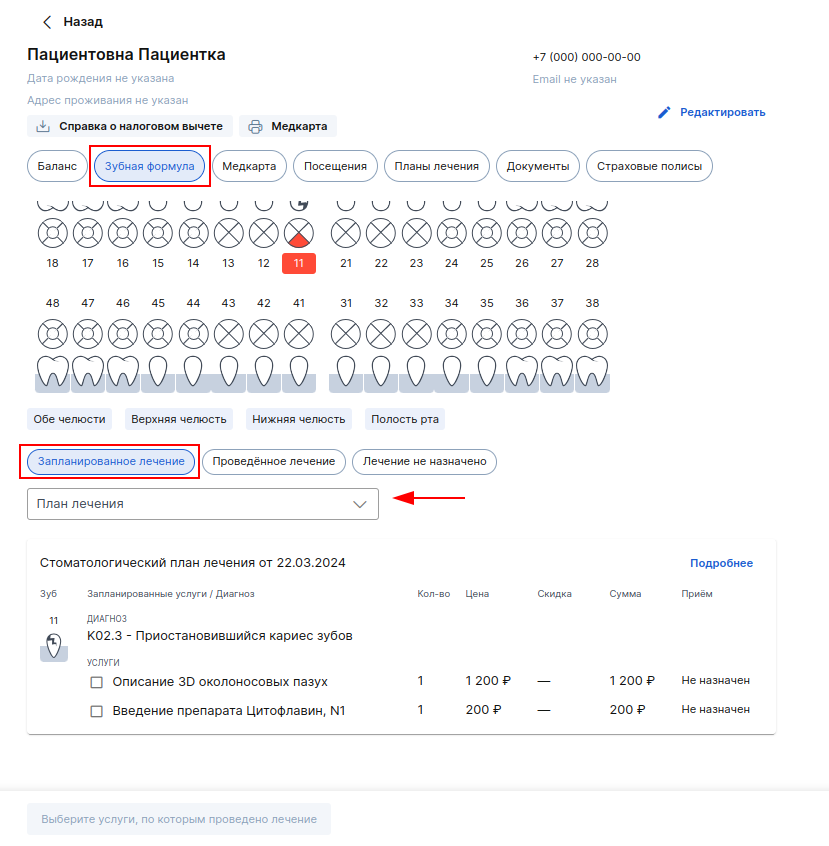
4. To view the information on the treatment plan or edit it, click on the button«Подробнее».
5. To edit, click «+ Добавить услуги», and then click on the desired tooth or part of it.
Here you can also remove services from the treatment plan.
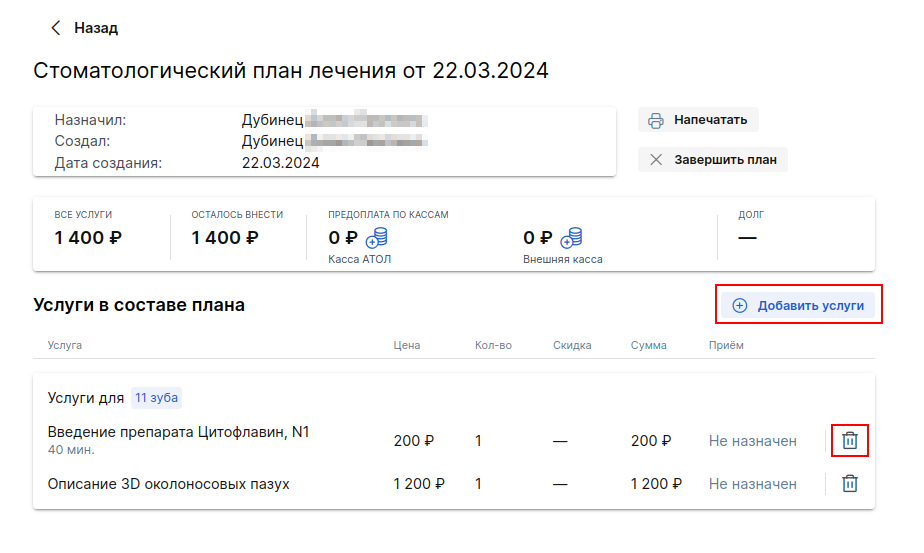
6. Add the necessary services to the treatment plan and save the changes.
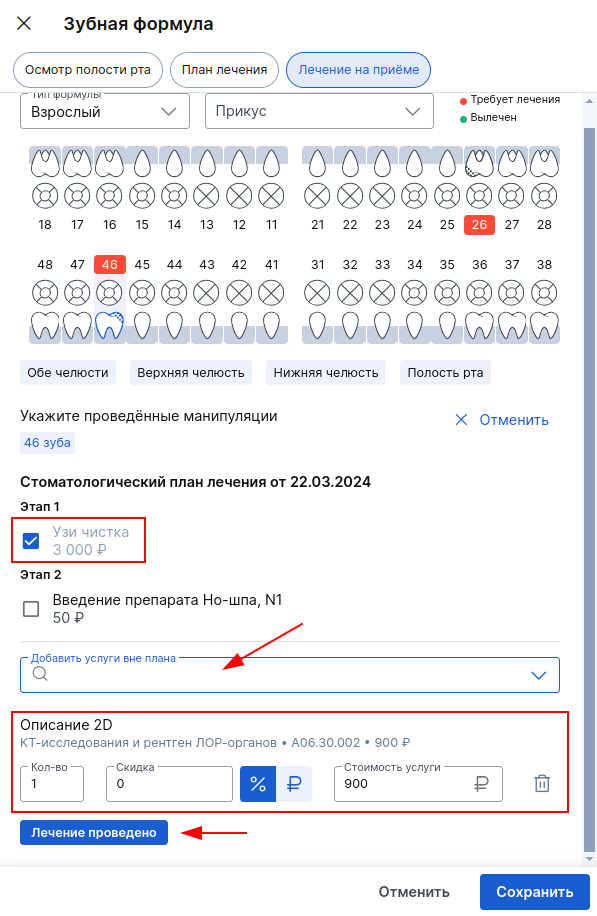
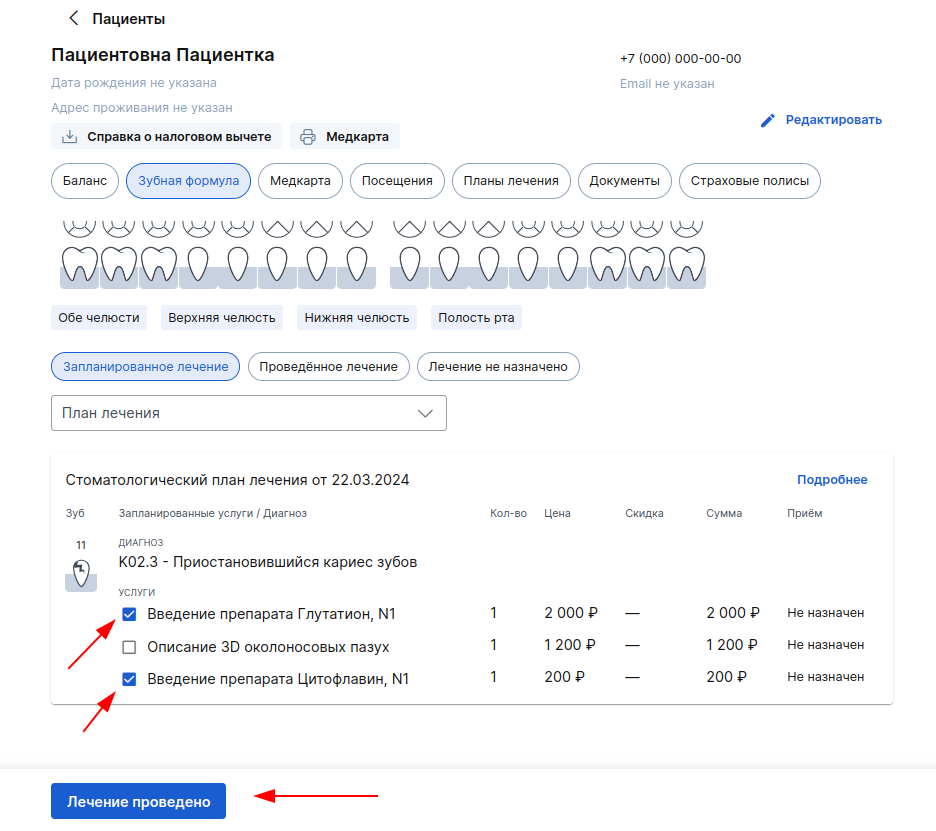
7. If the patient has an appointment with the status«Начат визит», then the services from the created treatment plan can be added to the appointment.
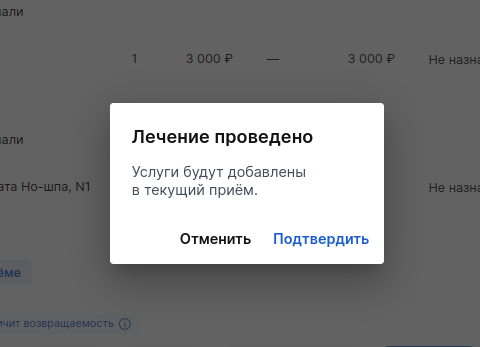
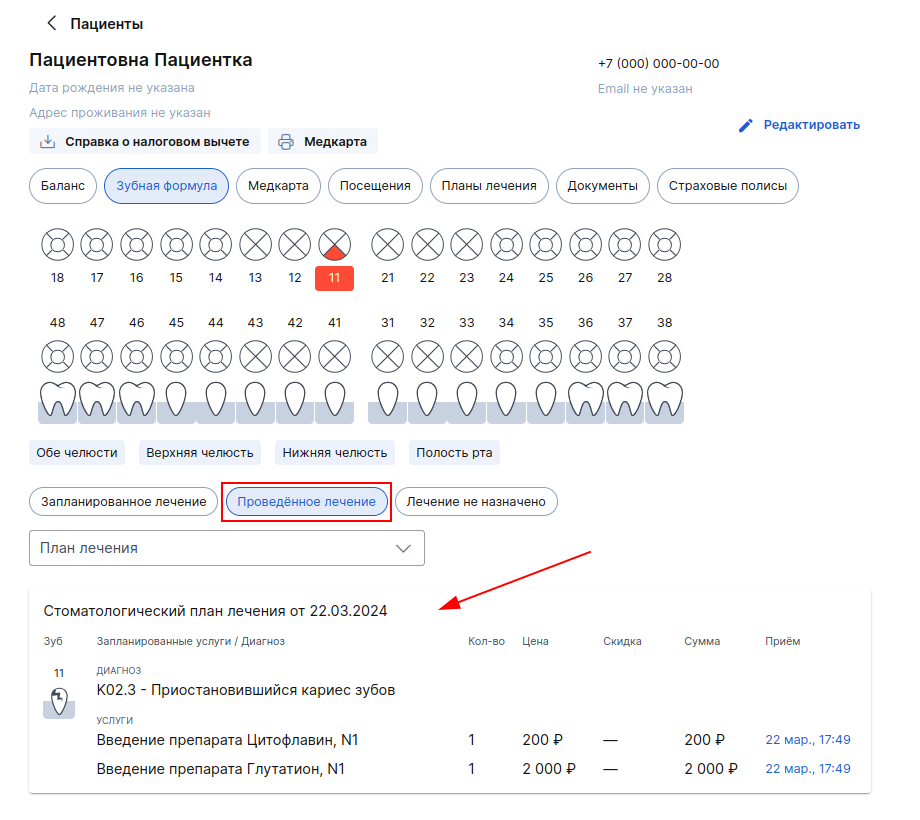
To do this, select the necessary services, click on the button«Лечение проведено», and the services will be displayed in the section «Проведённое лечение»and added to the reception.
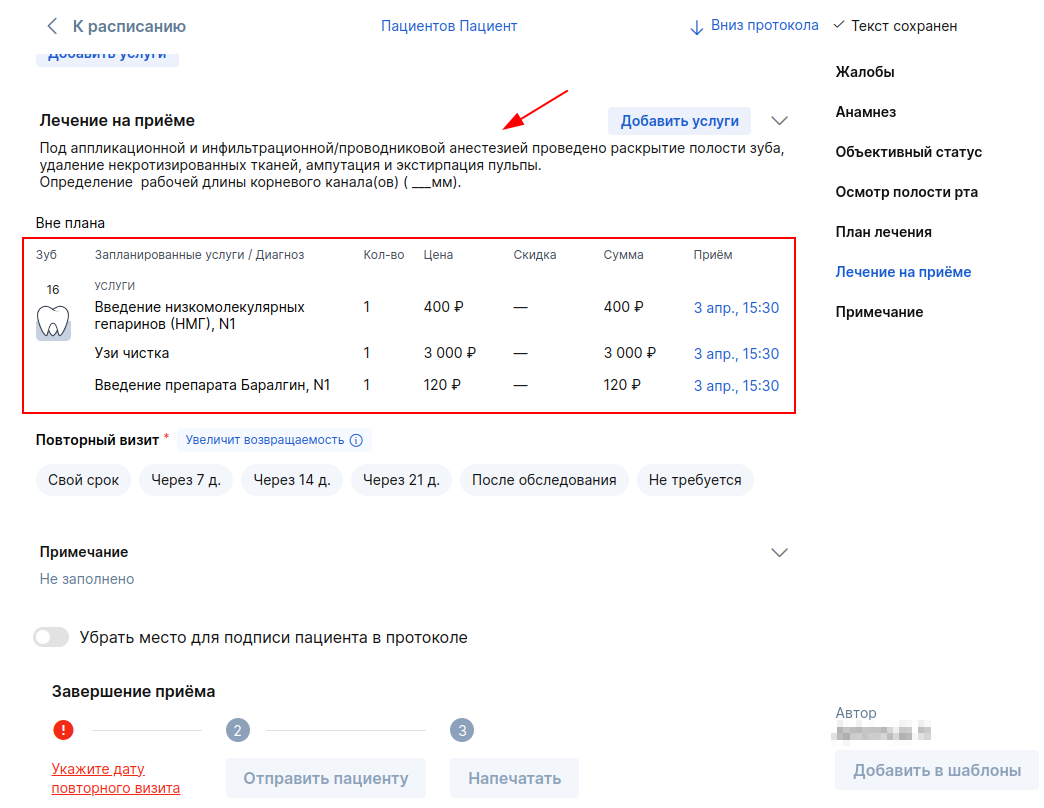
After adding services to the reception, make sure that some services in the reception are not superfluous, if necessary, delete them.
How to specify the treatment performed at the reception
- To work with the section«Проведённое лечение», it is necessary that the patient has an appointment with the status «Начат визит».
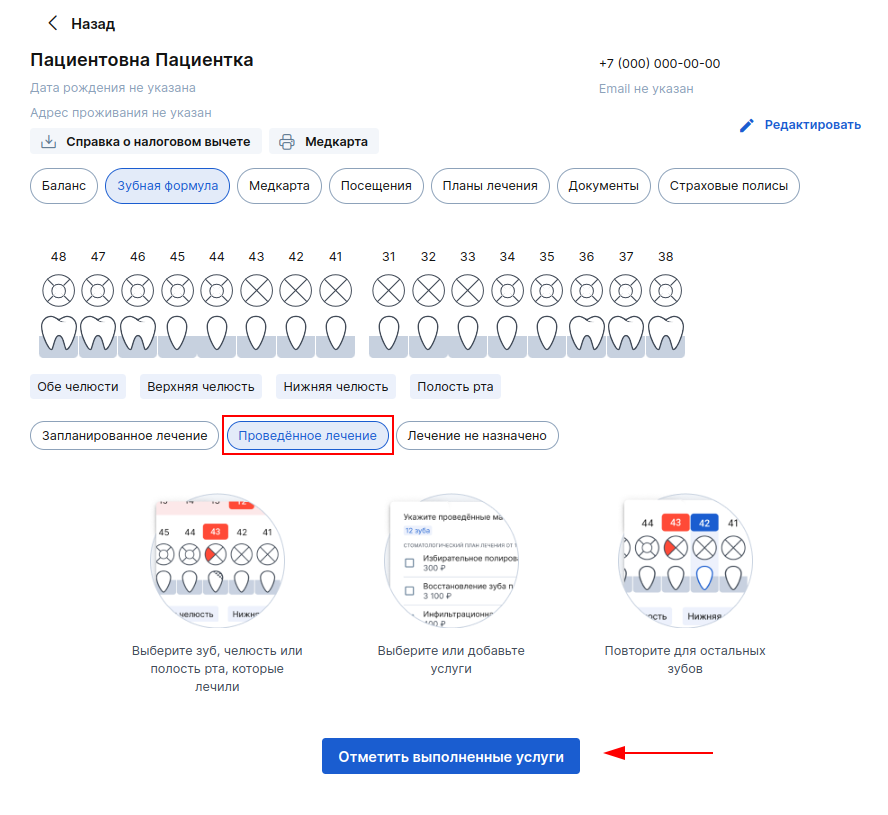
To indicate the treatment given to the patient, go to the section «Проведённое лечение»and click on «Отметить выполненные услуги»or switch to the tab «Лечение на приёме»in the data addition window.
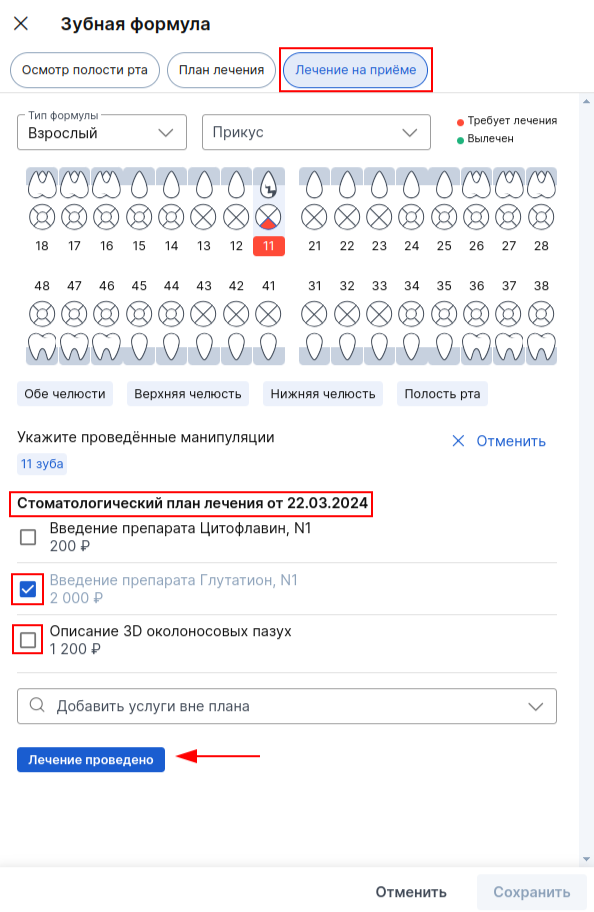
2. Select the desired tooth, check the box for services from the treatment plan that were provided to the patient, select services outside the treatment plan, if necessary, and then click the button «Лечение проведено»to save the data.
3. If the patient has several appointments with the status«Начат визит», then select which appointment you want to add services to.
After adding services to the reception, make sure that there are no unnecessary services in it, if necessary, delete them.
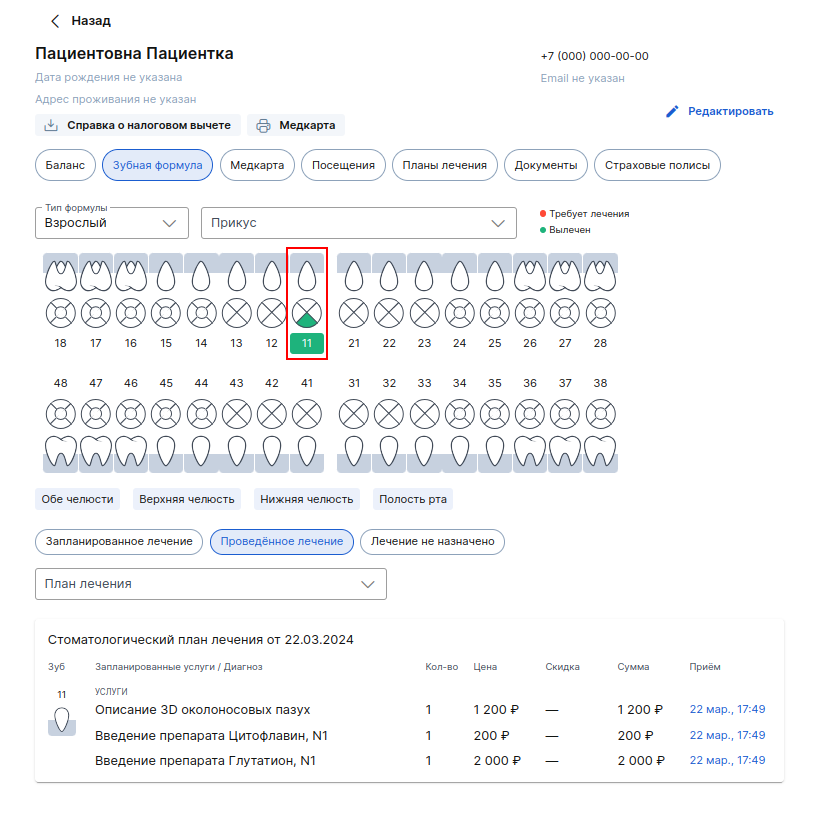
When all the services planned for the tooth are provided, it will become healthy and will be displayed in the dental formula in green.
Features of dental treatment plans for minors and incapacitated patients
If a dental treatment plan is created in the admission protocol, it will automatically be sent to the health care provider specified in the admission. In the medical section, the treatment plan will appear in the section «Мои зубы».
When editing the protocol, the updated version is always sent to the patient.
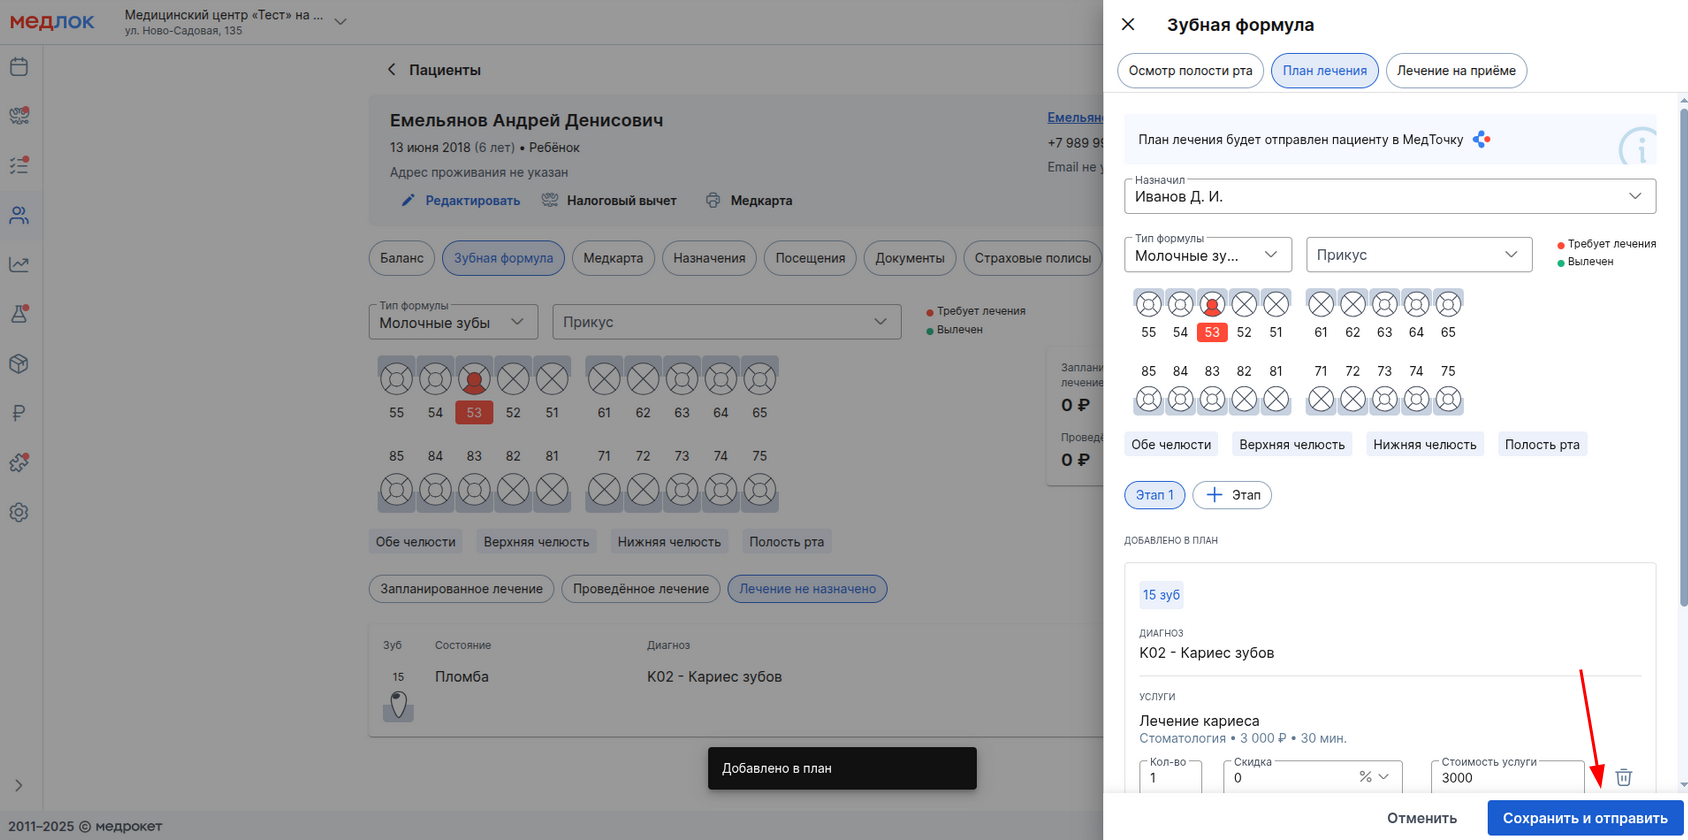
If you create a dental treatment plan in the profile of a minor or incapacitated patient, then before sending the plan, you can choose which of the guardians to send it to.
The treatment plan is created in the same way as for adult patients. After making a plan, click «Сохранить и отправить».
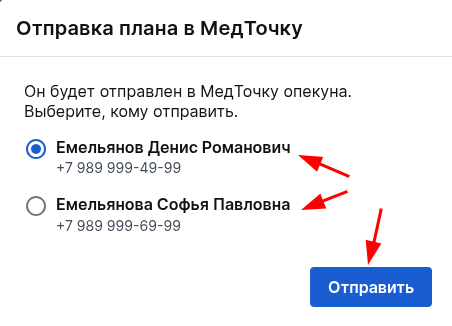
A window will appear with the choice of the caregiver to whom the dental treatment plan should be sent. Select a guardian and click «Отправить».
After that, the treatment plan will also appear in the guardian's medical card in the section«Мои зубы».
If there are caregivers who cannot be sent dental treatment plans to the medical center, an error will appear.
What errors can occur?:
- The guardian has a waiver of personal data.
- A local phone number or a foreign phone number is indicated.
- If there are no guardians to whom you can send files, an alert will appear in the file upload window.
- When you click on the button«Нет опекунов», a window opens with the reasons why it is impossible to send to each of the guardians.
You may also be interested in an article about working with the section.«Пациенты»