
The article contains sections: 
- Creating a schedule entry
- Making an appointment for a minor or incapacitated patient
- Sending appointment appointments to other services
- Chapter «Общее» — basic information about admission
- Chapter«Услуги»
- Chapter«Документы»
- Chapter«Похожие пациенты»
- For the doctor
- Frequently Asked Questions
Creating a schedule entry
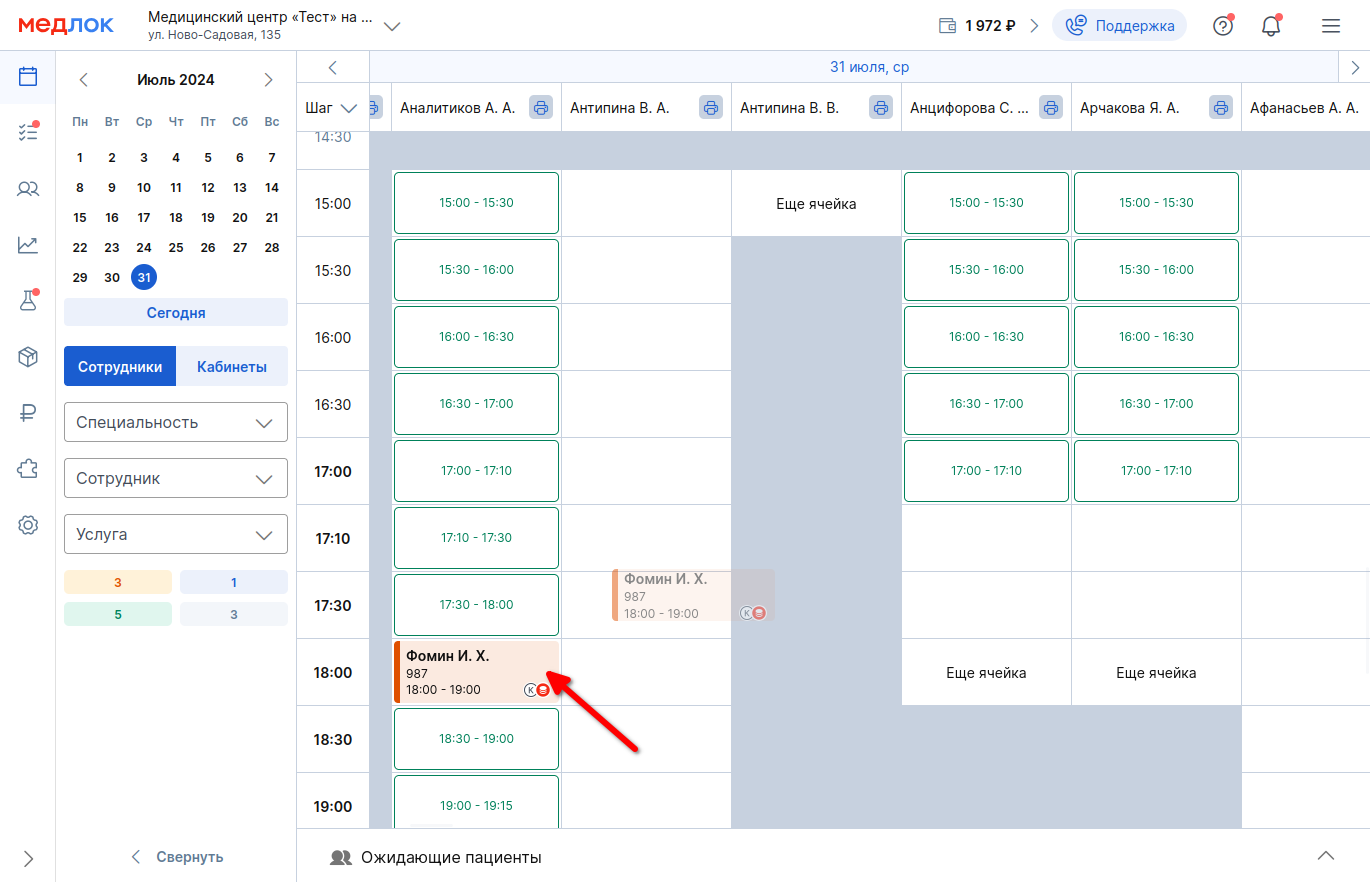
To record patients, go to the section«Расписание», select the time for recording the patient by clicking on the appropriate cell.
Writable cells are shown in white, inaccessible cells are shown in gray.
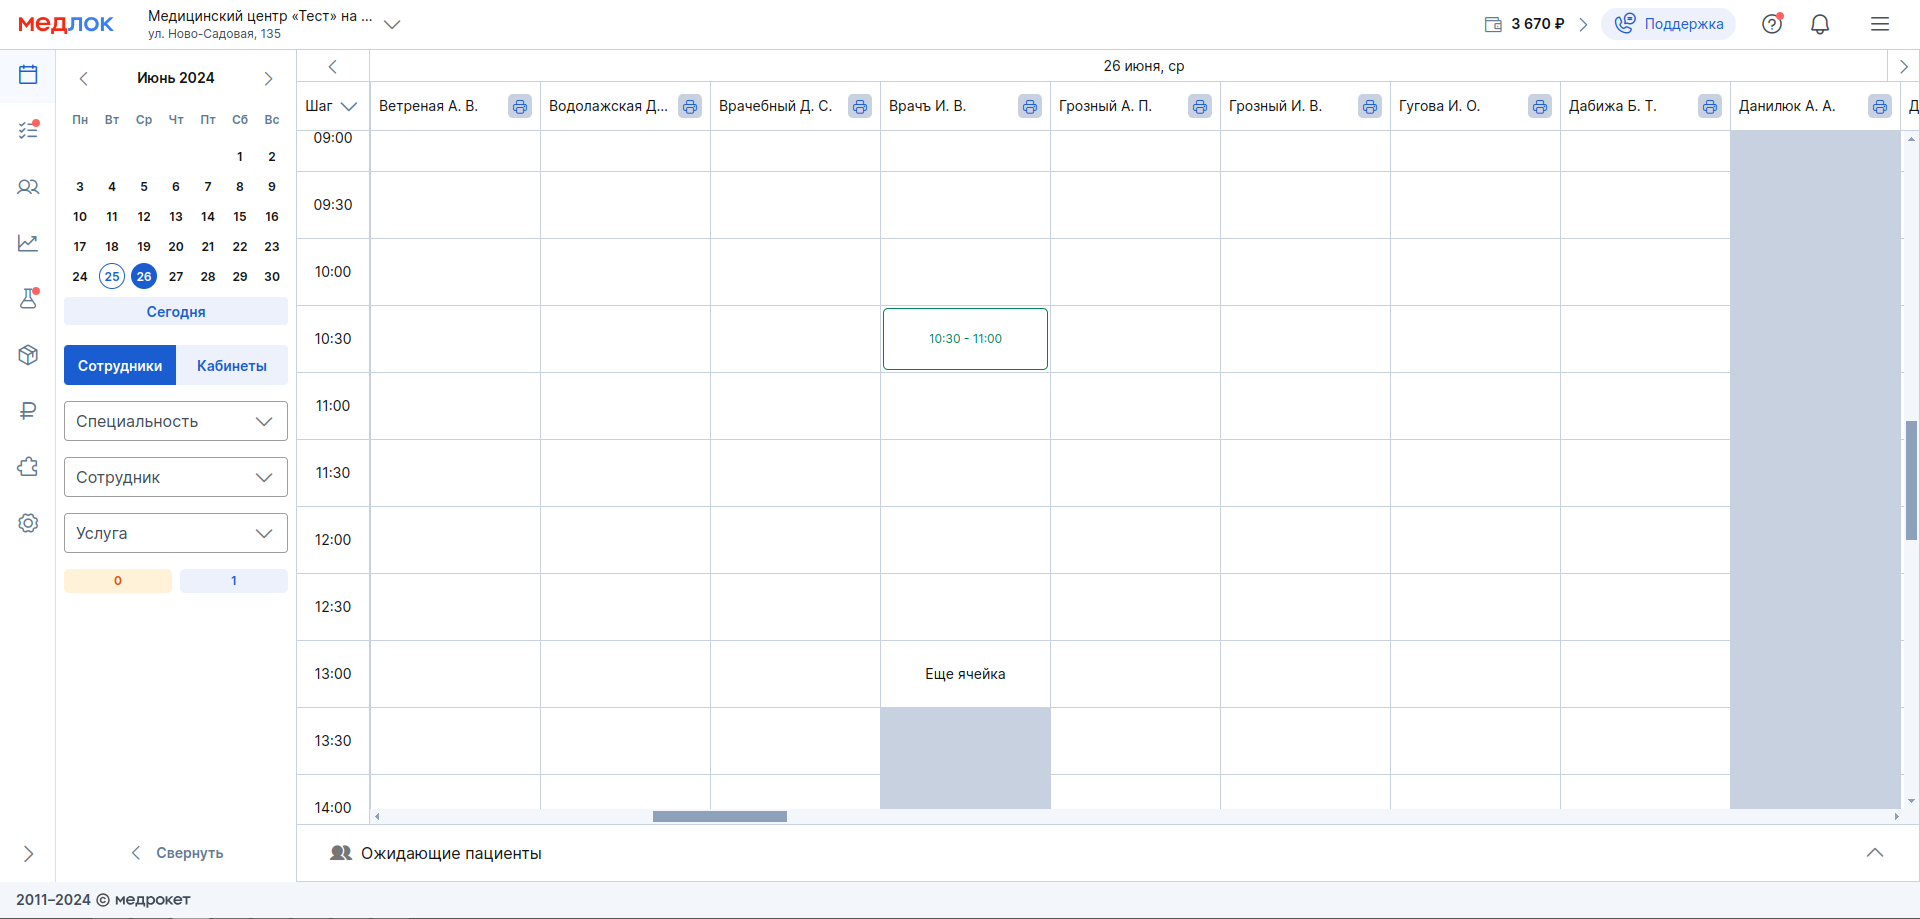
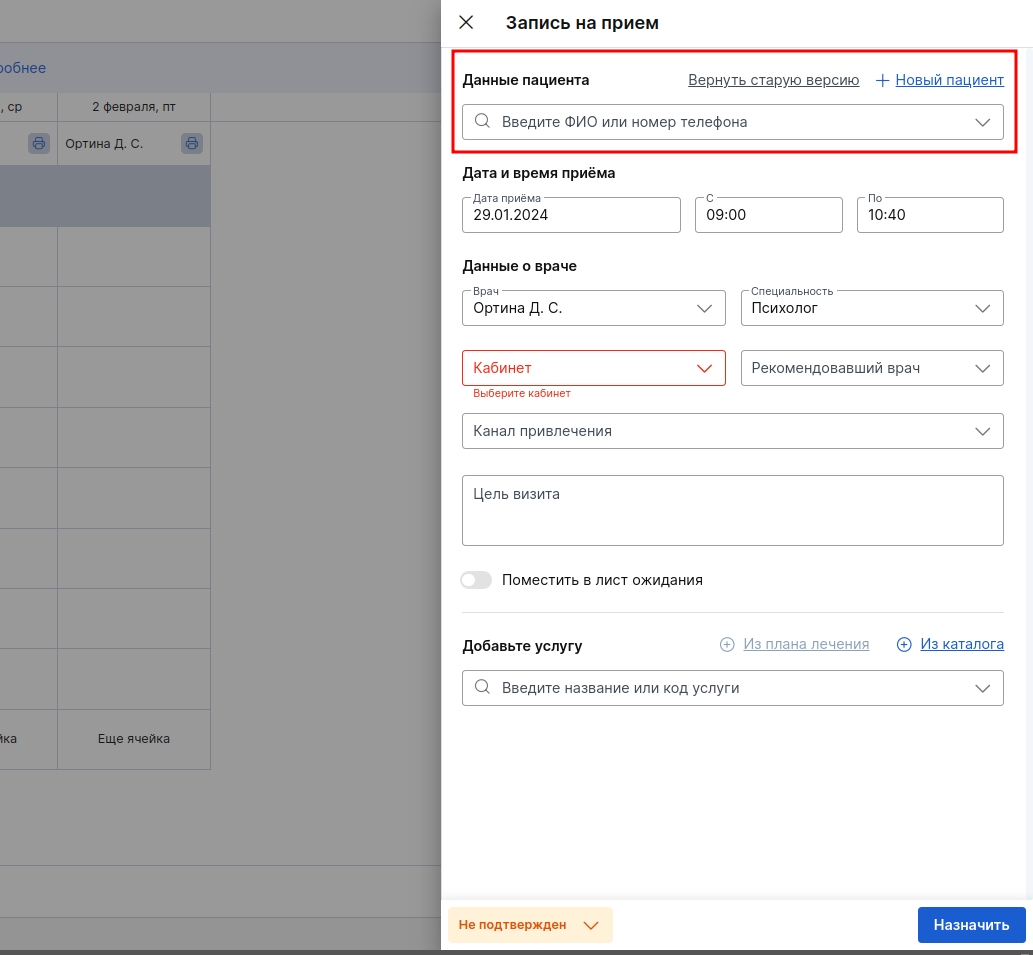
The side menu opens to make an appointment.
Fill in the fields:
- Select the patient's category (adult, child, or disabled citizen);
- Fill in the patient's details if he came for the first time, or find him by last name / phone number if he had previously been to the clinic.
When searching for a patient by phone or full name, all similar options will be displayed.
When the desired patient appears in this list, click on the line with his data, and they will automatically appear in the record.


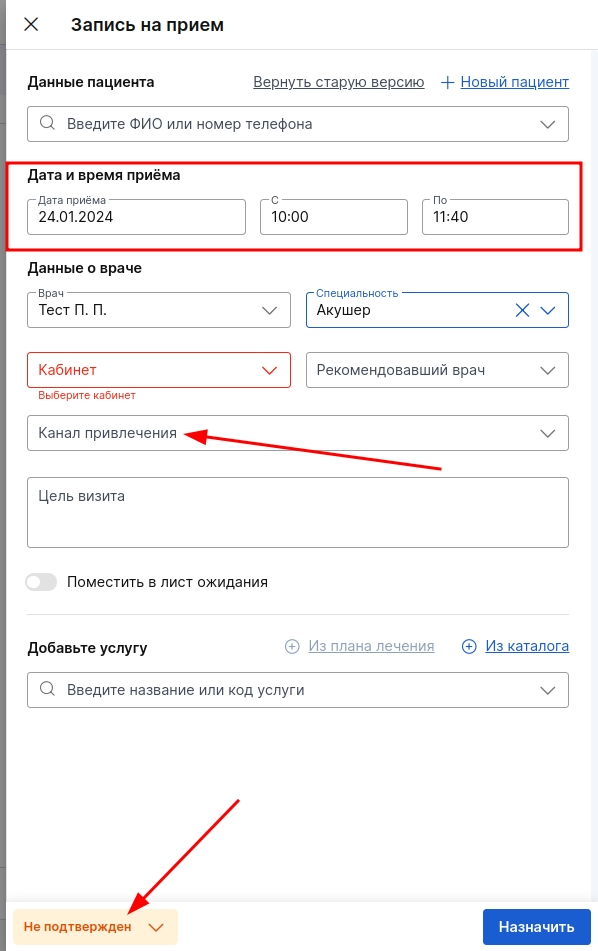
- Select the date and time of the appointment.
- Please specify below «Канал привлечения»if you plan to view analytics for this parameter in the future.
- At the bottom left, you can set the recording status. The following statuses are available: «Не подтверждён, «Подтверждён», «Пациент пришёл», «Начат визит», «Выполнен»and «Отменён».
- If the doctor has several specialties, select the one for which the patient is enrolled in the appropriate field.
- The purpose of the visit is a field for notes about the reception, that is, an administrator's comment.
- Here, the patient can also be added to the waiting list if he has asked to be rescheduled to an earlier date, if possible. All entries added to the waiting list are stored in the section«Задачи».
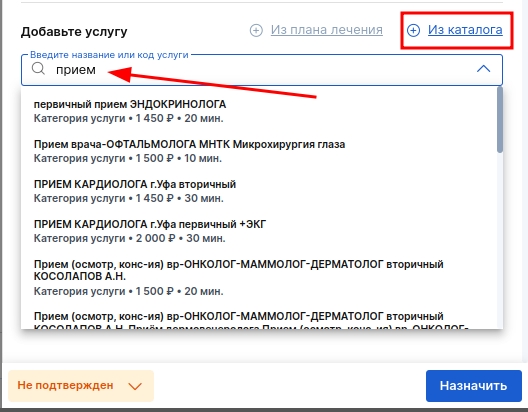
Next, you can select one or more services that the patient will attend, or you can leave the field empty.
To select a service, click «Добавить из каталога»— a window opens where you can select a service. Alternatively, enter the name of the service in the search bar and select the one you need.
For the selected services, you can specify the free cost in the appropriate field. If the price is less than indicated in the price list, the system will display this as a discount in rubles.
The initial price of the service according to the price list is always indicated under the name of the service.
You can also set a discount in rubles or percentages yourself using the button«%».
The «Стоимость услуги»price will be displayed in the field, including the discount.
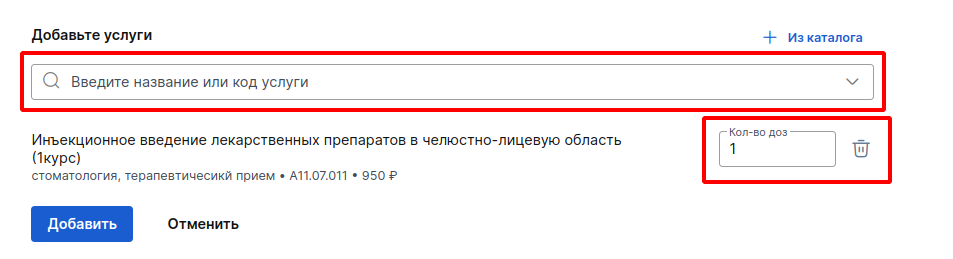
- When all the services are selected, «Итого»the total cost will be displayed in the line.
- To have the patient appear in the schedule, click «Назначить».
If you need to edit the patient's profile (add address, documents, etc.), click on the cell in the schedule and in the window that opens, click «Ред.»to the right of the patient's full name.
To go to the patient's profile, click on his full name.
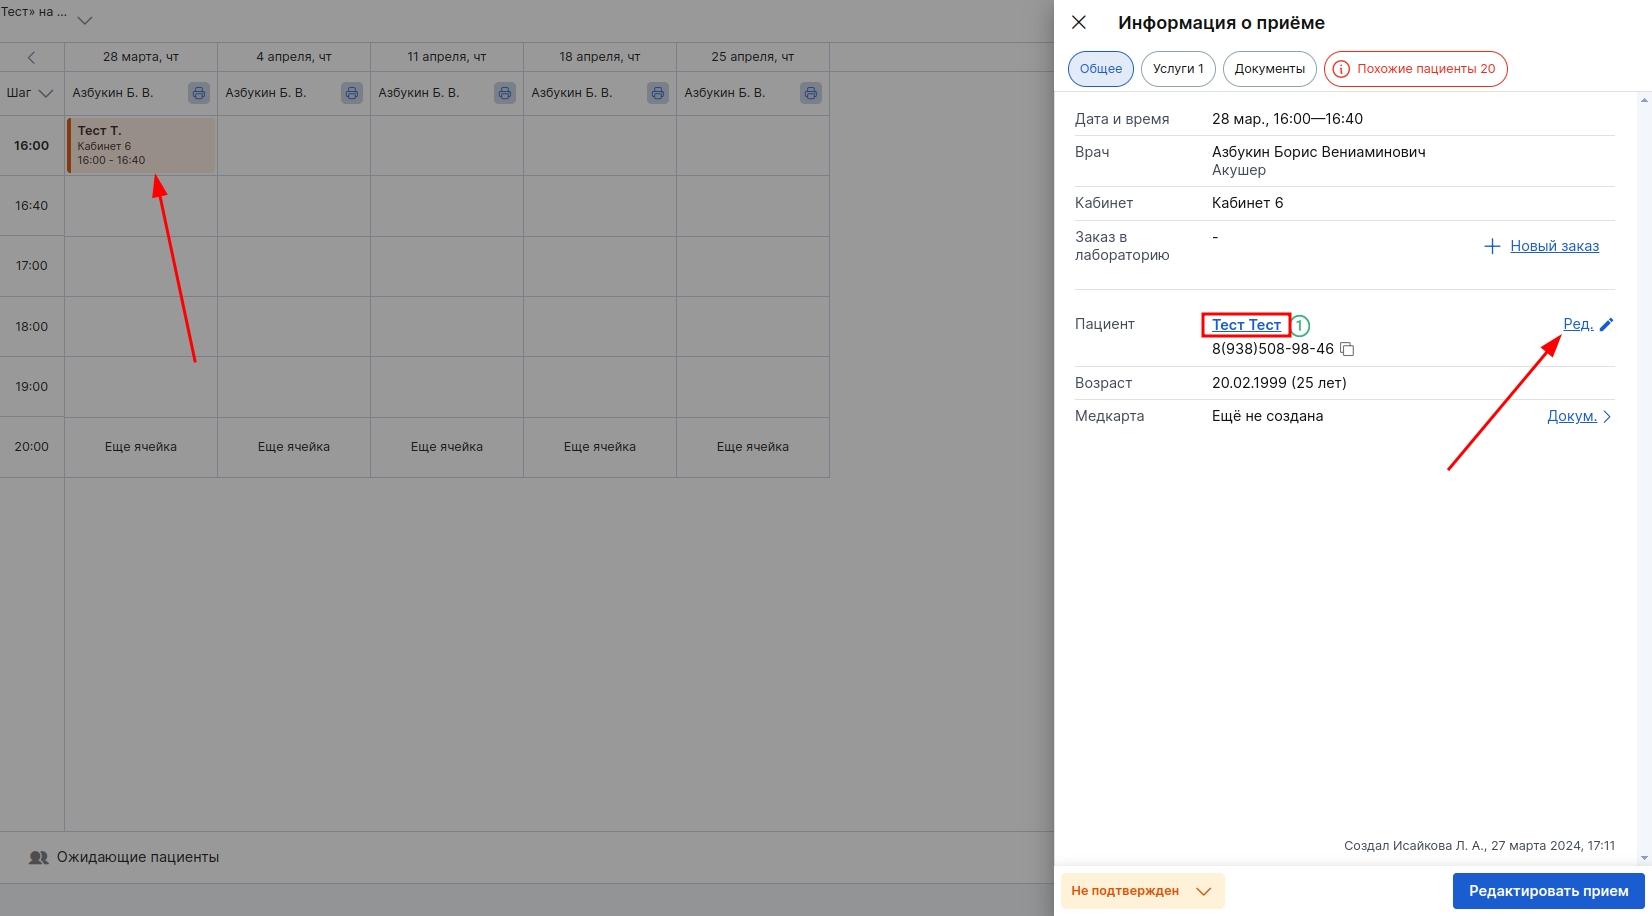
In the patient's profile that opens, you can make changes by clicking on the pencil to the right of the patient's full name.
After making the edits, save them.

You can find out about making an appointment for a minor or an incapacitated patient in the article Making an appointment for minors and incapacitated patients.
Sending appointment appointments to other services
If you «Личный кабинет пациента»have the or module enabled«Умная забота», the receptions created in the MedLock will be sent to the patient's or guardian's medical center, which is indicated in the admission.
If the patient or their caregiver has some bounce or slider enabled«Анонимный приём», then records will not be sent, the exception is online records via the or widgetProDoctorov. You can find out more about dealing with bounces in our article.
Window«Информация о приёме»
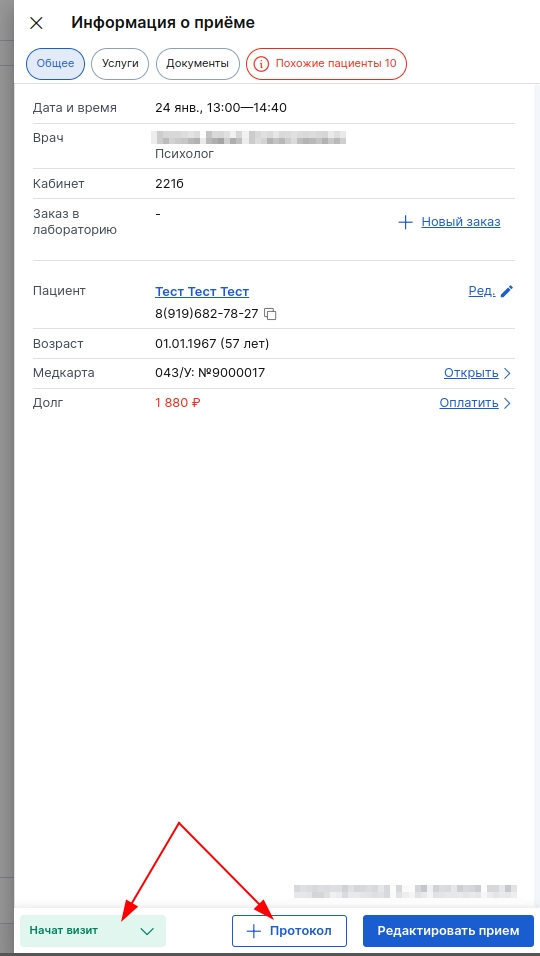
Chapter «Общее» — basic information about admission
- Date and time of recording, full name and specialty of the doctor.
- The patient's full name and phone number (with the transition to editing).
- Information on medical records and debt (if available).
- The purpose of the visit and the patient's comment (if filled in).
- Information about the author of the record, date and time of creation.
- The ability to edit a record and change its status.
- The label «New»indicates a new user in the branch, the label «1»indicates the primary patient appointment in the branch. For more information about tags, see the article in our Knowledge Base.

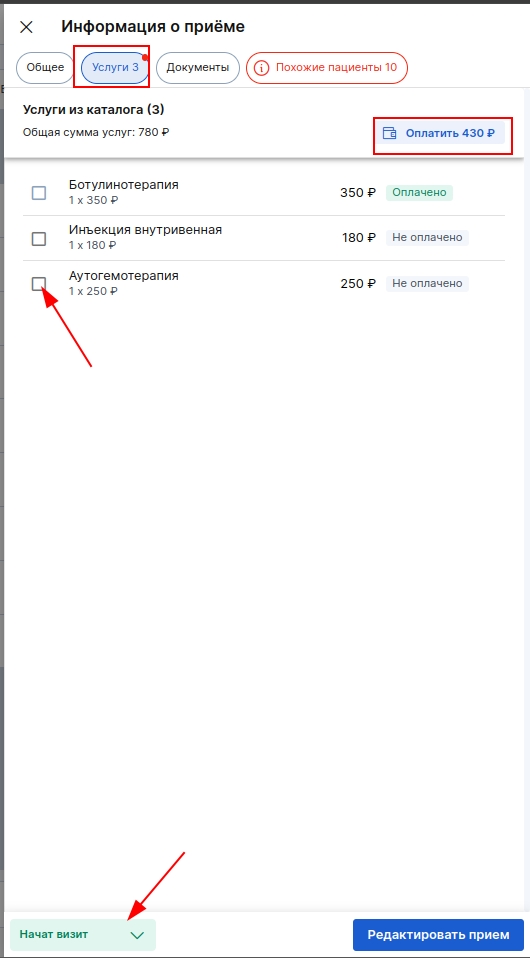
Chapter«Услуги»
Here you can add services to the record, view the service status (paid/unpaid/refunded), and click the payment button (if the status «Начат визит»is or«Выполнен»).
To pay for all services in the recording, you can click on the blue button in the upper-right corner.
You can pay for a specific service using the wallet button to the right of the service name.
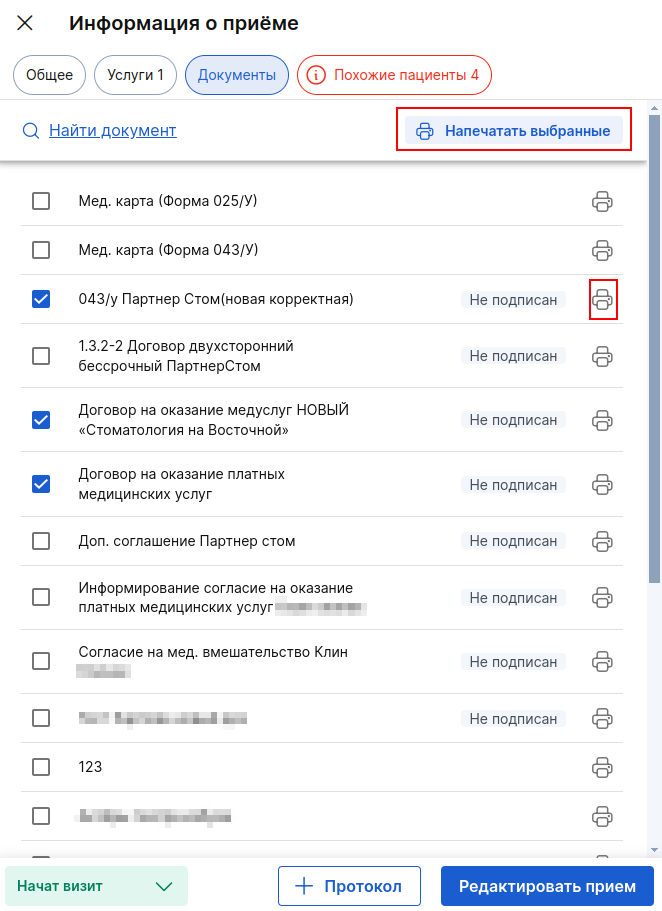
Chapter«Документы»
The list of documents available for printing is displayed here.
You can search for the desired document if there are more than 7 of them.
To print a document, click on the printer icon to the right of the name of the desired document, or select several documents and click «Напечатать выбранные»at the top right.
Chapter«Похожие пациенты»
Appears if there are patients with the same full name or phone number.
To combine the cards, click «Объединить»next to the desired patient.
Attention: This action cannot be undone!

For the doctor
If you are a doctor and work under an account with the appropriate position, to create a protocol for a patient, click «+ Протокол»at the bottom right in the appointment information window.
When the patient arrives at the clinic, you need to update the appointment status «Начат визит», and after the appointment ends «Выполнен».
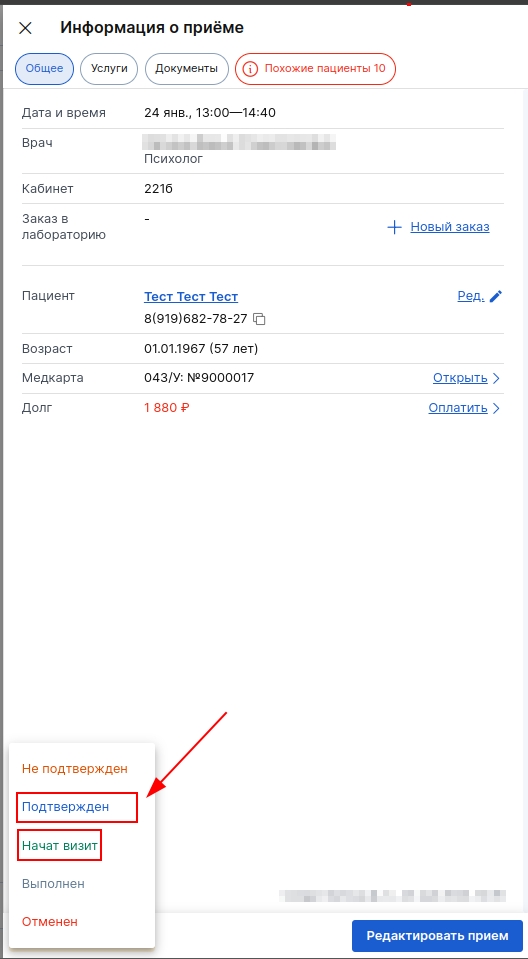
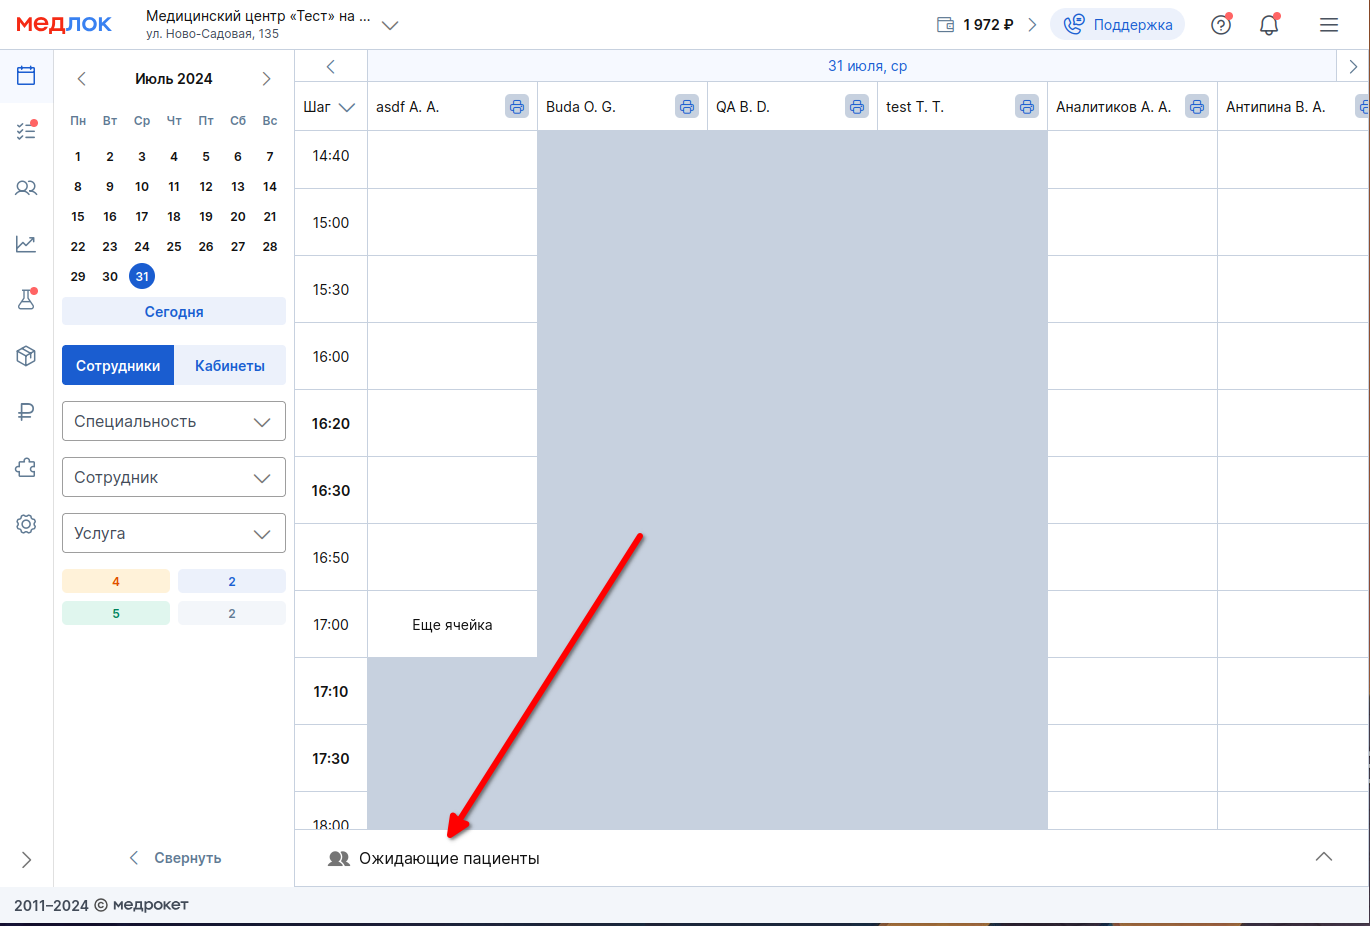
If the status of the record was not specified in time«Начат визит», it will be displayed in the section «Ожидающие пациенты».
The recording status must be updated before 00:00 local time. If this is not done, the reception status will be automatically assigned«Неявка».
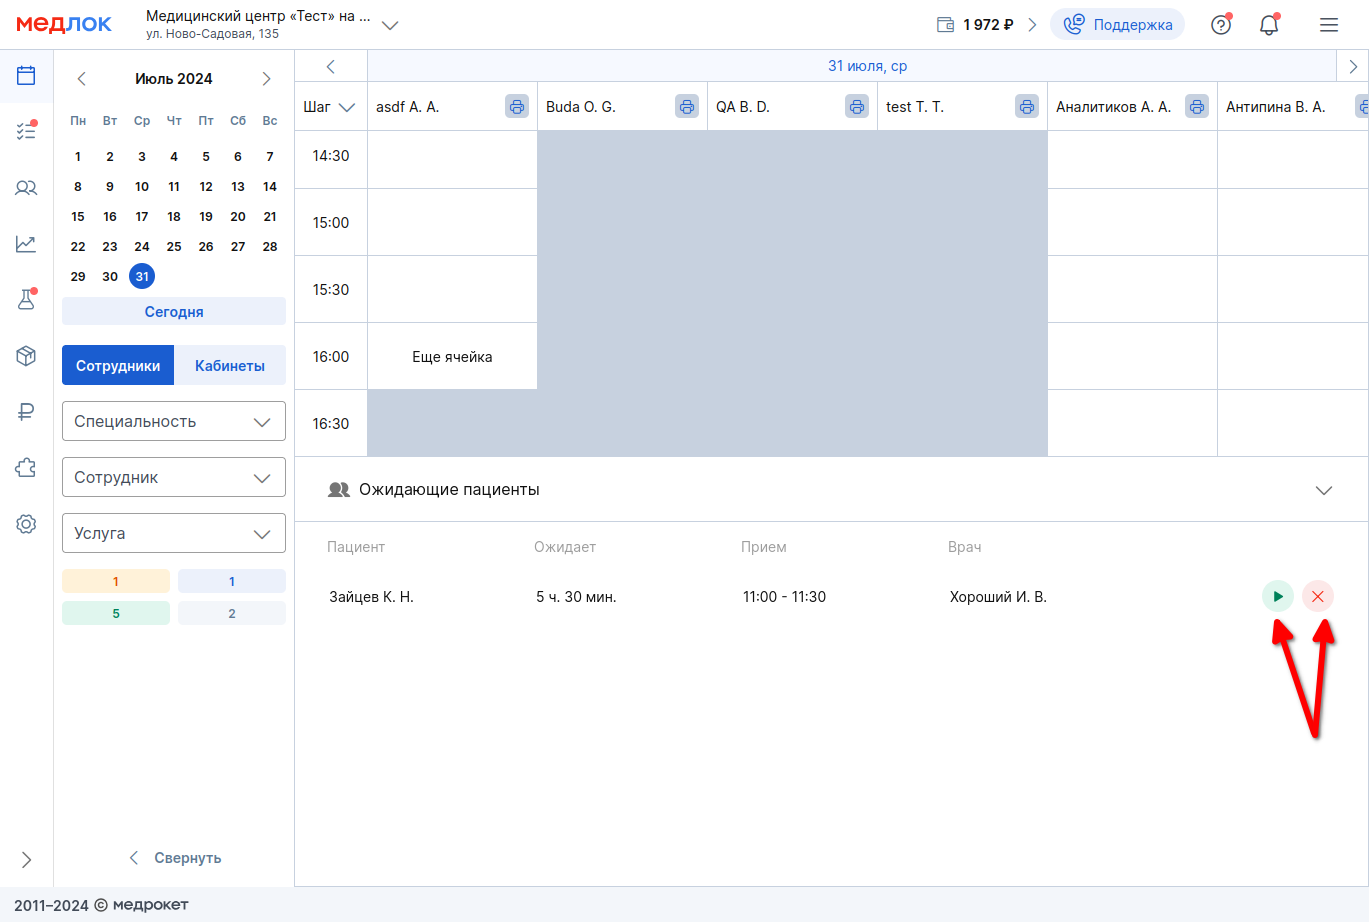
In the block«Ожидающие пациенты», when you click on the icon«▶», the status will change to «Начат визит». If you click the X, the reception will be canceled.
By clicking on the printer icon next to the doctor's full name, you can print out a list of appointments for the whole day.
If necessary, you can include items «Услуги»and in the printout «Цель визита».

If you need to reschedule a patient's appointment, hold down the cell and move it to an available window. Free windows are highlighted in green.
The transfer is available within the schedule of one doctor and within the same specialty.
Frequently Asked Questions
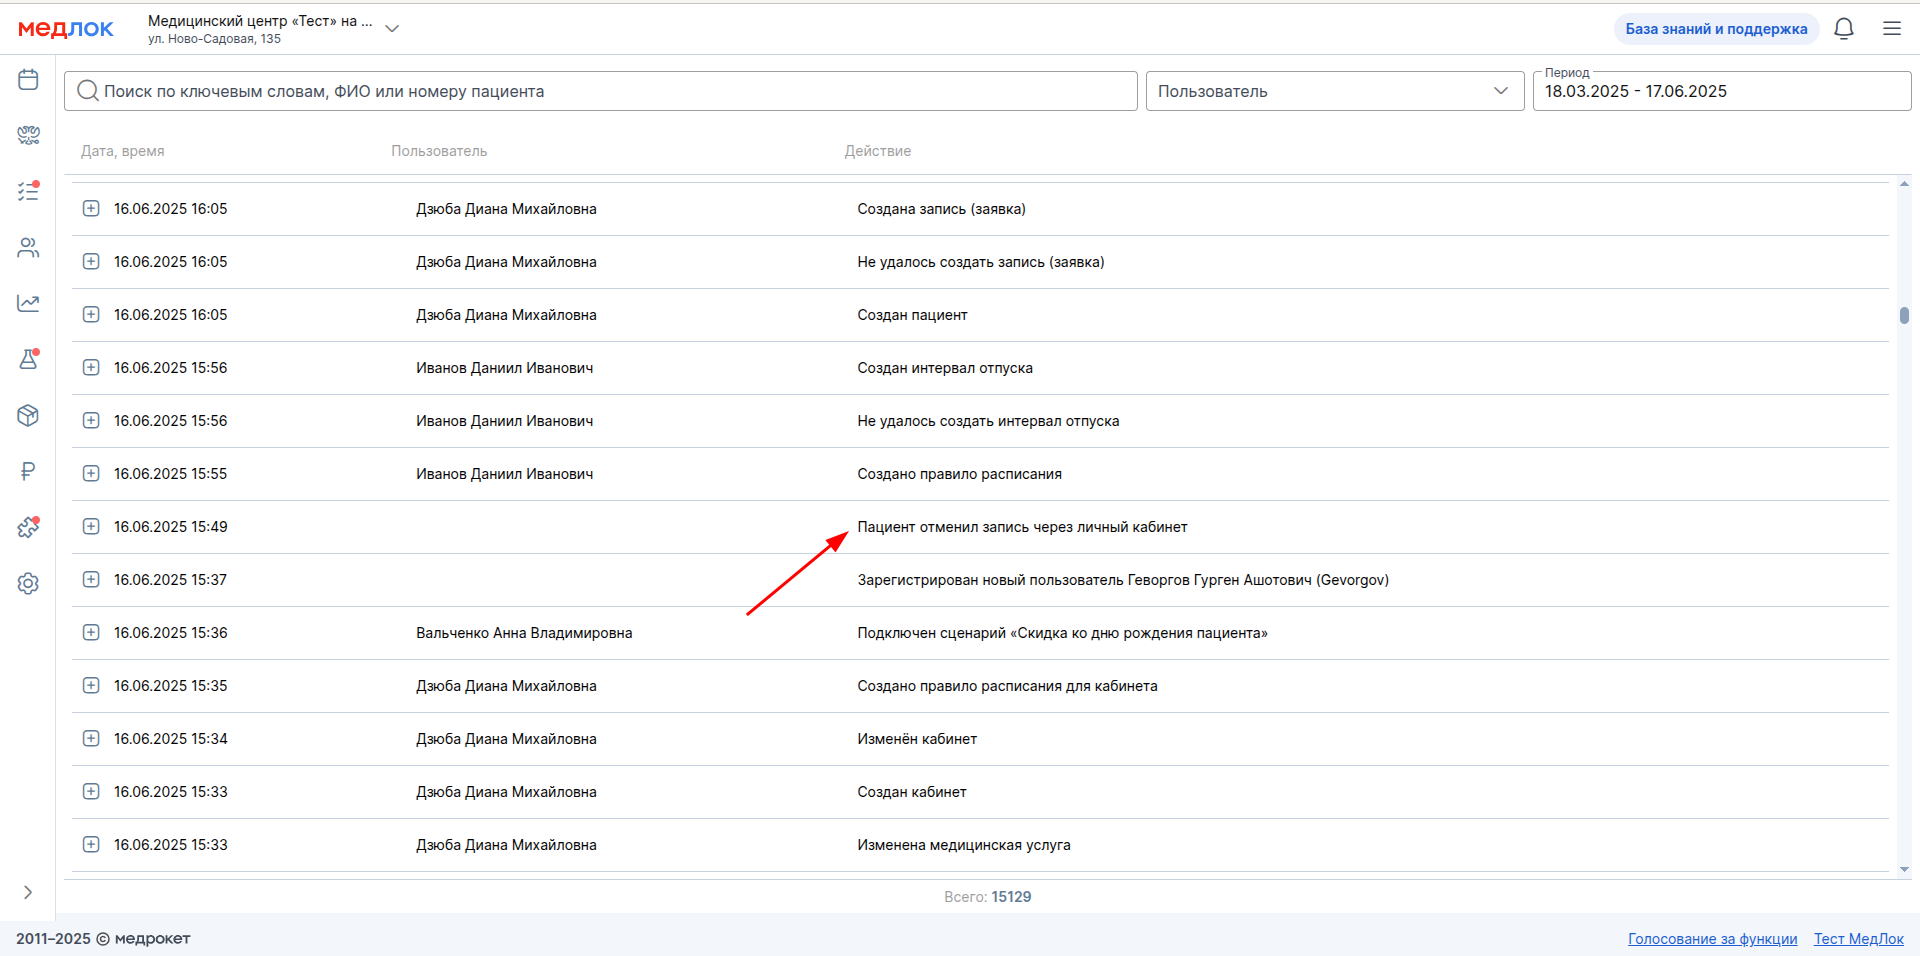
- Why is the patient's record missing from the schedule?
Go to «Журнал действий»and use the patient's full name or phone number to find the actions in the MedLock for him. The recording may have been canceled by a clinic employee or by the patient himself.
- How do I make a refund?
You can refund the payment to the patient through his profile or in the section «Касса»(only if the ATOL sales register is enabled). For more information, see the Refund article.
- How can I add a document to the patient's signature list?
Create a document template. To do this, go to the section «Настройки», then «Документы»click «Добавить документ». Design the template by adding the necessary variables, make sure that the slider is active«Выводить на печать», and click «Сохранить». For more information about creating document templates, see the article Configuring documents and working with them.
- Why do some patients have all the necessary documents in the section «Документы»in the admission information, and some do not have all?
There are three categories of patients in MedLock: adults, minors, and incapacitated patients. If you use variables in the document that have a name«опекун», then such a document can only be printed in receptions for children or disabled citizens.
Also, make sure that the slider «Выводить на печать»is enabled in the template of the document you need.
Read more in our article Setting up documents and working with them.
- What should I do if I forgot to set the status in the patient's appointment, and the status is «Начат визит»the next day«Неявка»?
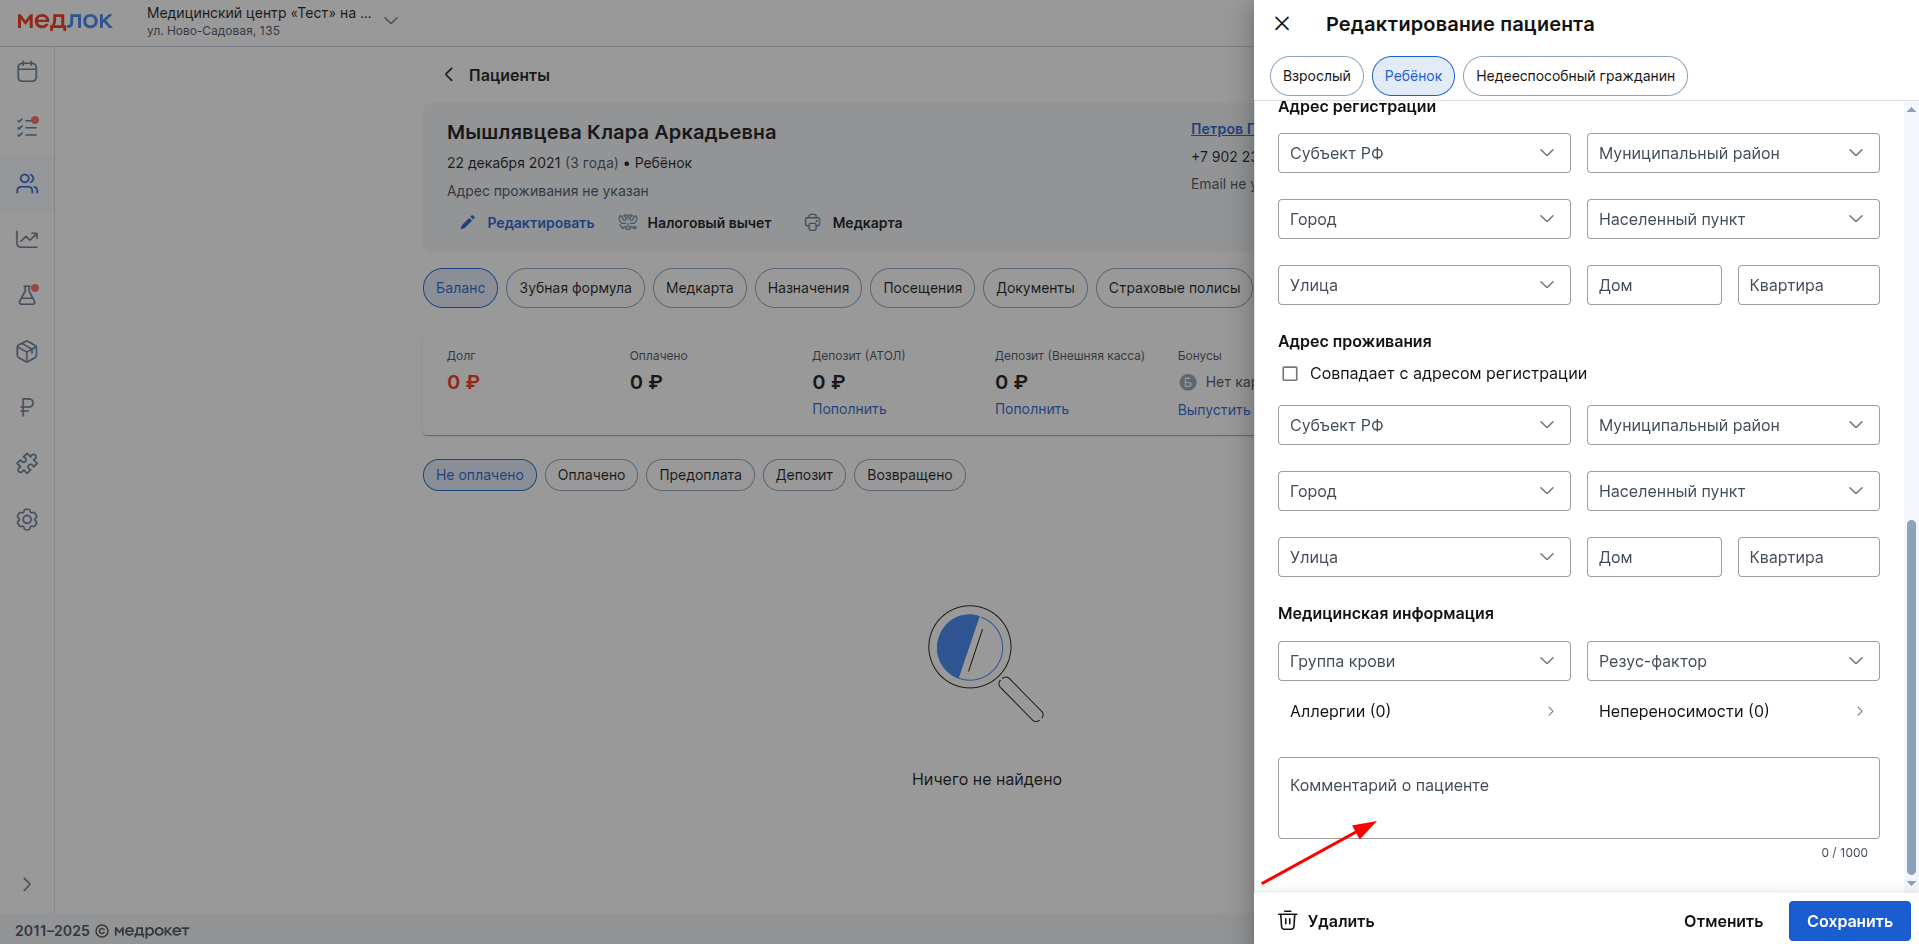
The status «Неявка»cannot be canceled. We recommend analyzing appointment appointments at the end of the day in order to set the necessary statuses. In order not to lose information about the patient's appointment, write it down in the section «Комментарии»in the patient's profile.
You can also add data to the report yourself after exporting it to Excel.
- What should I do if the patient does not want to provide SNILS?
If the patient has not refused to process personal data, you can fill out the passport data and request the SNILS from the FIU. Read more about this in our article How to request a patient's SNILS.
If the patient has refused to process personal data or to transfer data to the USISZ, mark this in the patient's edit window. For more information, see the article Dealing with patient refusals.
- How can I add a service to an appointment if it has a status«Выполнен»?
If the reception has a status«Выполнен», then you cannot add new services to the reception. This applies to both the window «Информация о приёме»in the schedule and the patient's profile.