


Content:
- Setting up in a new personal account UIS
- Setting up in the old personal account UIS
- Creating HTTP Notifications
- Setting up softphones
Setting up in a new personal account UIS 
Enabling the tariff
Important! To use API telephony in MedLock, you must enable any tariff from the category«Виртуальная АТС». For more information, see the UIS page.
You will also need an additional option to connect telephony in your personal UIS account«Инструменты интеграции». It is necessary for the integration to work correctly.
Important! In order for call transcription to work in Medlock, connect the Speech Analytics module in the UIS
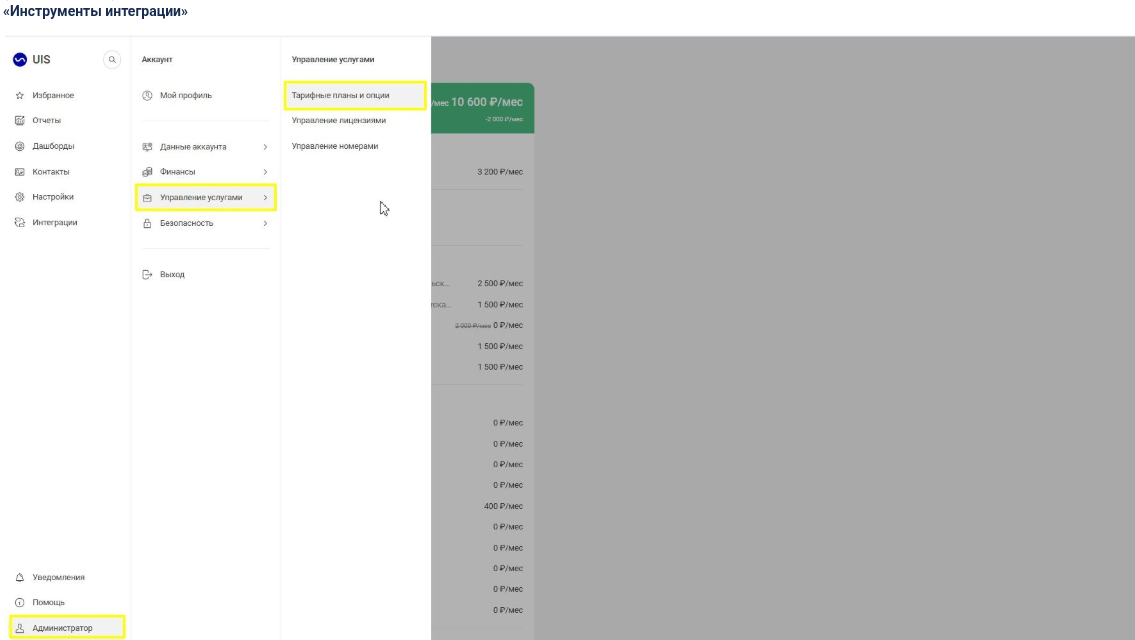
- Open the section with pricing plans and options.
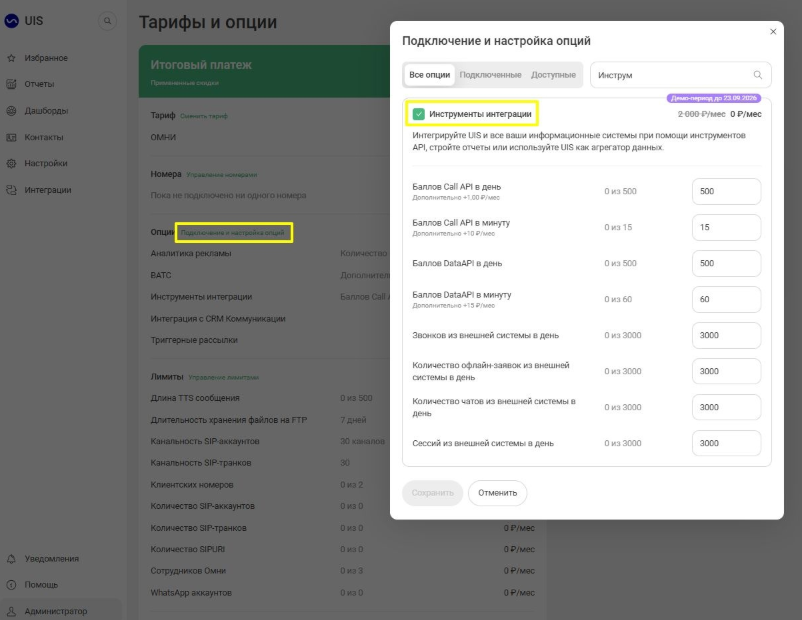
2. Activate the option«Инструменты интеграции».
Configuring the user and their rights
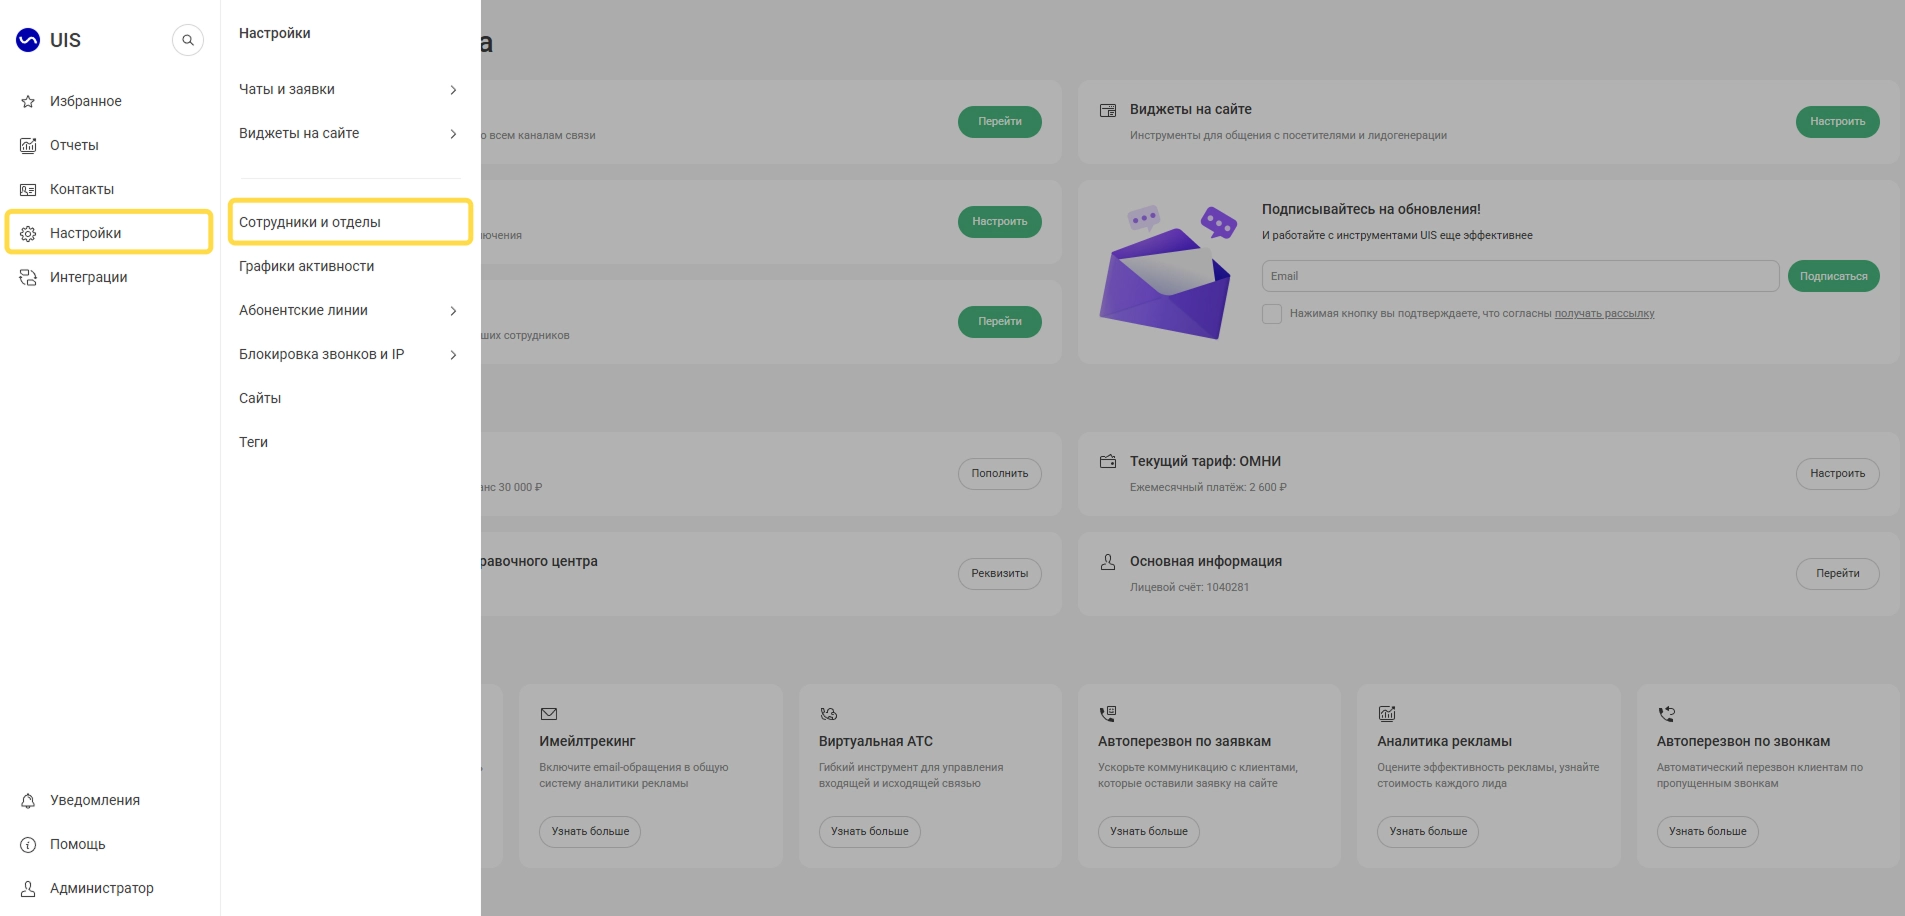
- Open «Настройки»the → section«Сотрудники и отделы».
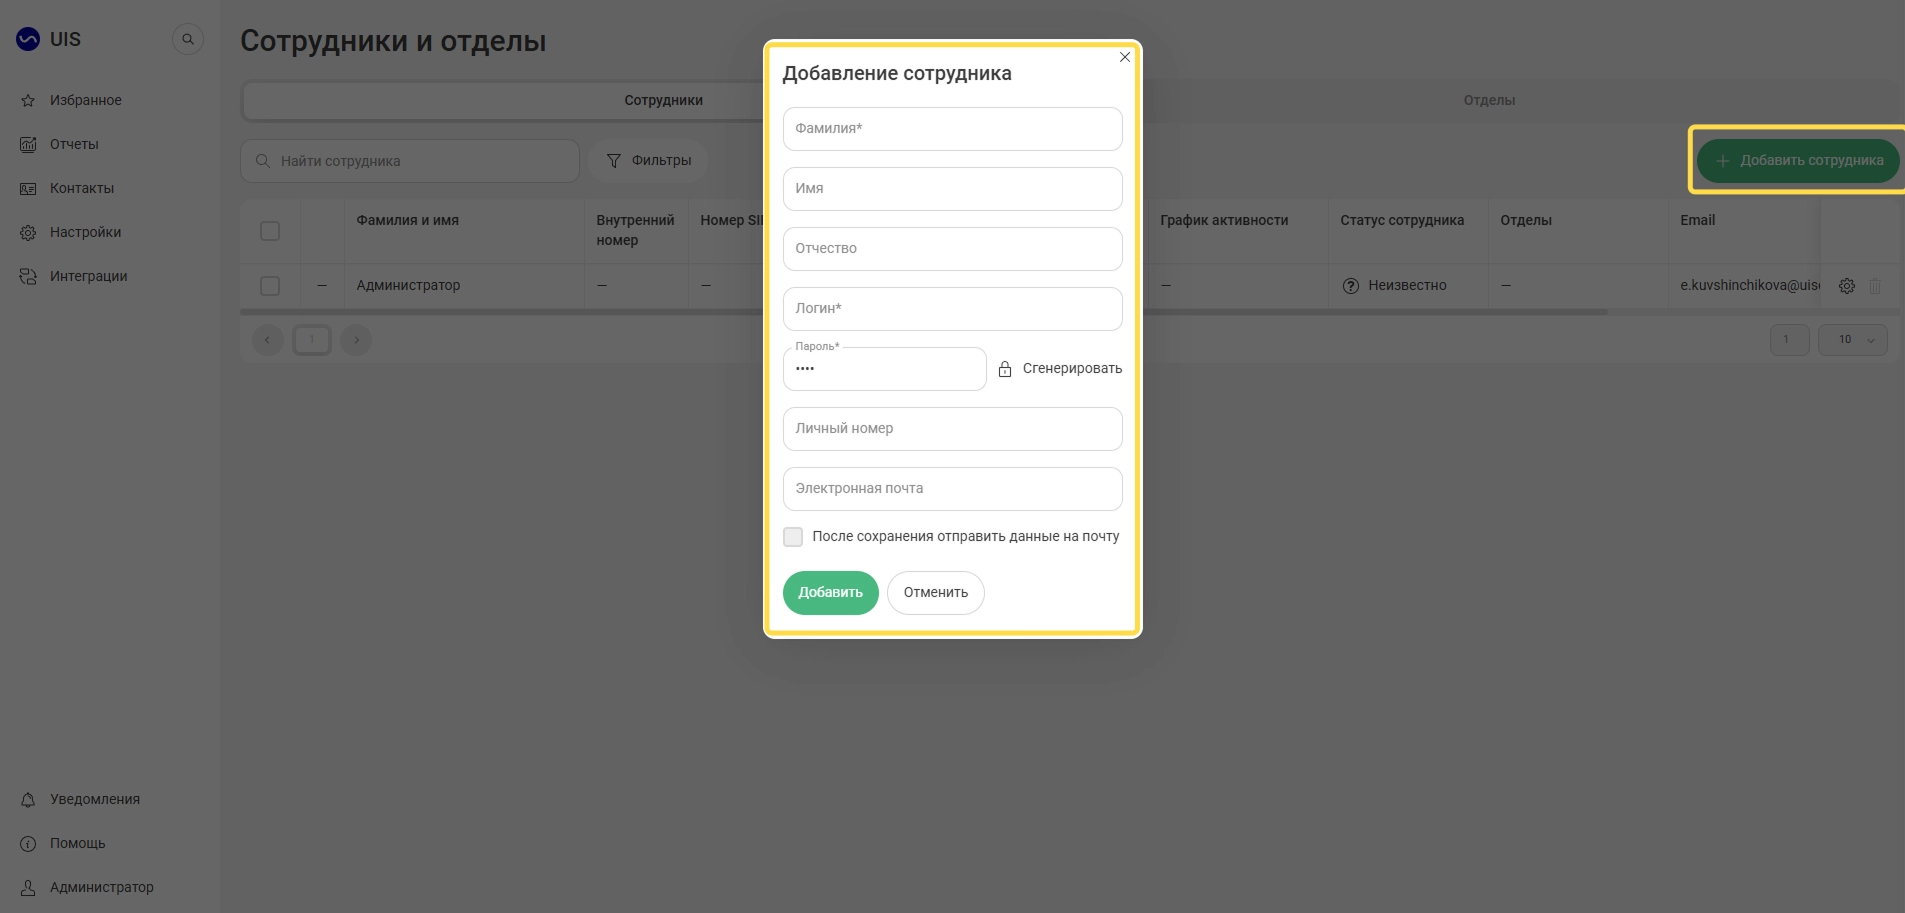
2. Click «Добавить сотрудника», fill out the form and click «Добавить». An extended employee card will open.
3. Give the employee the rights. In the extended card«Роль», select the preset role in the field«Администратор». The UIS recommends assigning this role to the employee whose key is used for integration.
4. If you have created your own role and selected it instead of the role«Администратор», configure the access rights:
- Open «Администратор»the → «Безопасность»→ section«Права доступа».
- Find the column with the desired role.
- Select all the items in the section «HTTP-уведомления»and group«Виртуальная АТС», including the nested items.
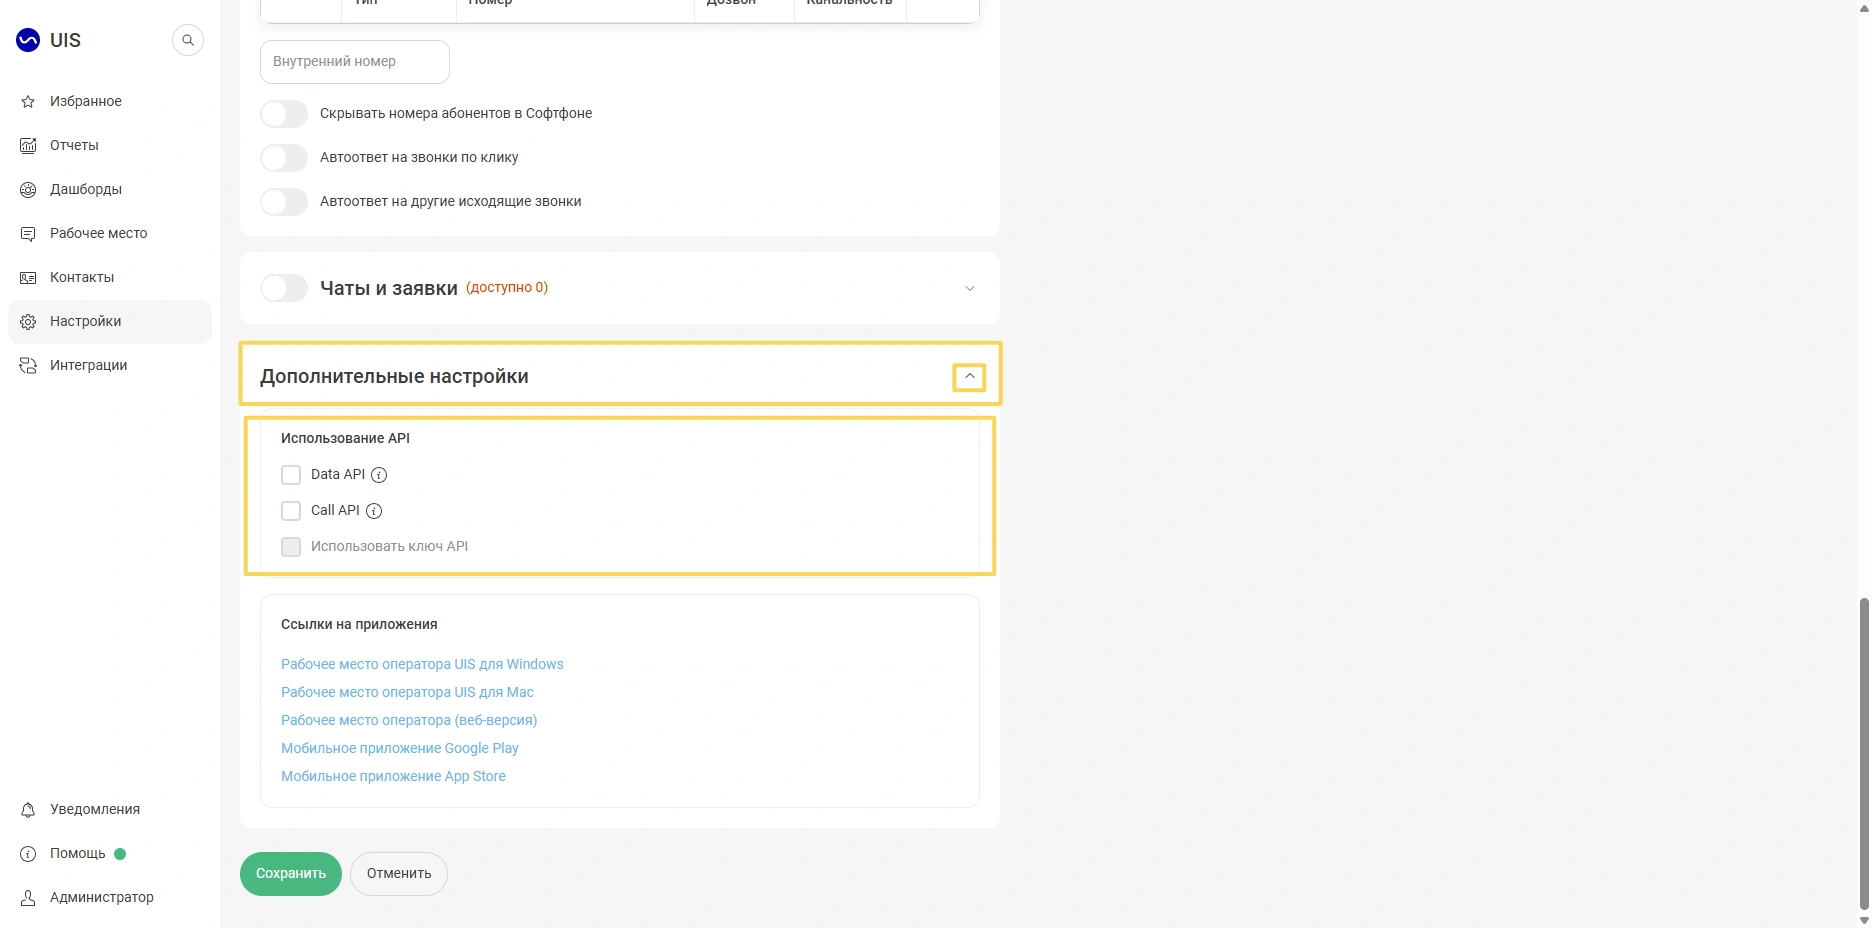
5. Grant the employee access to the API. Expand the section «Дополнительные настройки»and select the API types: Data API and Call API.
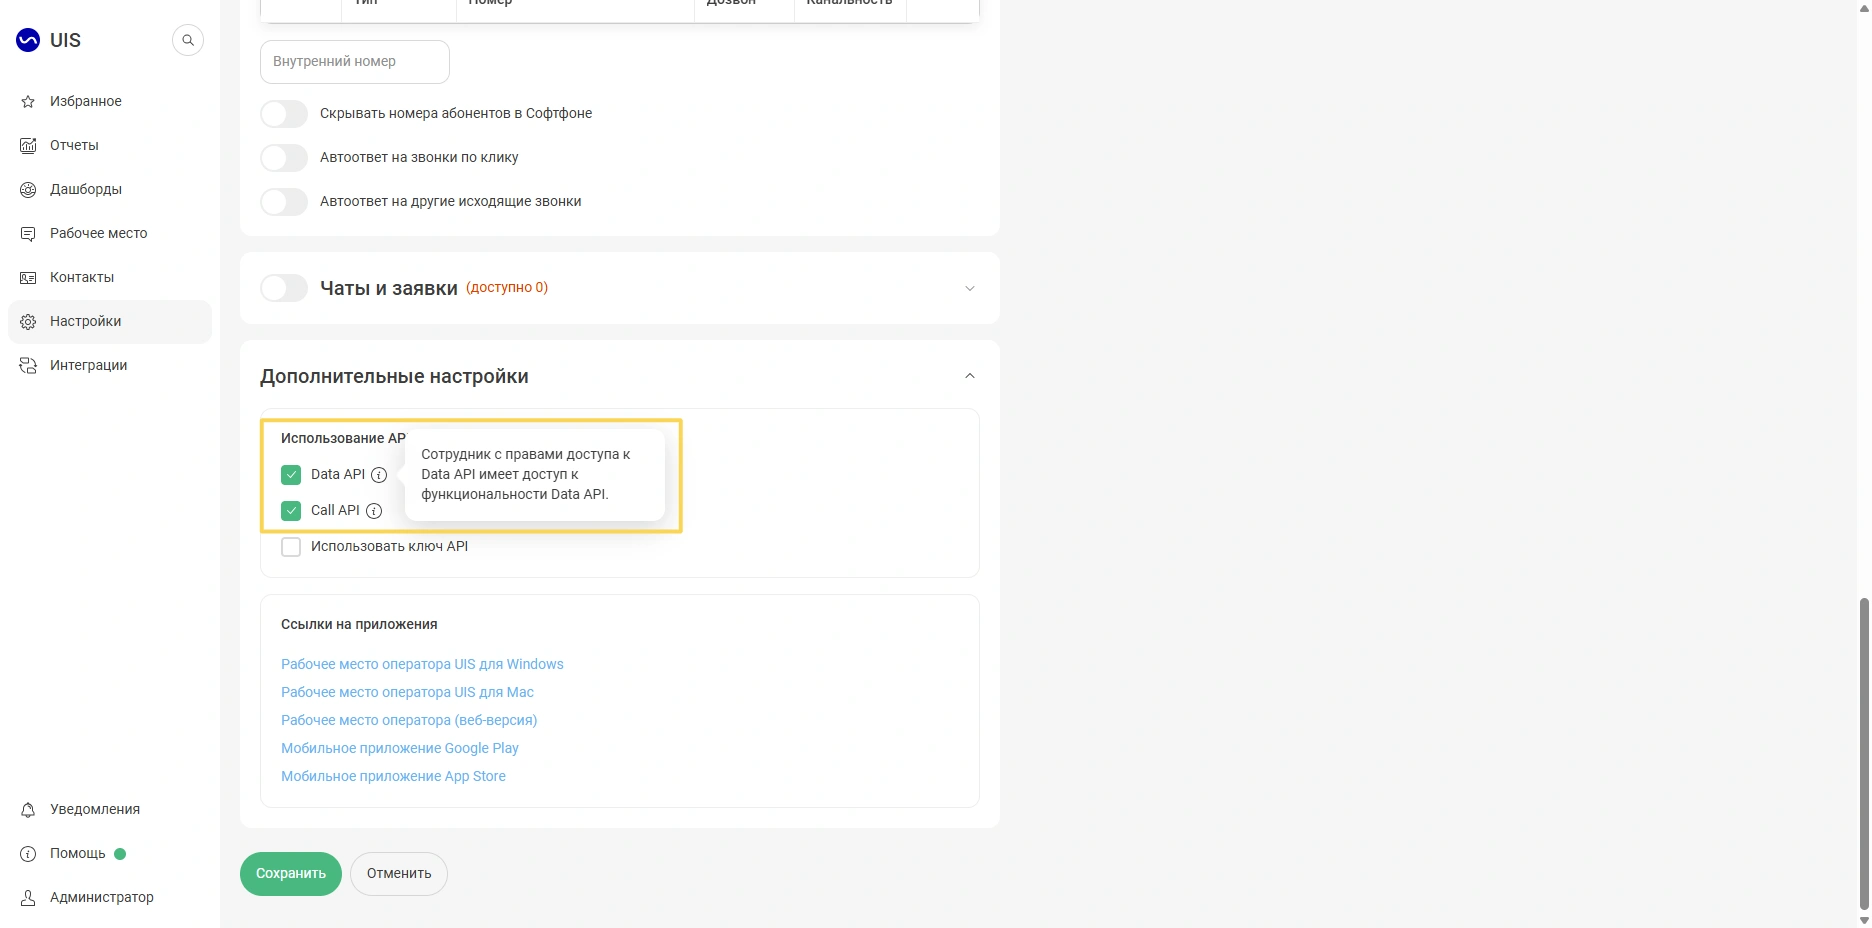
6. Select the option «Использовать ключ API»— the system will generate a unique key. The switch «Ключ API активен»should be green.
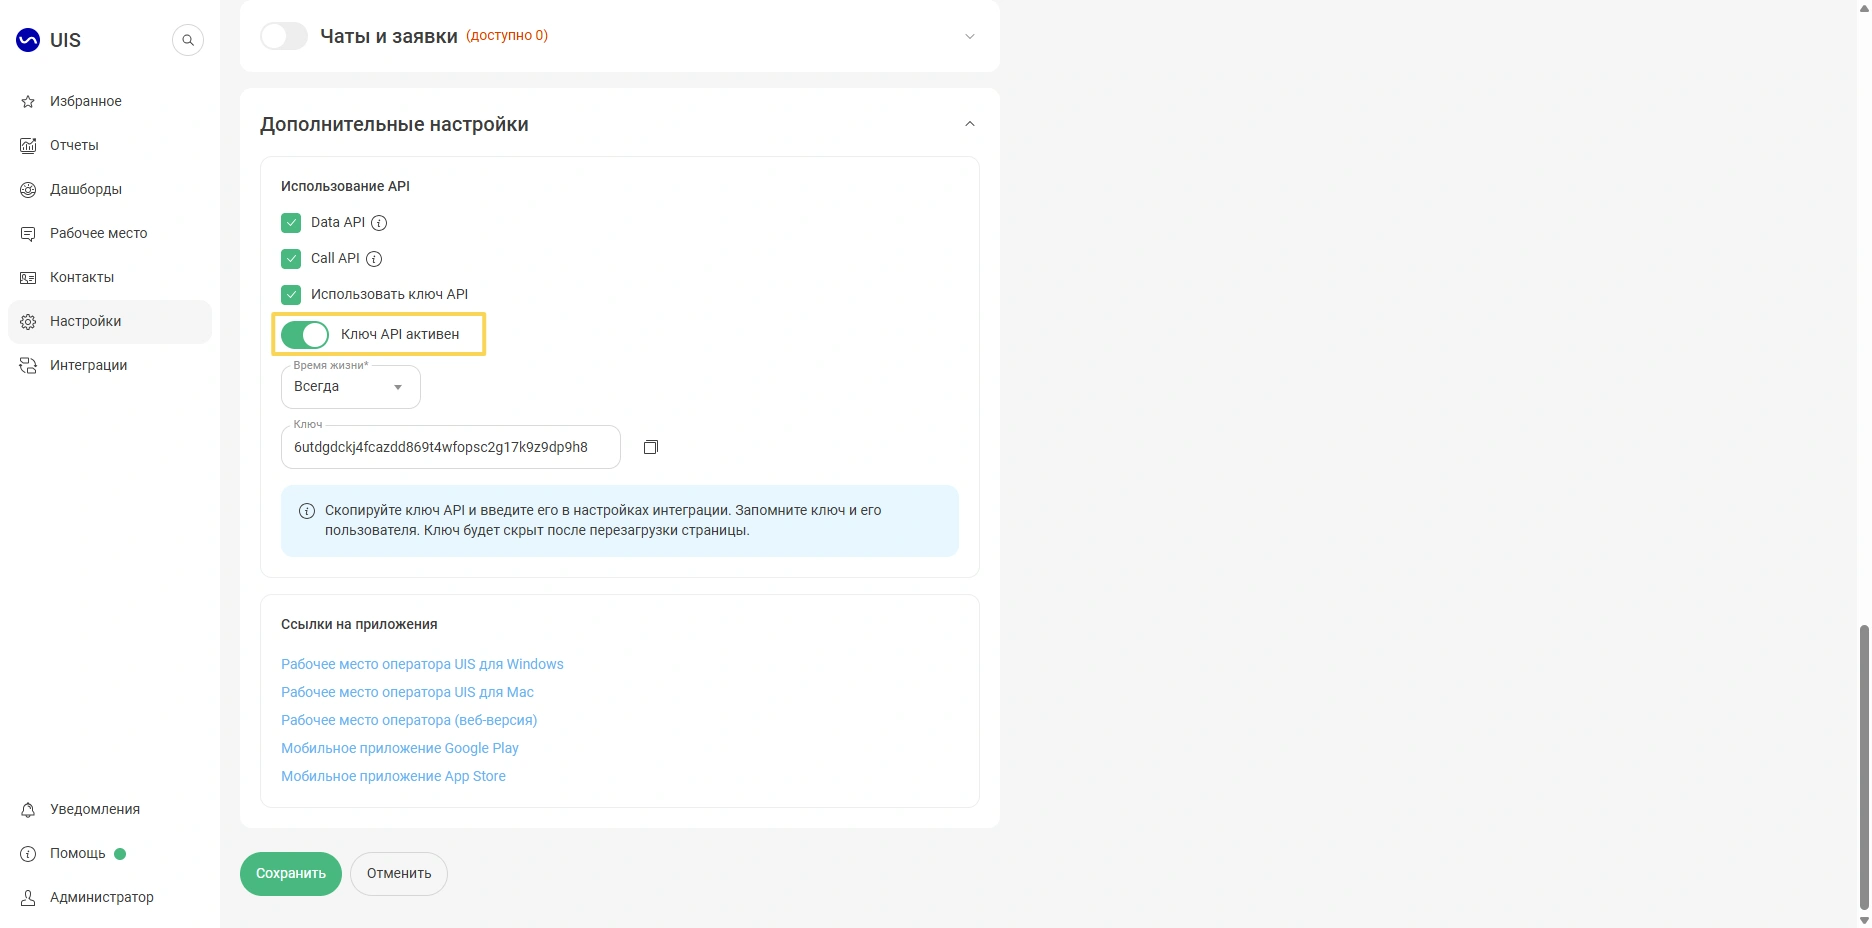
7. In the field«Время жизни», select «Всегда»the key to be valid indefinitely. If you select «До»and specify a date, the key will stop working after it. Telephony in the MedLock will be disabled until you generate a new key.
8. Click «Копировать»next to the key and save it. You will need it when connecting the module in the MedLock. Then save the employee's settings.
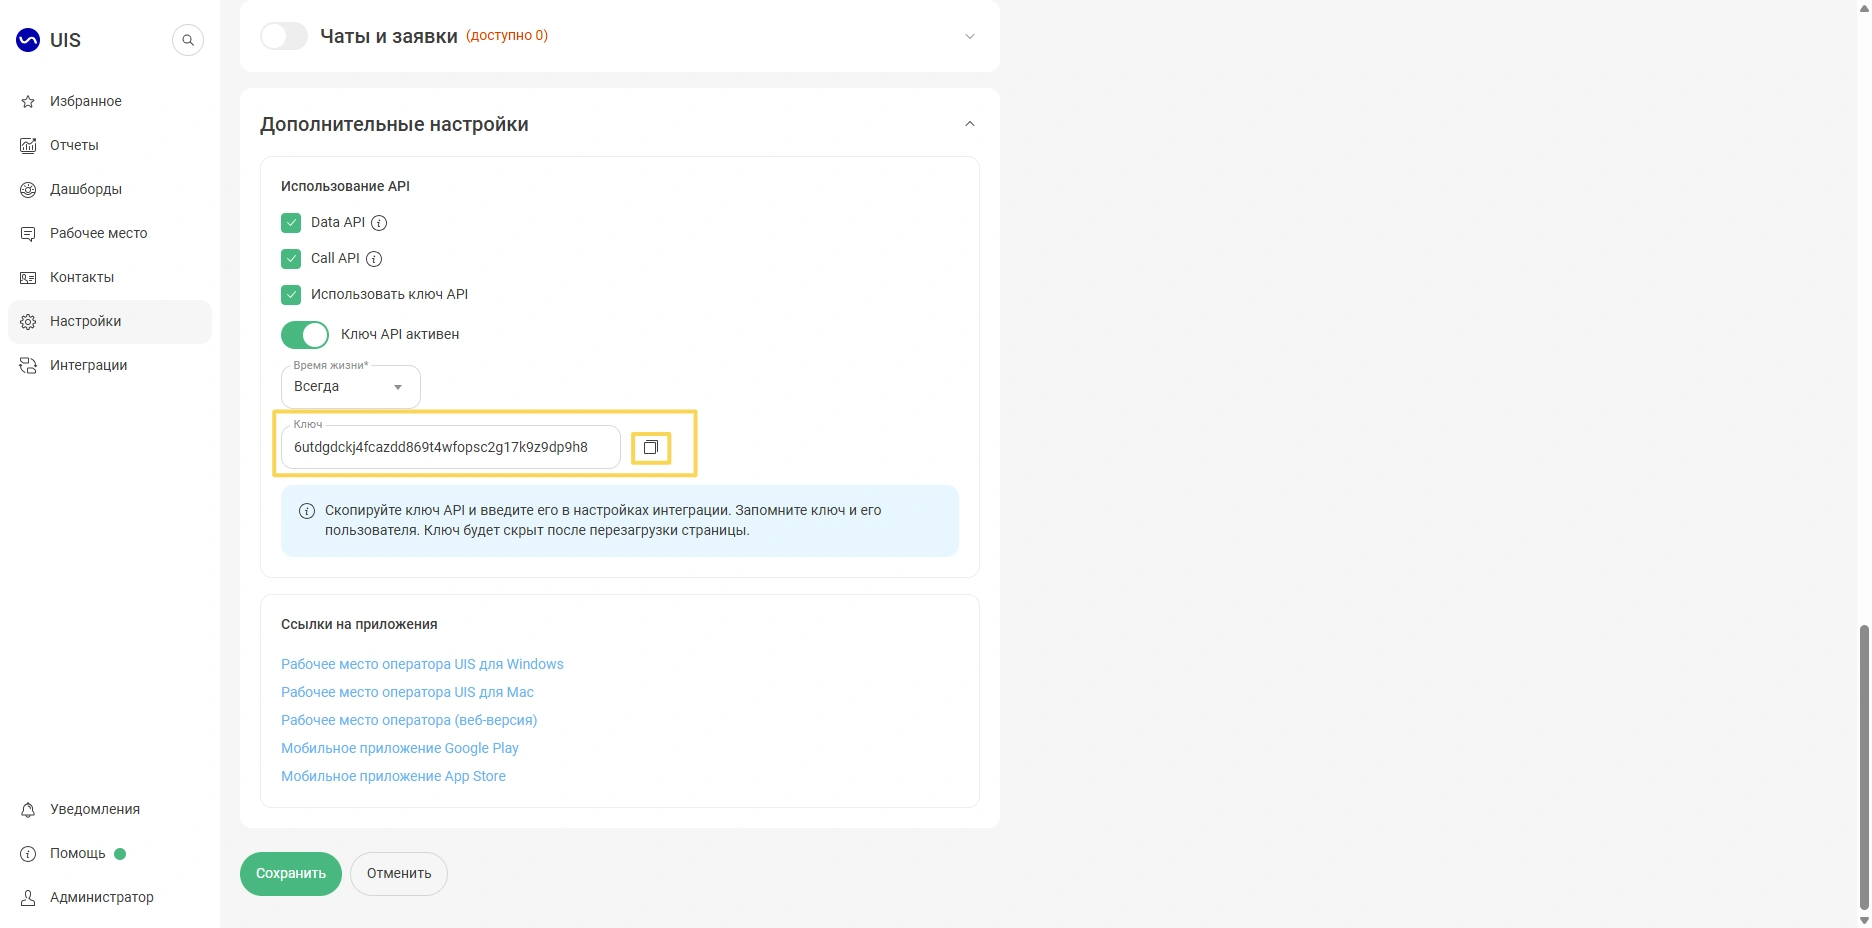
Important! The key is displayed only once and is hidden after saving the settings or reloading the page. Save the key and remember which employee it was created for.
Important! If you are using the module«Сквозная аналитика», you can get the key from its settings.
Setting up Security
The security settings are available to the user with the role«Администратор».
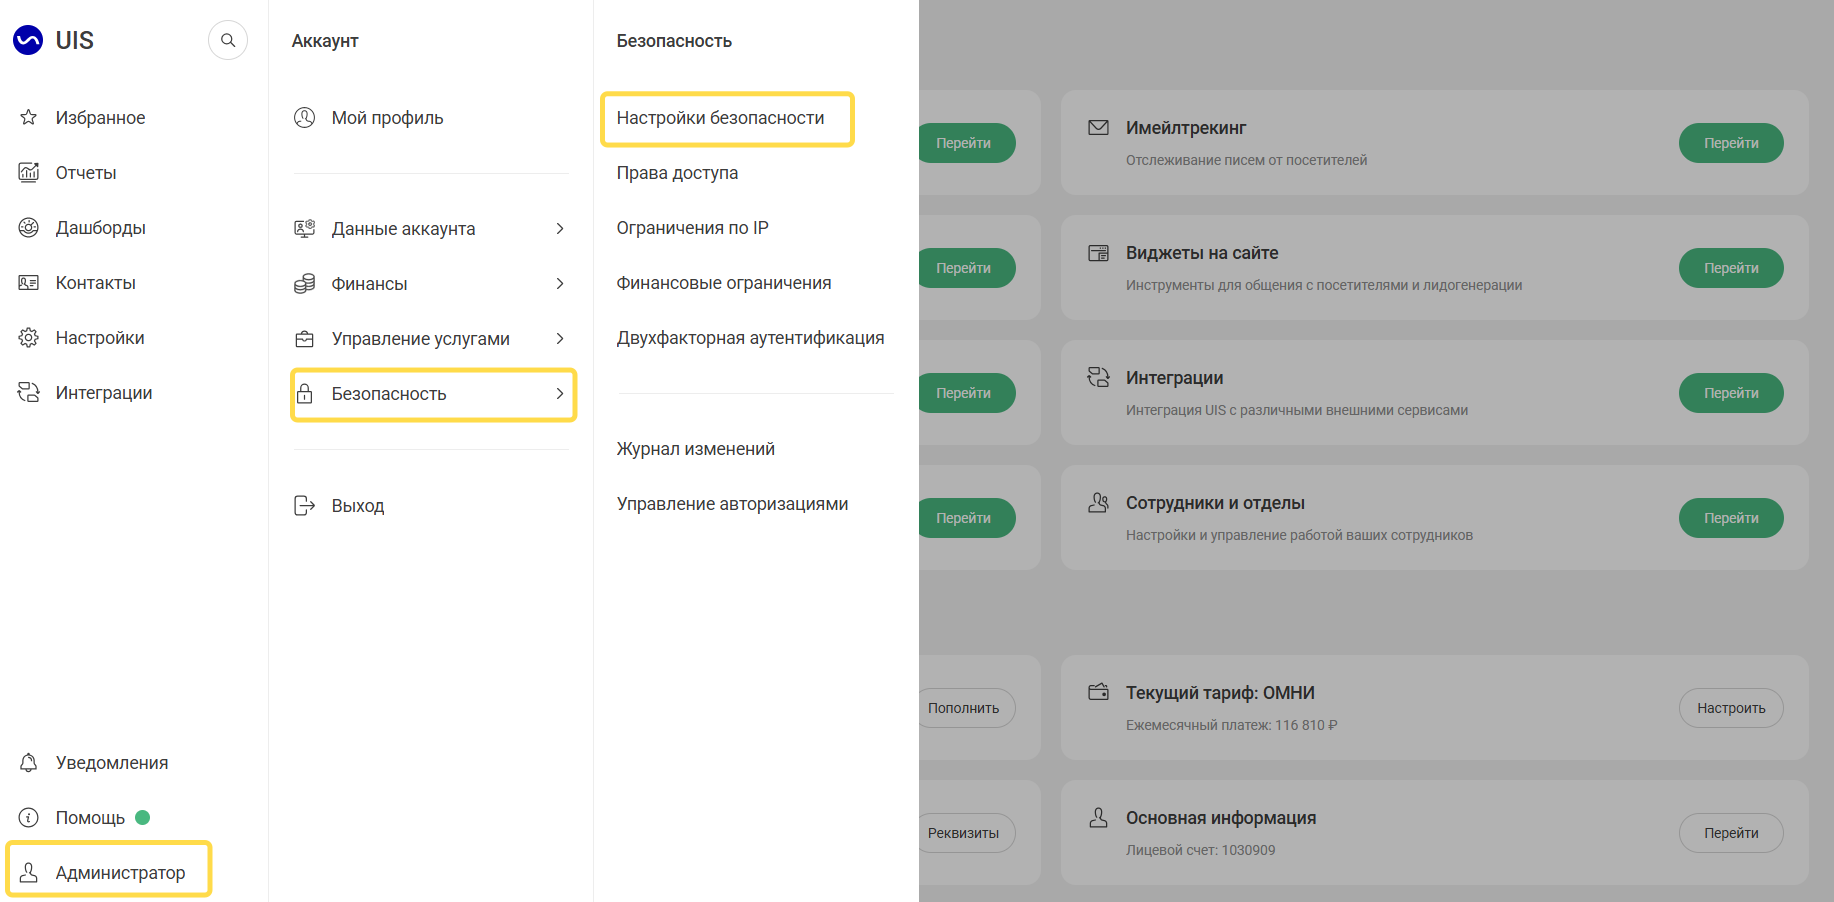
- Open «Администратор»the → «Безопасность»→ section«Настройки безопасности».
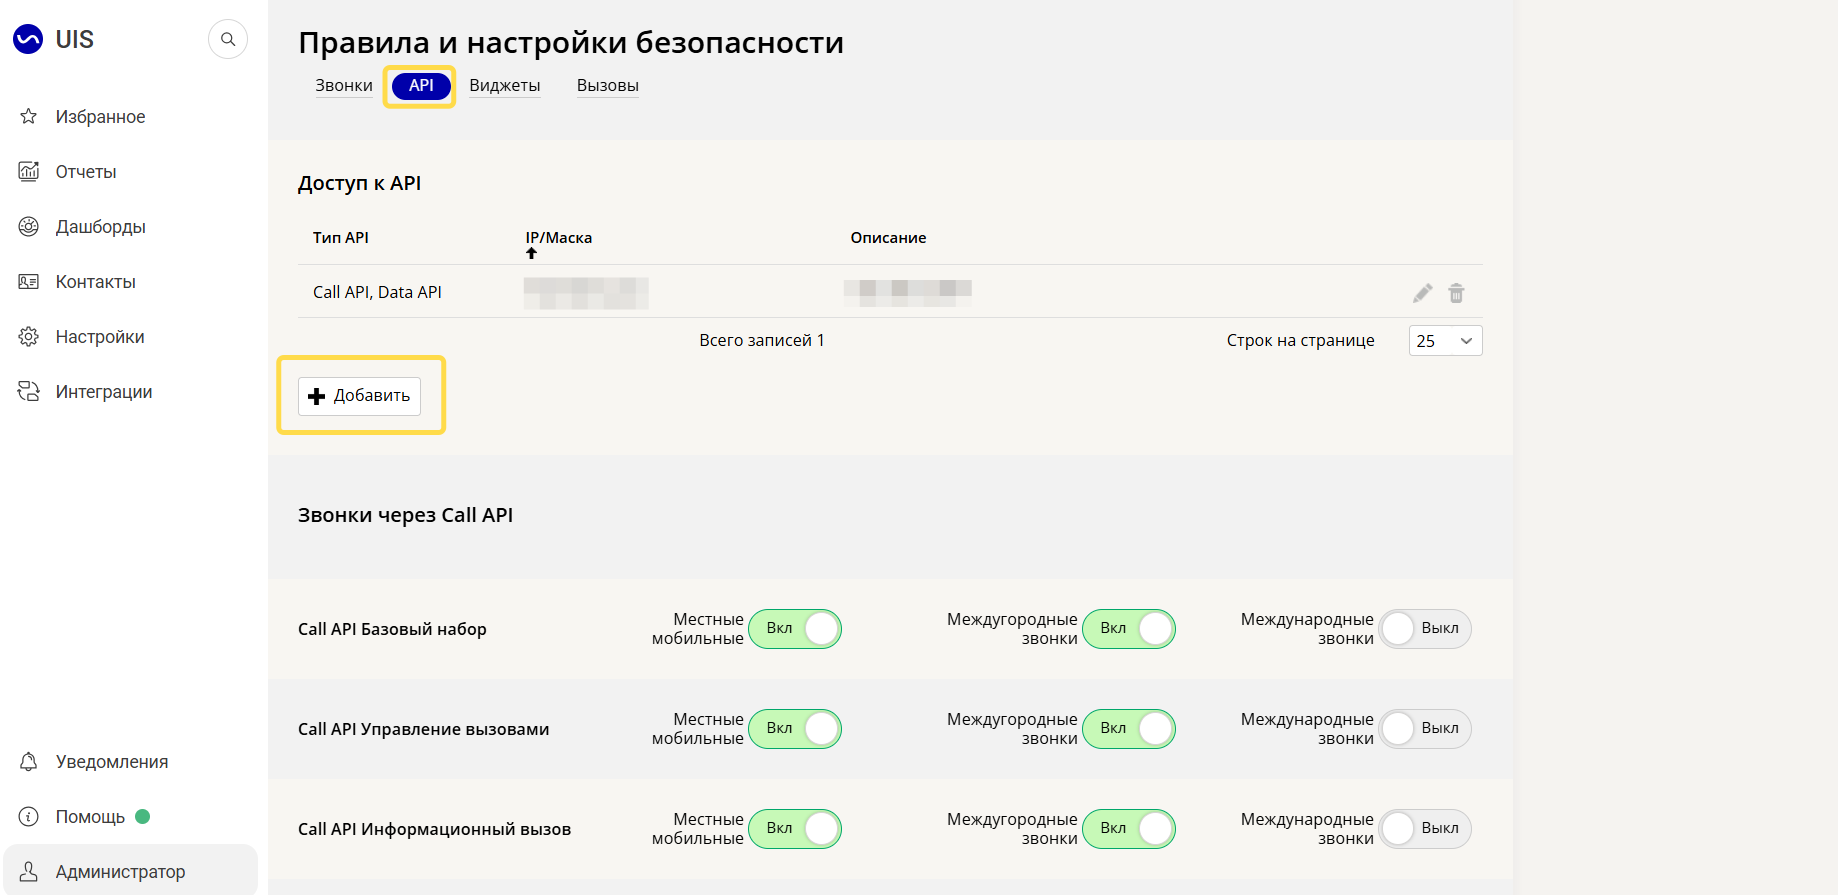
2. Go to the tab «API»and click «+ Добавить».
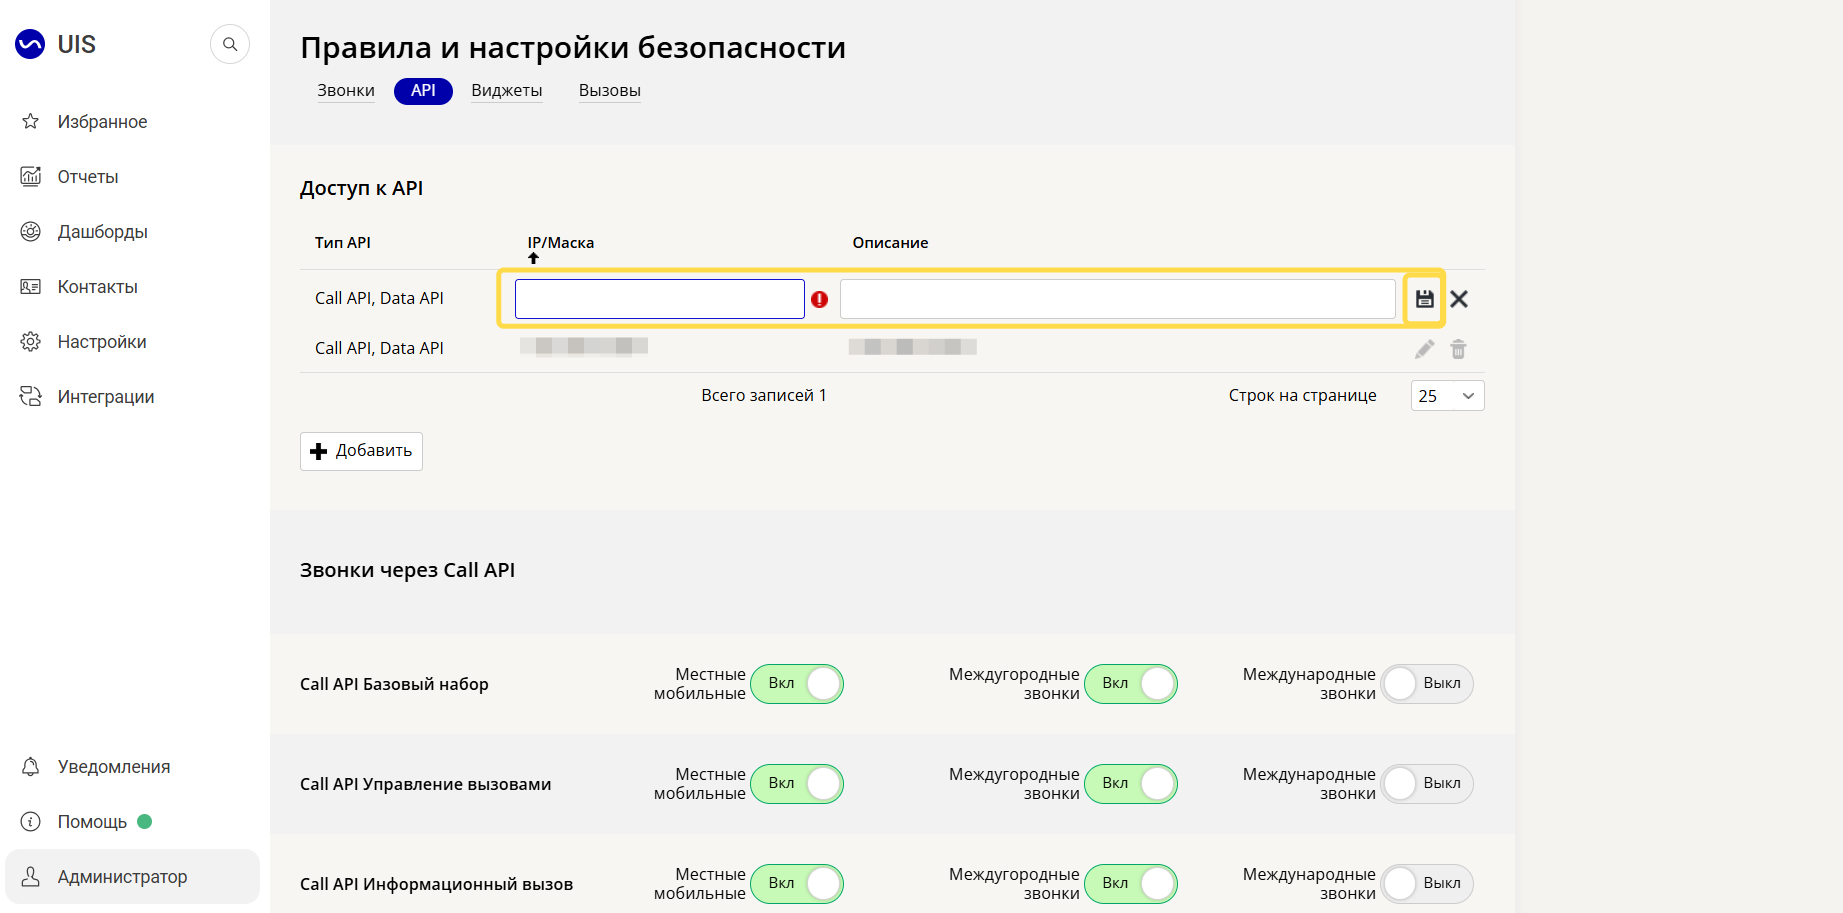
3. «IP/маска»Enter 0.0.0.0/0 in the field«Описание». You do not need to fill in the field.
4. Save the address by clicking on the floppy disk icon next to the fields.
Important! The changes will take effect within one hour.
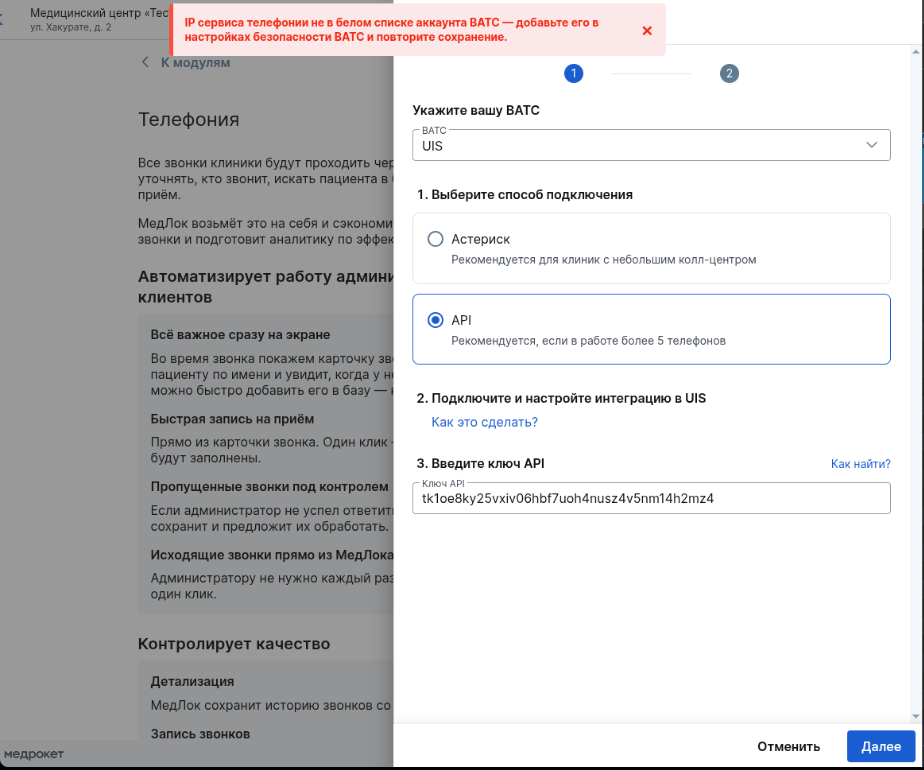
Important! If the IP address of the MedLock is not added to the list of allowed UIS in the personal account«Телефония», an error will be displayed when connecting the module.
Important! You need to create and configure SIP lines in your personal UIS account. For more information, see the SIP numbers article.
Connecting the module «Телефония»in the MedLock
Connect and configure the module «Телефония»in the MedLock.
For more information, see the Module Connection article«Телефония».
Configuring HTTP notifications in the UIS
After connecting the module in the MedLock, you need to set up notifications in the personal account of the UIS so that calls are displayed in the system.
- Go to the personal account of the UIS.
2. Open «Интеграции»the → section«HTTP-уведомления».
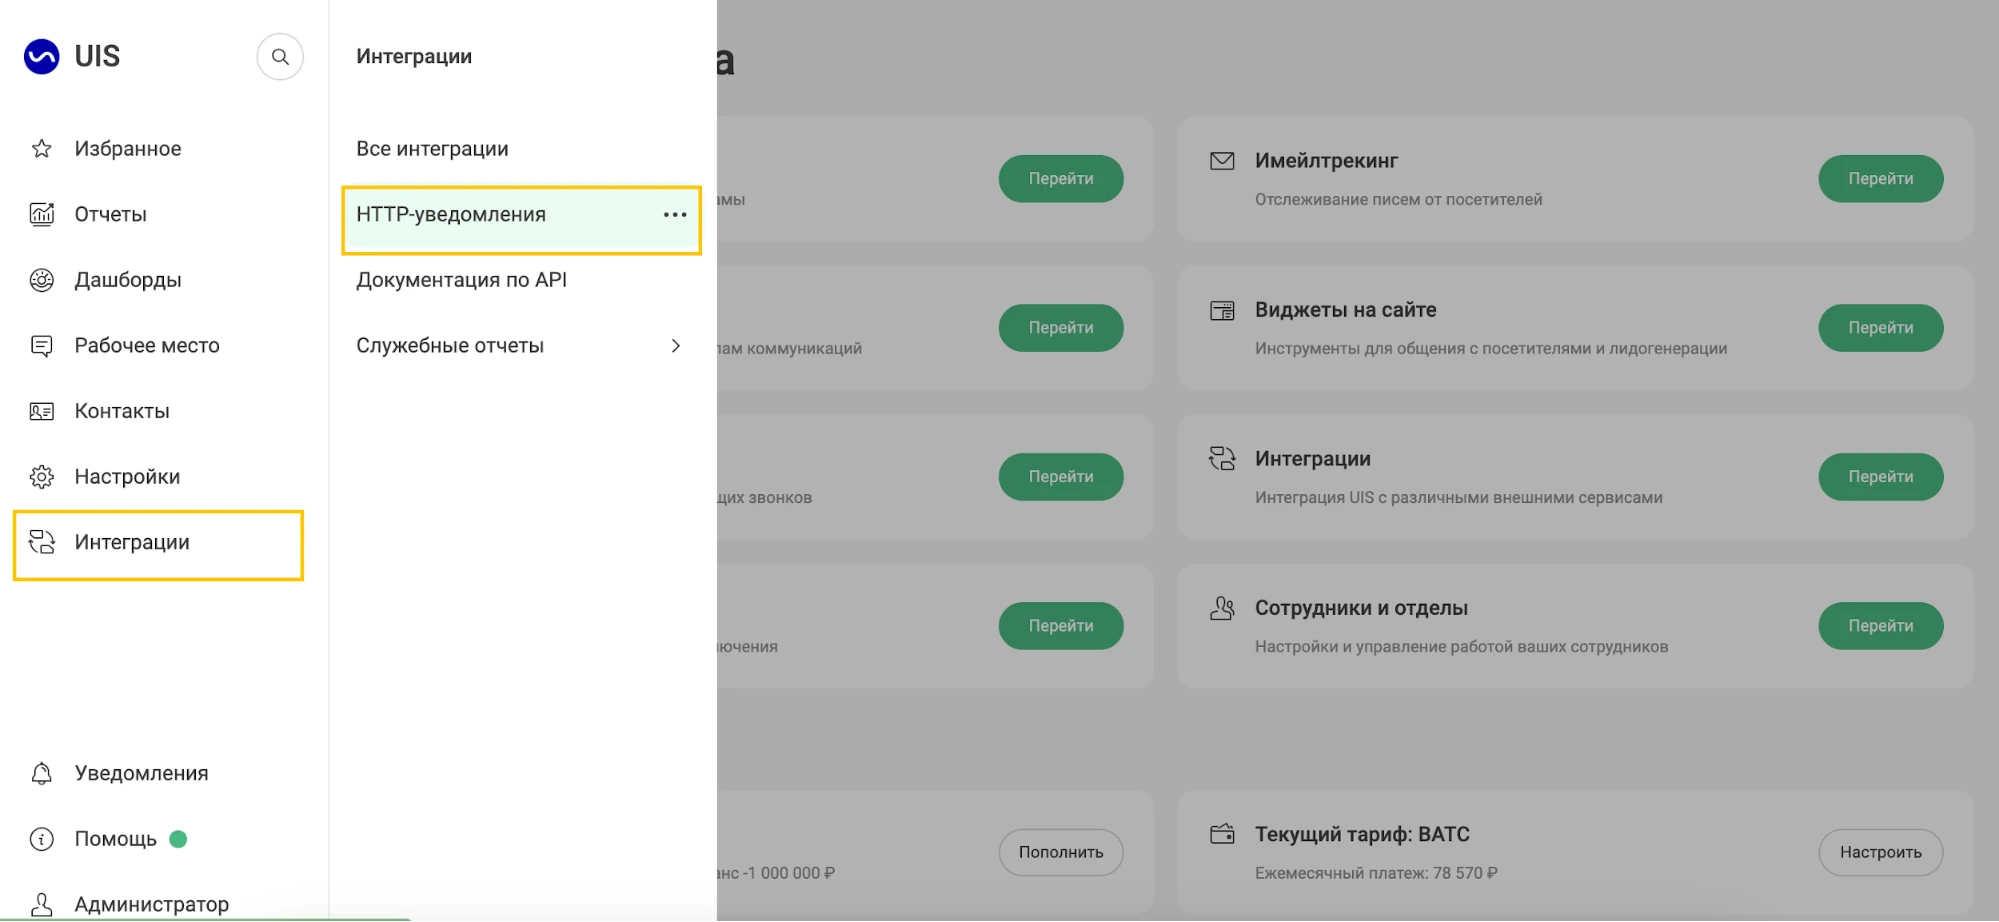
3. Click «+ Добавить HTTP-уведомление».
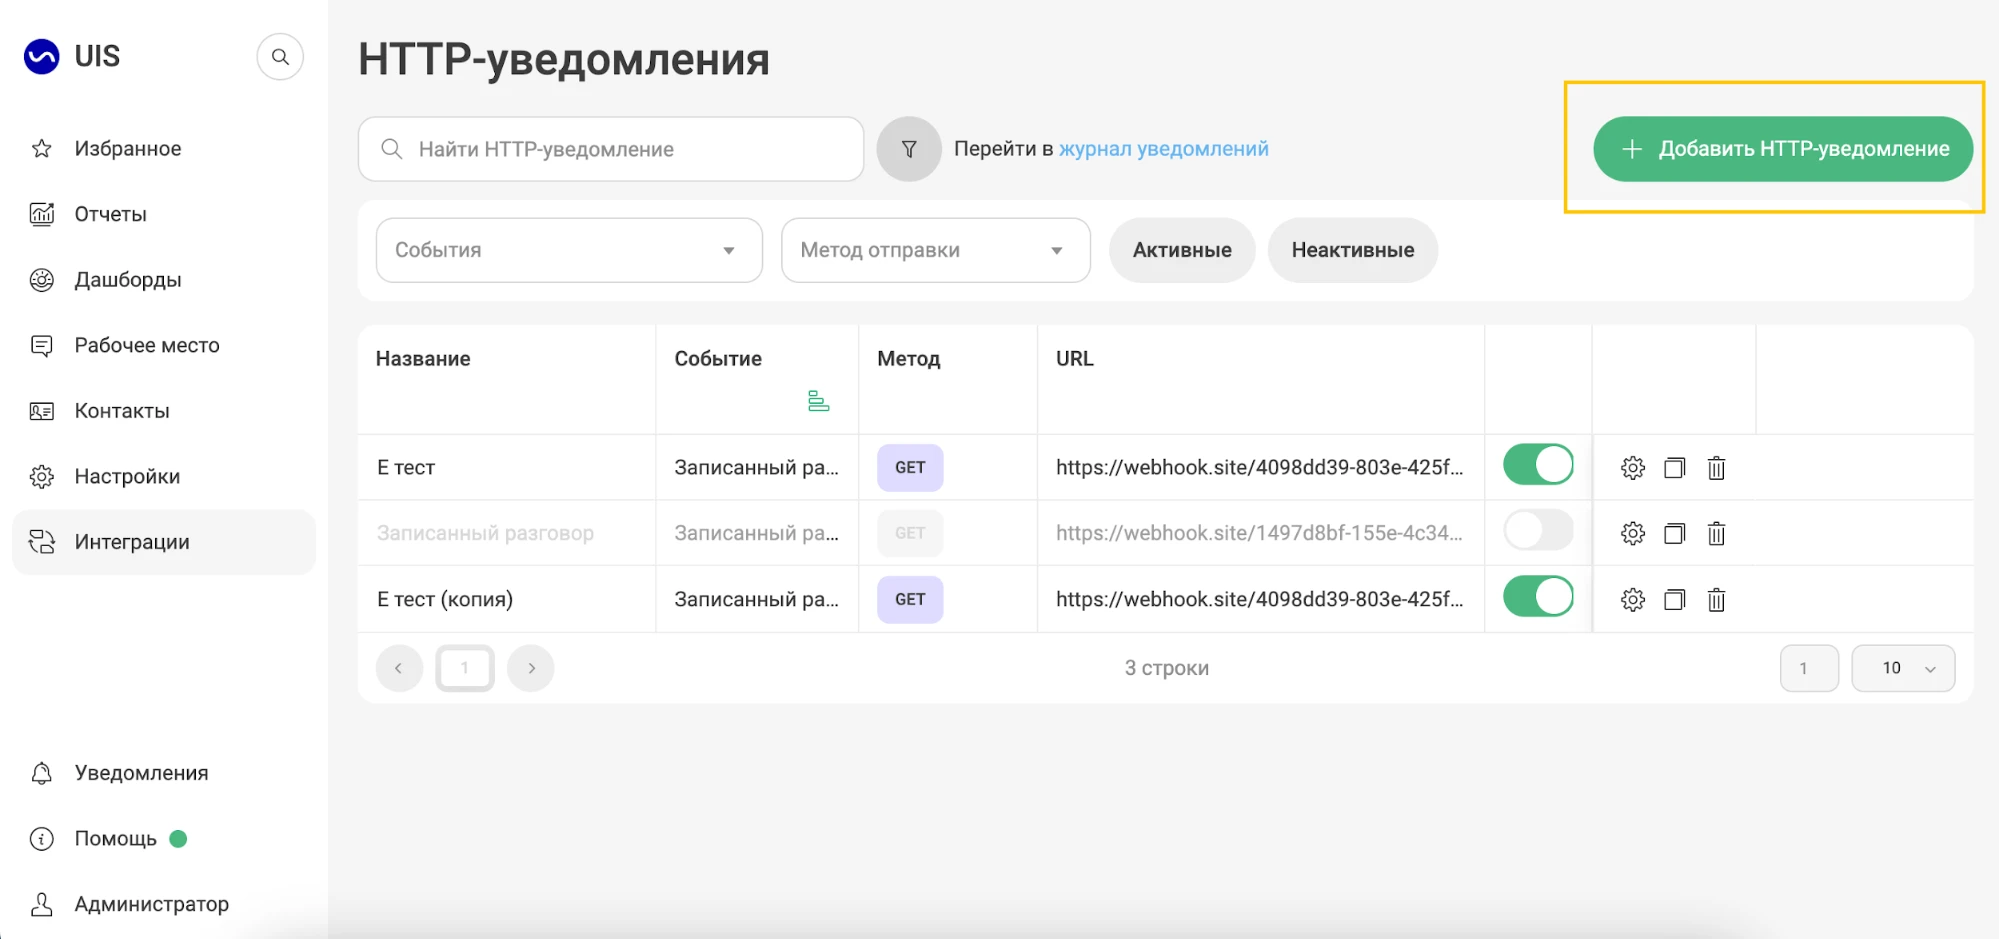
Filling out the HTTP Notification form
Create six types of notifications. Their names, terms, and texts are listed in the section «Создание HTTP-уведомлений»below.
The notification creation form consists of the following blocks:
- HTTP notification name" - enter the name from the instructions.
- Event Type" — select an event from the drop-down list. The events are grouped by services: «Звонки», «ОМНИ», «Аналитика рекламы».
- «Условия» — fill it out only if the conditions are specified in the instructions.
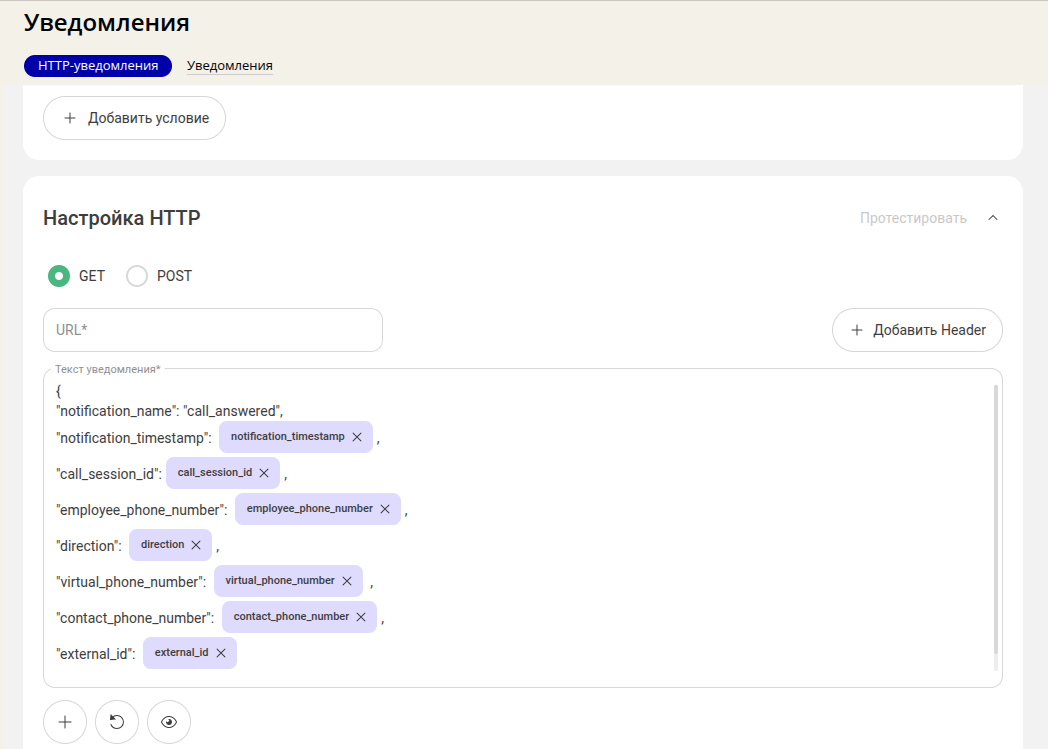
- «Настройка HTTP» — select the POST method, specify the URL copied when connecting the module in the MedLock, and paste the notification text.
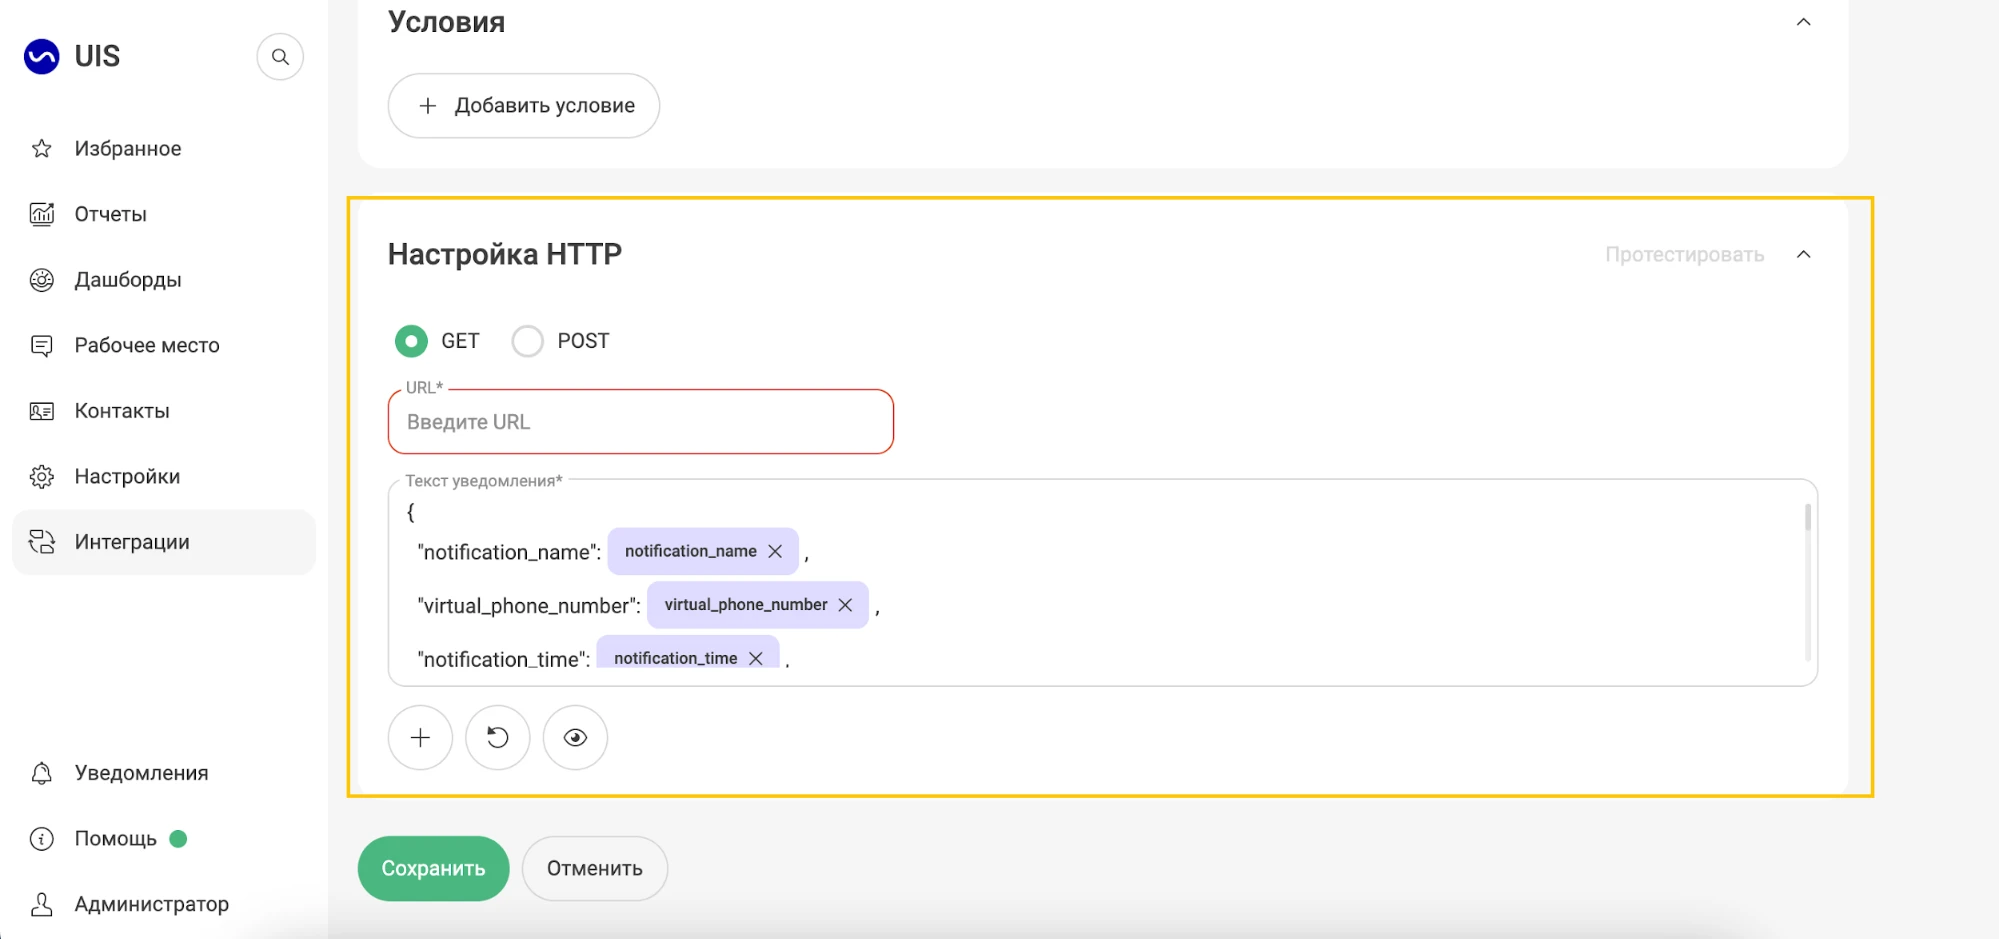
After filling out the form, click «Сохранить».
Setting up in the old personal account UIS
Enabling the tariff
Important! To use API telephony in MedLock, you must enable any tariff from the category«Виртуальная АТС».
You will also need an additional option to connect telephony in your personal UIS account«Базовые отраслевые решения». It is necessary for the integration to work correctly.
- Click on the username in the upper-right corner and select «Аккаунт».
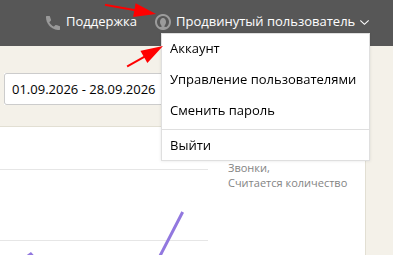
2. On the page that opens, click «Тарифы и опции»and activate the option«Базовые отраслевые решения».
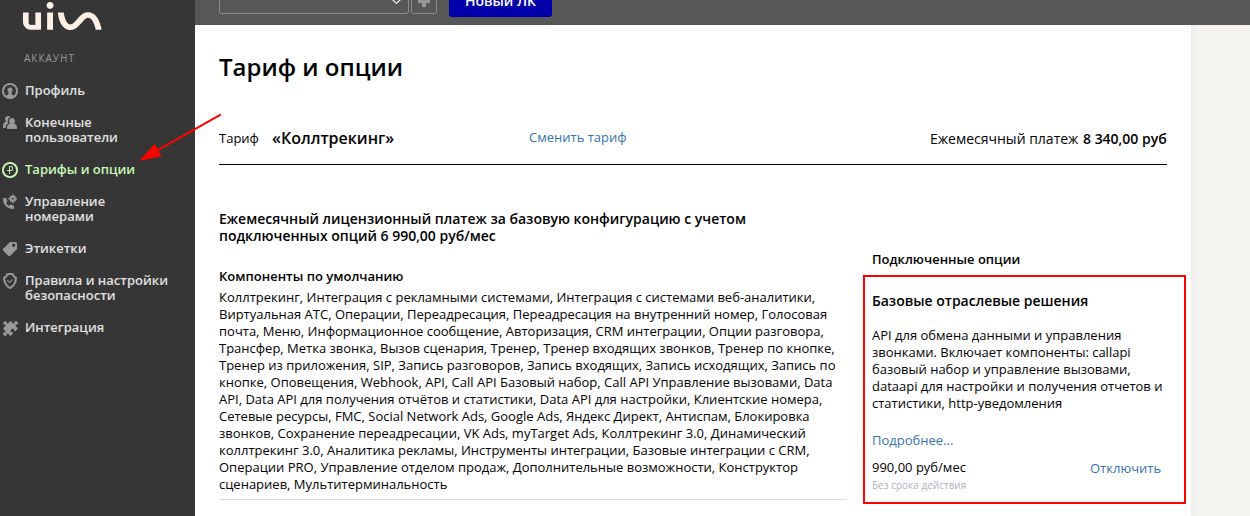
Configuring the user and their rights
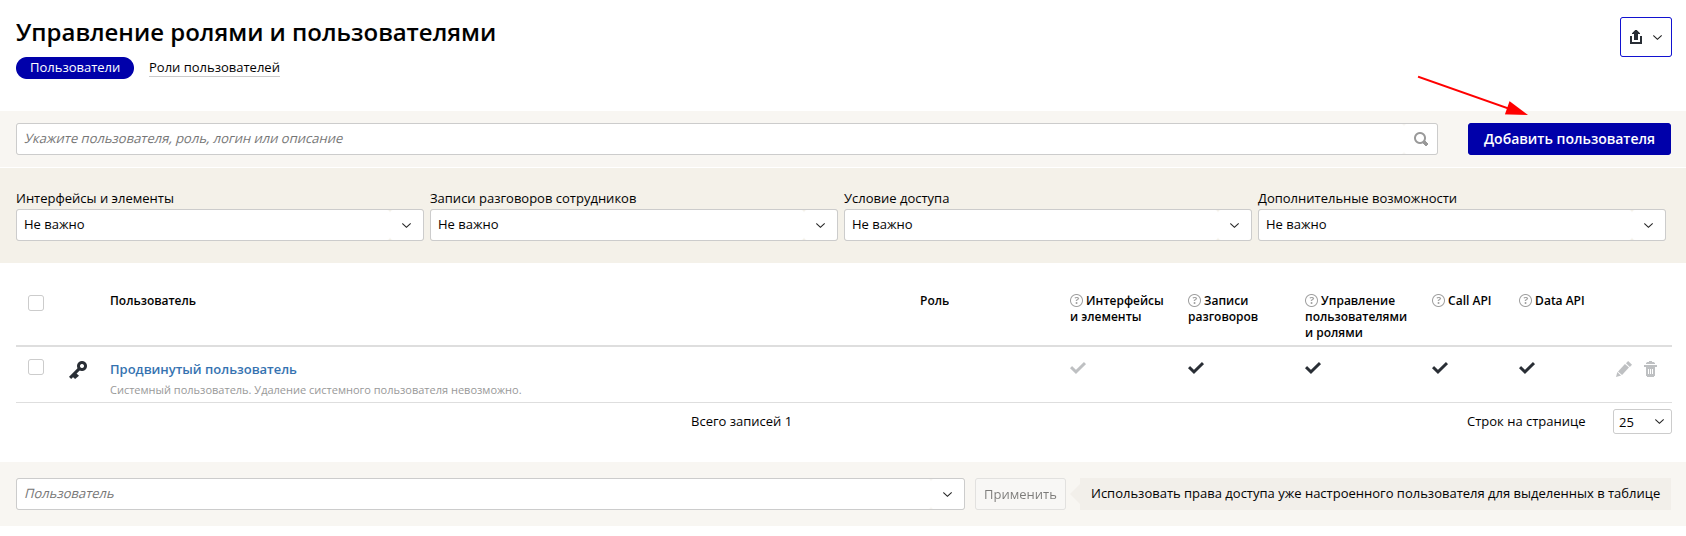
- Click on the username in the upper-right corner and select «Управление пользователями».
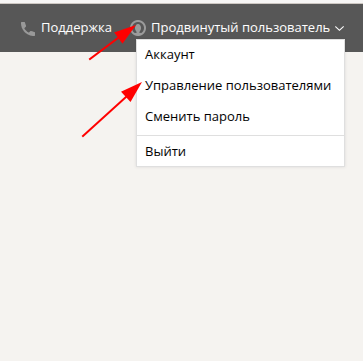
2. Click «Добавить пользователя».
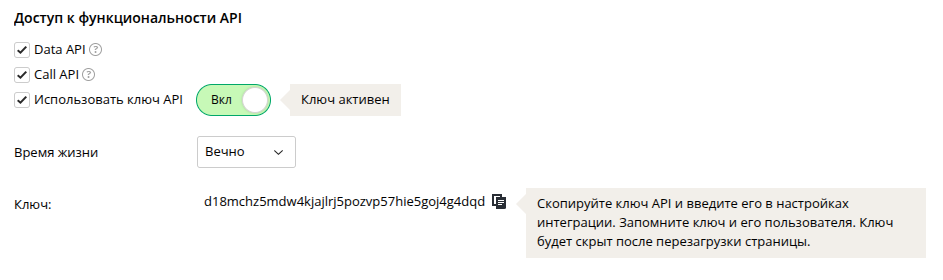
3. Grant the user access rights to the Data API and Call API.
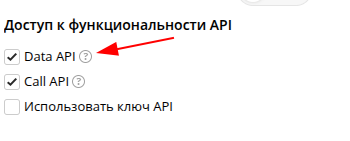
3. Enable the API key.
4. Generate and save the API key. You will need it when connecting the module in the MedLock.
Setting up Security
The security settings are available to the user with the role«Администратор».
- Click on the username in the upper-right corner and select «Аккаунт».
2. Open the page «Правила и настройки безопасности»and go to the tab«API».
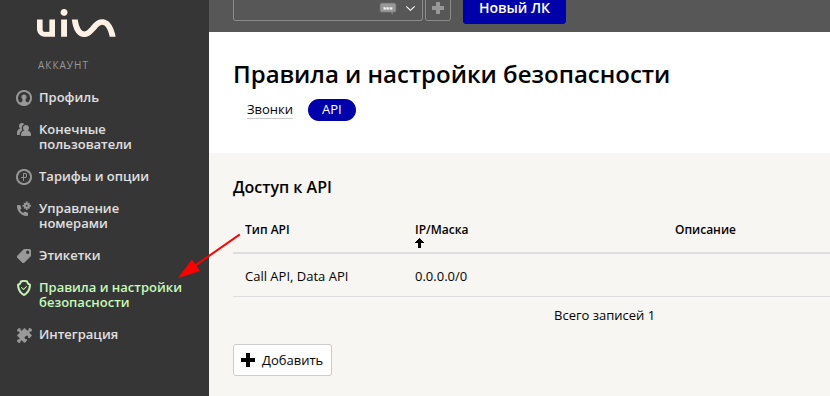
3. Click «+ Добавить»and add IP address 0.0.0.0/0 to the allowed list.
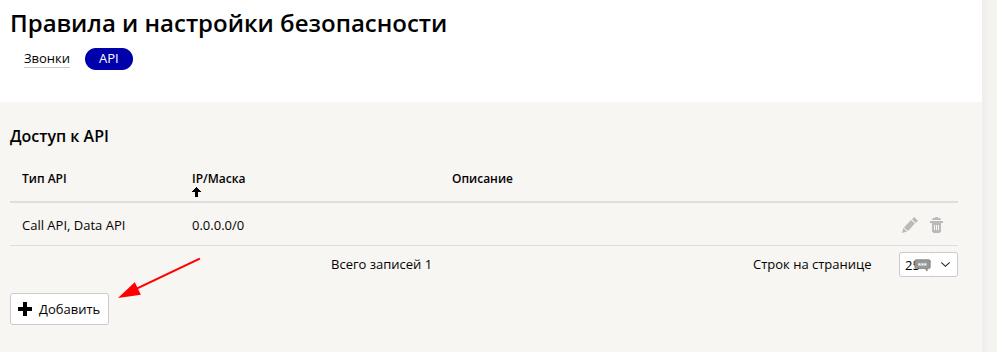
4. Save the changes by clicking on the floppy disk icon on the right.
Important! The changes will take effect within one hour.
Important! If the IP address of the MedLock is not added to the list of allowed UIS in the personal account«Телефония», an error will be displayed when connecting the module.
Connecting the module «Телефония»in the MedLock
Connect and configure the module «Телефония»in the MedLock.
For more information, see the How to Connect the Module article«Телефония».
Configuring HTTP notifications in the UIS
After connecting the module in the MedLock, you need to set up notifications in the personal account of the UIS so that calls are displayed in the system.
- Go to the personal account of the UIS.
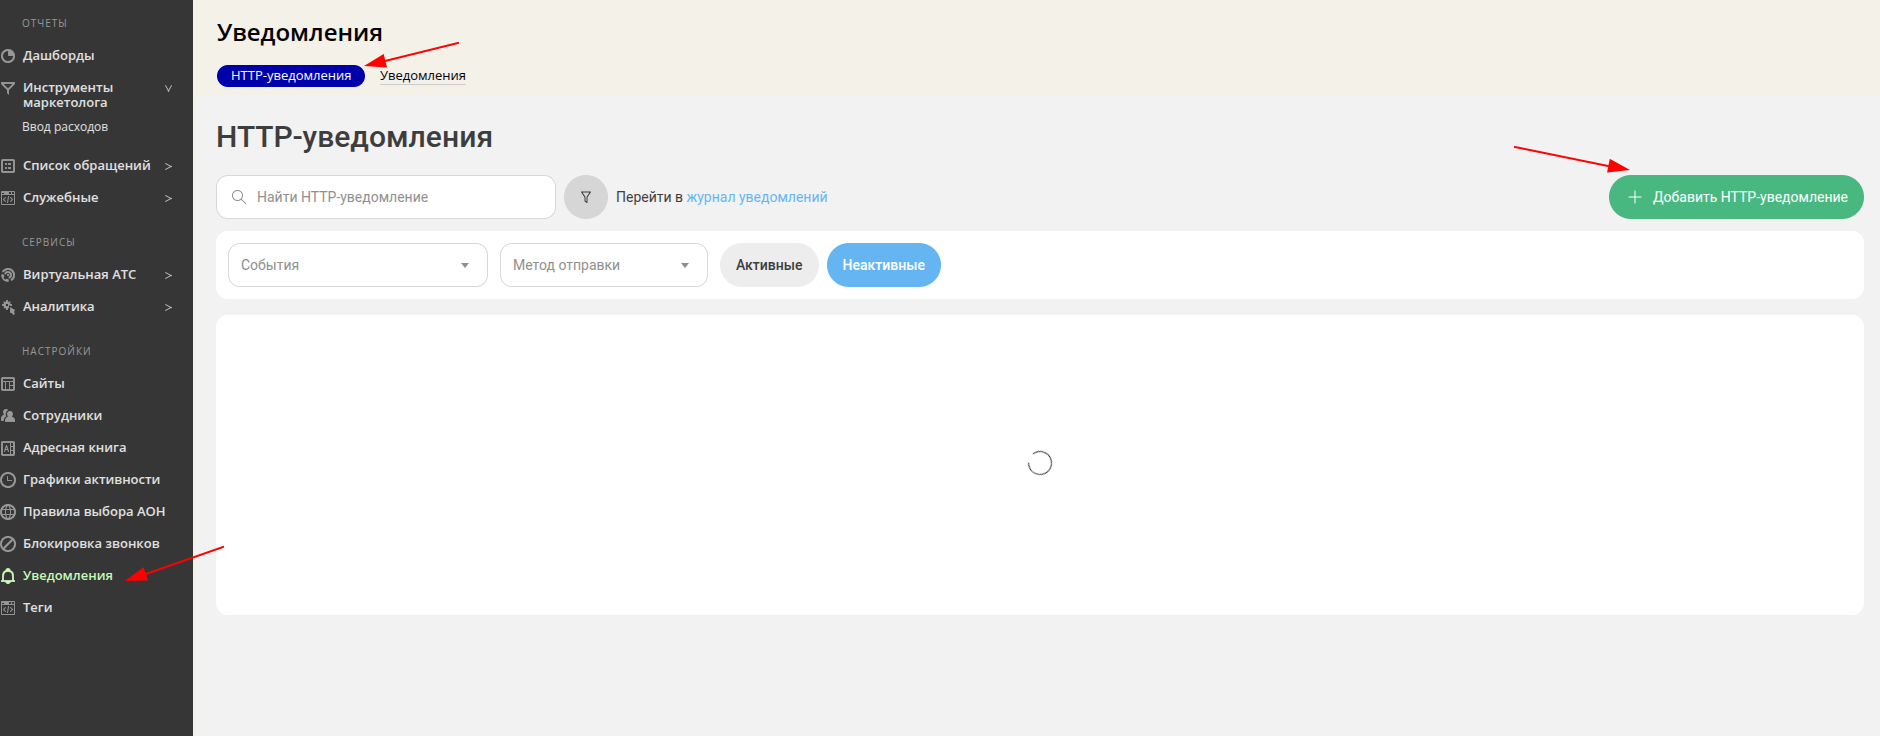
- Open the section«Уведомления».
- Select a subsection «HTTP-уведомления».
- Click«+ Добавить HTTP-уведомление».
Important! You need to create and configure SIP lines in your personal UIS account. For more information, see the SIP numbers article.
Filling out the HTTP Notification form
Create six types of notifications. Their names, terms, and texts are listed in the section «Создание HTTP-уведомлений»below.
After filling out the form, click «Сохранить».
Creating HTTP Notifications
Notification No. 1. The beginning of a conversation
- The name is «Начало разговора».
- The event type is «Начало разговора».
- Setting up an HTTP POST.
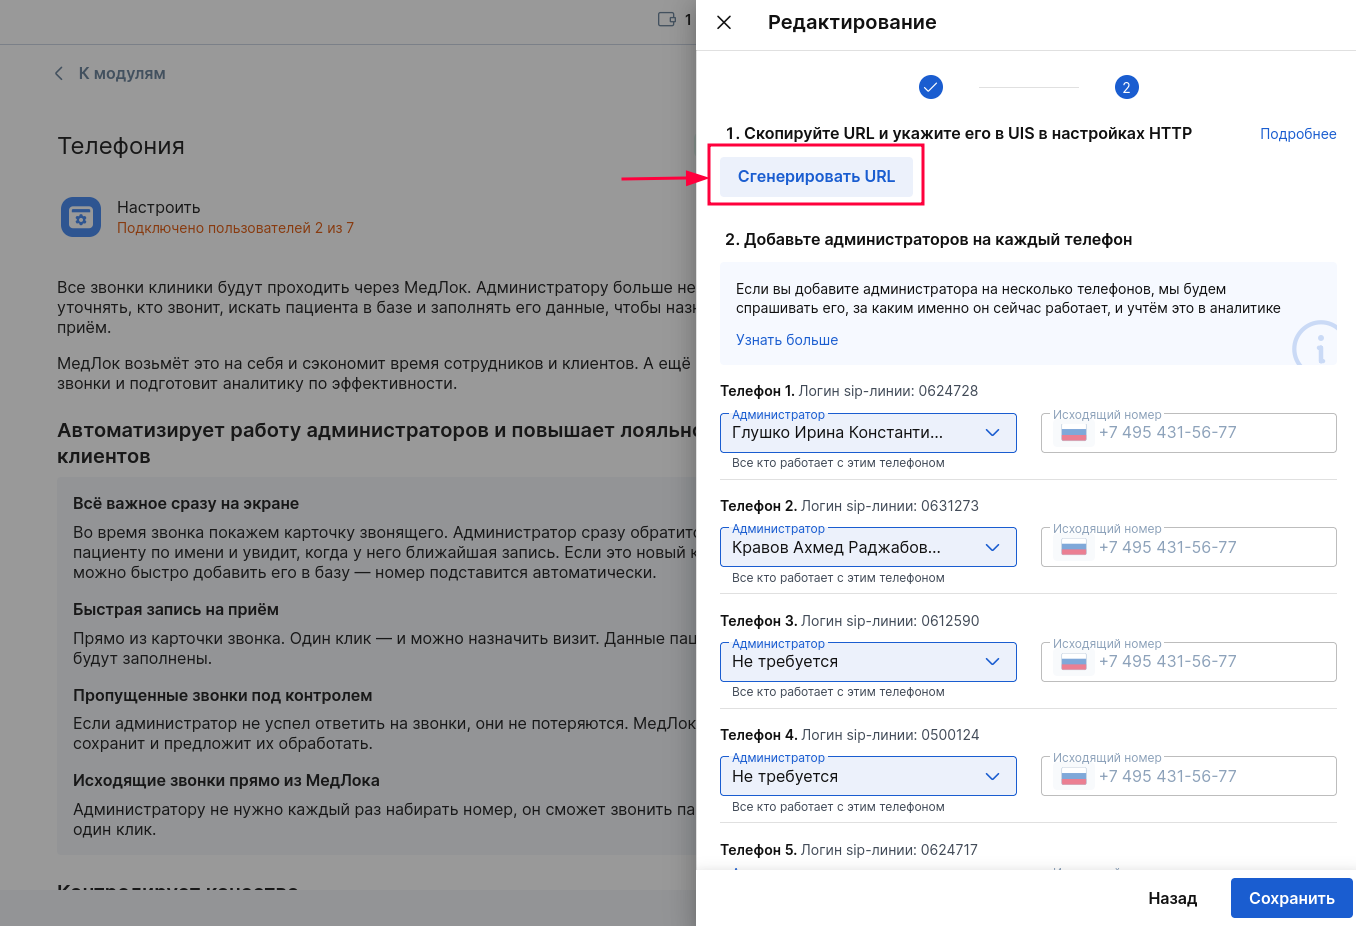
- URL — paste the URL that you copied when connecting the module in the MedLock.
Notification text:
{"notification_name": "call_answered","notification_timestamp": {{notification_timestamp}},"call_session_id":{{call_session_id}},"employee_phone_number": {{employee_phone_number}},"direction": {{direction}},"virtual_phone_number": {{virtual_phone_number}} ,"contact_phone_number": {{contact_phone_number}},"external_id": {{external_id}}}Notification No. 2. Call Termination
- The name is «Завершение звонка».
- The event type is «Завершение звонка».
- Setting up an HTTP POST.
- URL — paste the URL that you copied when connecting the module in the MedLock.
Notification text:
{"notification_name": "call_finished","lost_reason": {{lost_reason}},"finish_reason": {{finish_reason}},"is_lost": {{is_lost}},"call_status": {{call_status}},"call_session_id": {{call_session_id}},"notification_timestamp": {{notification_timestamp}},"employee_phone_number": {{employee_phone_number}},"direction": {{direction}},"virtual_phone_number": {{virtual_phone_number}},"contact_phone_number": {{contact_phone_number}},"external_id": {{external_id}}}Notification No. 3. End of conversation
- The name is «Окончание разговора».
- The event type is «Окончание разговора».
- Setting up an HTTP POST.
- URL — paste the URL that you copied when connecting the module in the MedLock.
Notification text:
{"notification_name": "conversation_ended","call_session_id": {{call_session_id}},"notification_timestamp": {{notification_timestamp}},"employee_phone_number": {{employee_phone_number}},"direction": {{direction}},"virtual_phone_number": {{virtual_phone_number}},"contact_phone_number": {{contact_phone_number}},"external_id": {{external_id}}}Notification No. 4. Termination of leverage
- The name is «Завершение плеча».
- The event type is «Завершение плеча».
- Setting up an HTTP POST.
- URL — paste the URL that you copied when connecting the module in the MedLock.
Conditions:
- Turn on the conditions.
- In the field«Параметр», select «Направление плеча».
- Specify the condition «Точно соответствует».
- Choose«Исходящее».

Notification text:
{"notification_name": "leg_ended","call_session_id": {{call_session_id}},"notification_timestamp":{{notification_timestamp}},"external_id": {{external_id}},"employee_phone_number": {{employee_phone_number}},"leg_id": {{leg_id}},"direction": {{direction}},"virtual_phone_number": {{virtual_phone_number}},"contact_phone_number": {{contact_phone_number}}}Notification No. 5. Outgoing shoulder
- The name is «Исходящее плечо».
- The event type is «Исходящее плечо».
- Setting up an HTTP POST.
- URL — paste the URL that you copied when connecting the module in the MedLock.
Notification text:
{"notification_name": "outbound_leg","call_session_id": {{call_session_id}},"notification_timestamp":{{notification_timestamp}},"external_id": {{external_id}},"employee_phone_number": {{employee_phone_number}},"leg_id": {{leg_id}},"direction": {{direction}},"virtual_phone_number": {{virtual_phone_number}},"contact_phone_number": {{contact_phone_number}}}Notification No. 6. Incoming Leverage
- The name is «Входящее плечо».
- The event type is «Входящее плечо».
- Setting up an HTTP POST.
- URL — paste the URL that you copied when connecting the module in the MedLock.
Notification text:
{"notification_name": "inbound_leg","call_session_id": {{call_session_id}},"notification_timestamp":{{notification_timestamp}},"external_id": {{external_id}},"employee_phone_number": {{employee_phone_number}},"leg_id": {{leg_id}},"direction": {{direction}},"virtual_phone_number": {{virtual_phone_number}},"contact_phone_number": {{contact_phone_number}}}Setting up softphones
If the telephony is being connected for the first time
In the softphone settings, specify the username, password, and URL of the UIS operator.
If the telephony was previously connected via Asterisk
In the softphone settings, replace the username, password, and URL with the data specified in the personal account of the UIS.
For more information about setting up a softphone, see the article How to set up a SIP phone/softphone for the module«Телефония».
Checking the settings
Important! The notification URL cannot be viewed again after copying. If you haven't saved it, generate a new URL in the module settings «Телефония»in the MedLock and update it in all six HTTP notifications in the UIS. For more information, see the article How to connect the Telephony module.
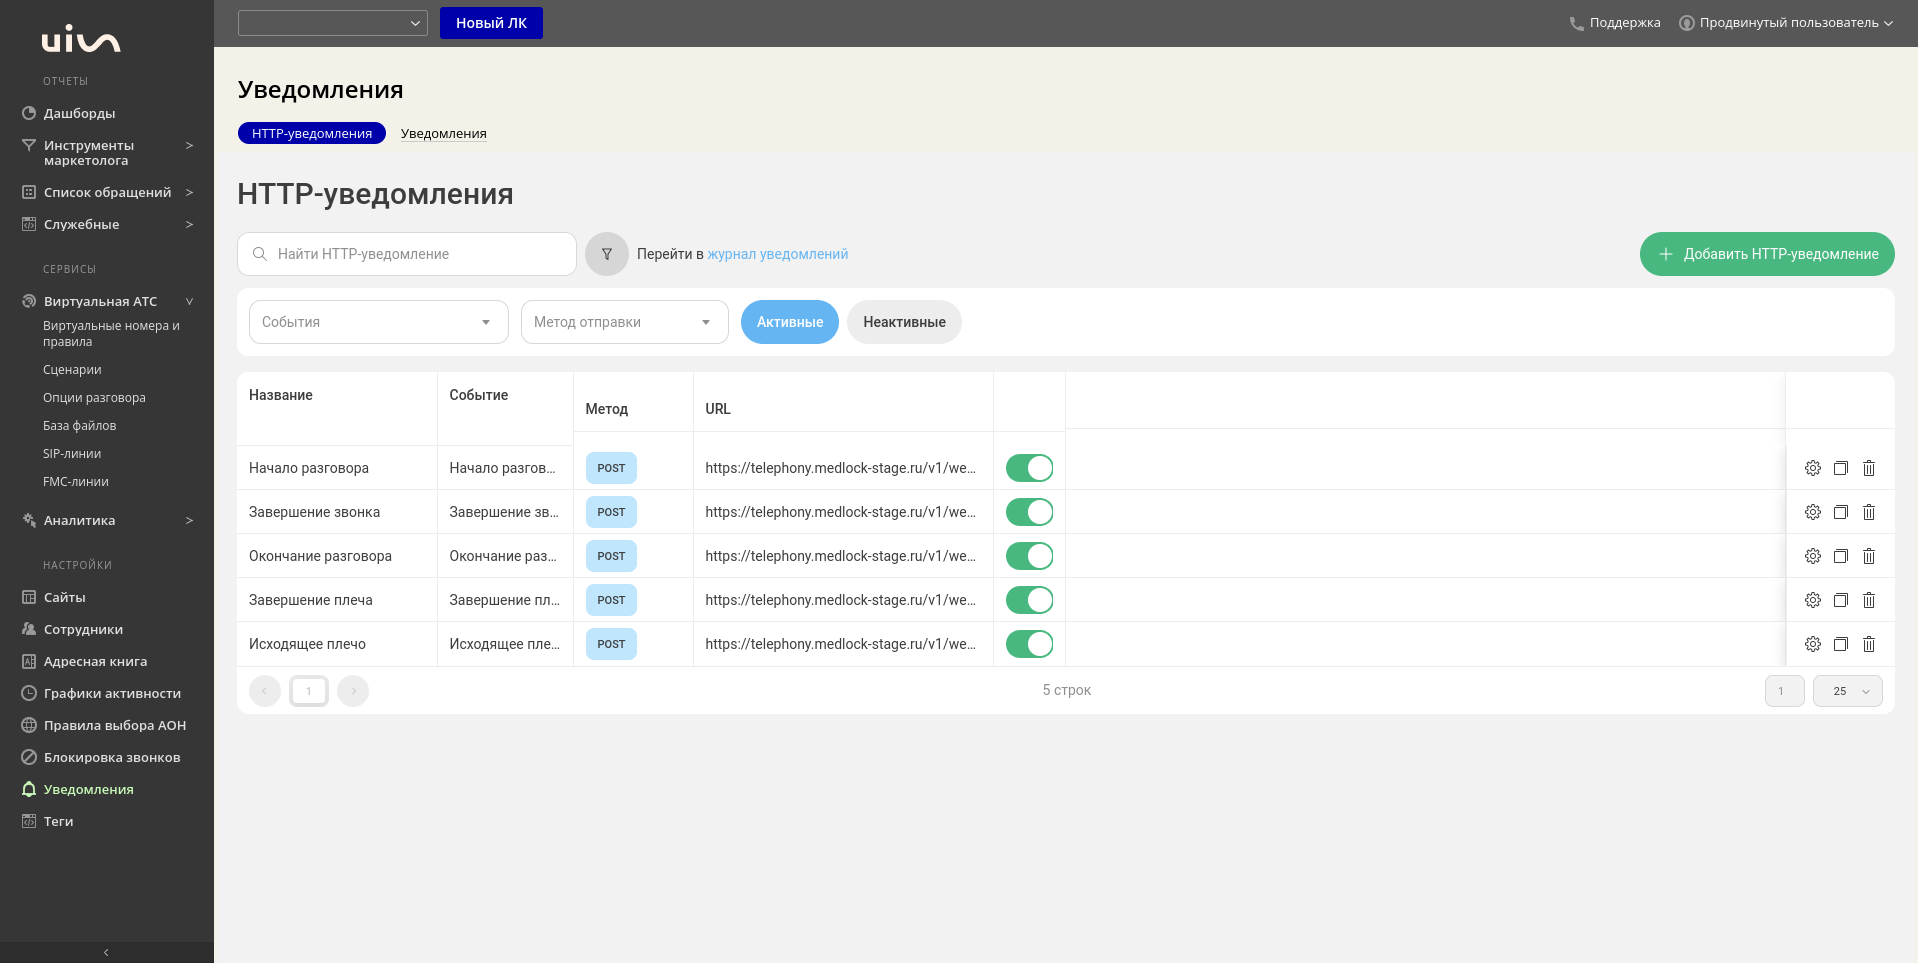
After setting up notifications, we recommend making a test call.
A call card should be displayed in the MedLock with the option to accept or reject the call.
The completed actions with the call will be displayed in the call history in the MedLock.